

0. Introduction
When building “cloud ready” horizontally scalable applications, you’ll typically either have to:
- Stay away from SQL and Relational Databases
- Use some specific products often promoting vendor or even cloud lock-ins
The Open Source YugabyteDB offers a new option, and is game changer.
Wikipedia: YugabyteDB is a high-performance transactional distributed SQL database for cloud-native applications, developed by Yugabyte.
You might think about a Galera for PostgreSQL, but it’s very different:
- Galera cluster is a layer on top of MySQL and MariaDB providing semi-synchronous replication. Galera is easy to manage and provided in Ubuntu Servers. Galera is a great solution for availability but doesn’t scale well horizontally for writes. MySQL is limited compared to PostgreSQL. If you’re looking for MySQL compatible DB, check TiDB.
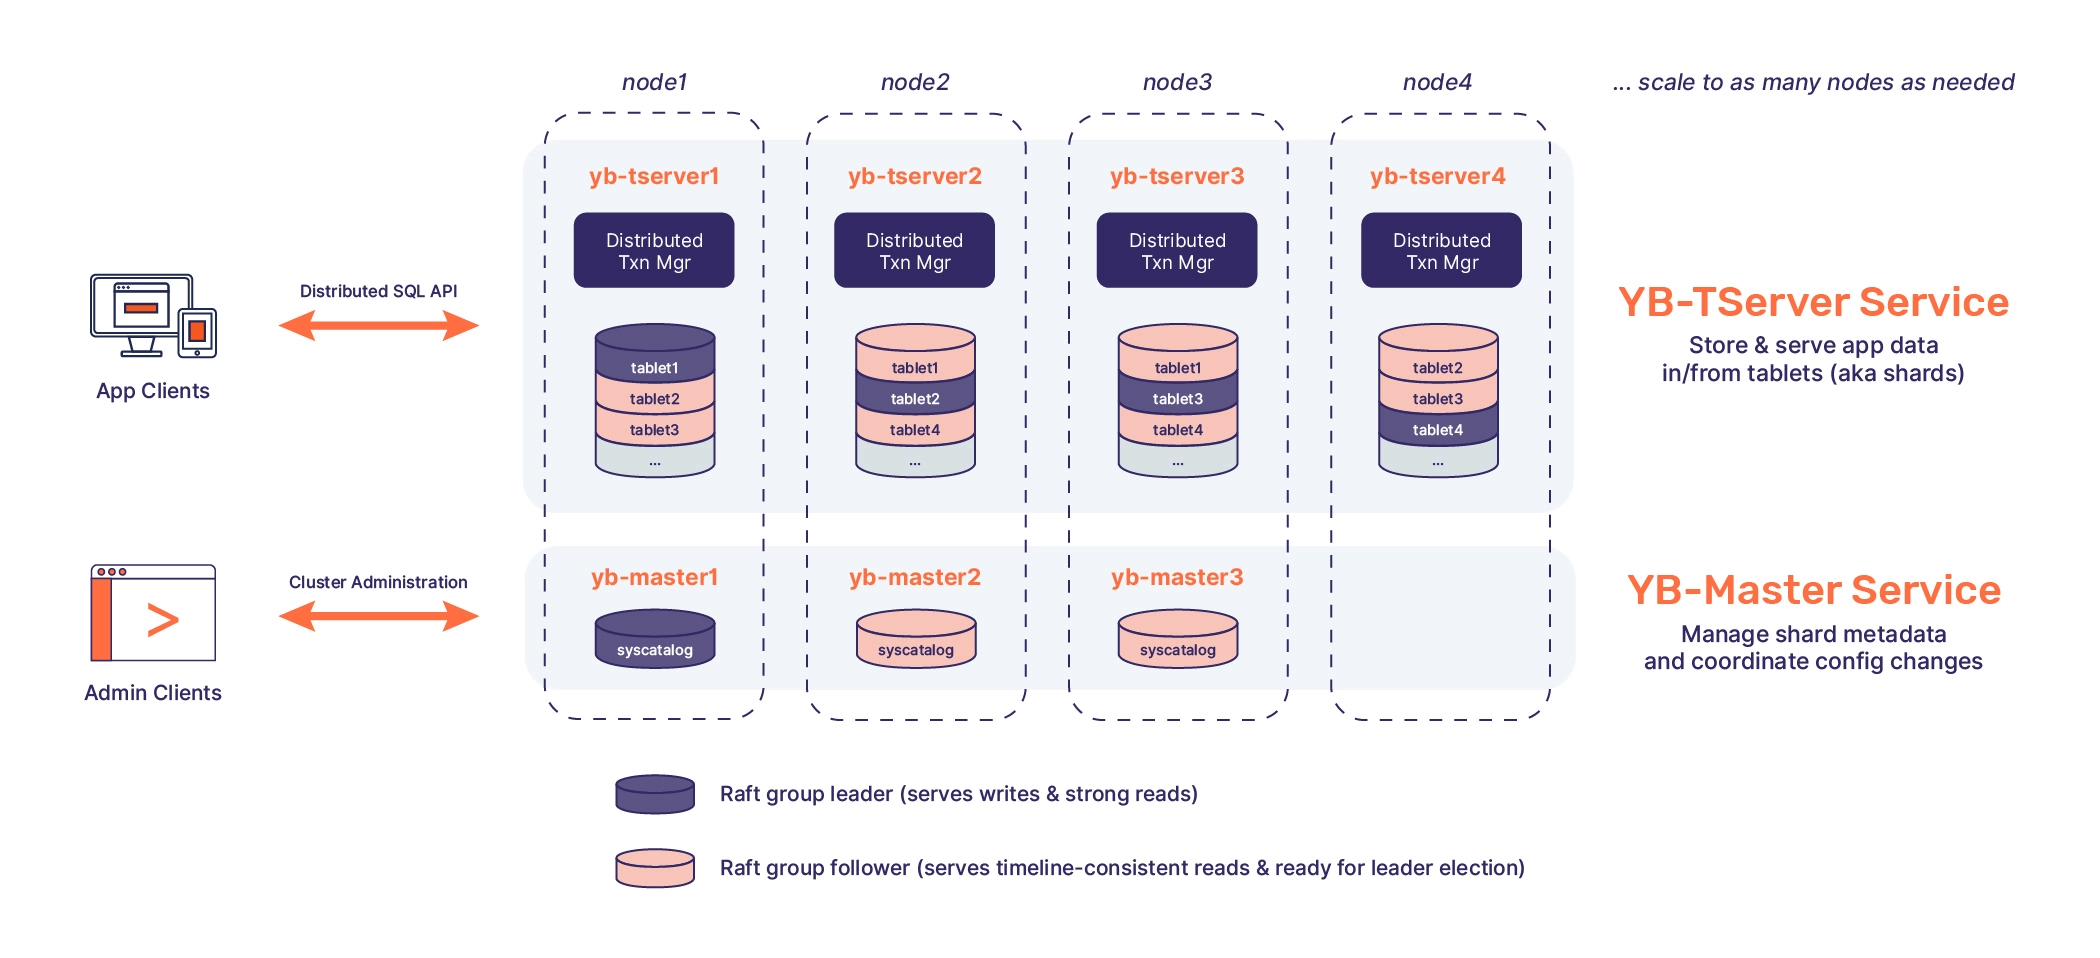
- YugabyteDB uses a different storage layer (DocDB) below a PostgreSQL and a Cassandra Query Language (CQL) compatible «Query Layer».
- YugabyteDB uses the concept of «tablets» that are shards of a table based on partitioning.
- YugabyteDB is provided “as a service”, or on premises with many installation options, including local servers and Kubernetes.
There is no Debian packages (yet) for YugabyteDB, so I created a couple of scripts and systemd startup scripts while following the installation instructions.
You’ll see, it’s super easy.
We will eventually run the Yugabyte proposed benchmark to test the performances of the cluster.
Also check the video (Switch it to full screen)
1. Prerequisites
- A Linux workstation with Docker. I’ll use the
pivert/ansible-neovim-pyrightpivert/seashell Docker container that I maintain. (Project has been renamed in 12/2022) - You need 3 sequential free IP addresses for your servers, starting with xx1. Feel free to adapt to your IPs.
- Your ssh public key and ssh-agent.
2. Preparation
Tips
- Database likes SSDs with native performance, so use local SSD if possible.
- RAM: Runs fine with 2 GB of RAM for testing. Benchmarks require 8 GB RAM or more per server.
Environment
Sizing your VMs :
- 2 GB RAM are enough for testing installation
- 8 GB RAM are a strict minimum for running the benchmark without having OOM killed processes. I choose this option since I want to also run the benchmarks.
- Prefer local SSDs
I’ll use Proxmox VE since it provides native performances with LXC containers and local block devices. I want to test the performances on a <2k€ home lab in true HA with 3 physical servers.
The Ubuntu 22.04 image is on ext4 while XFS is recommended by Yugabyte, so feel free to add a block volume for the data. (I didn’t do it)
Prepare your workstation that will be used to deploy & manage the cluster
sudo apt install docker.io wget
mkdir $HOME/yugabytedb
cd $HOME/yugabytedb
ssh-add
wget https://gitlab.com/pivert/seashell/-/raw/main/seashell && chmod u+x seashell
./seashell
nvimdocker shell script will download and start a «workstation» container containing ansible, neovim, and many other tools. It will also try to reuse your ssh-agent if you started it before. The image will take 2GB once decompressed in your /var/lib/docker/overlay2. It will mount the current working directory into /workdir, and drop you in Bash. Its recommended to configure terminal with “solarized-dark” colors. You should have something like: (nvimdocker and ansible-neovim-pyright have been renamed to seashell on 12/2022)
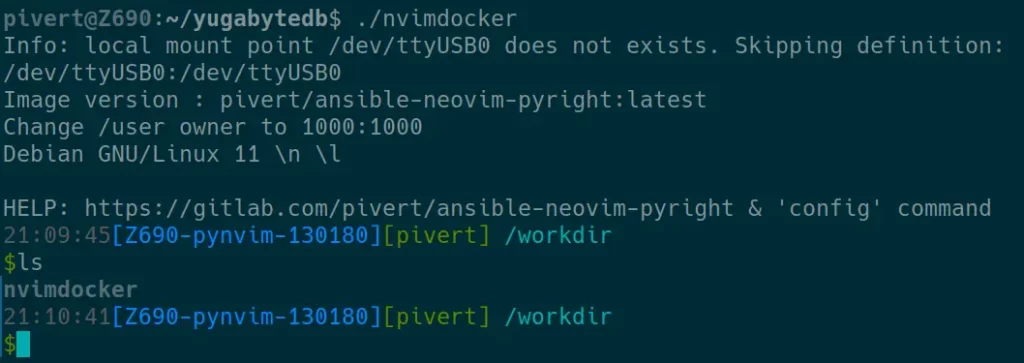
As you can see, the nvimdocker script lists in the /workdir folder, it means that the current working directory has been mounted into /workdir, and that the files under /workdir will persist if you leave the container.
It’s not mandatory to use the nvimdocker, but it facilitates things since it already has all the shell tools installed. Feel free to run directly on your workstation if you have python, ansible, curl, and related dependencies installed.
Clone the git repository
git clone https://gitlab.com/pivert/yugabyte-lab.git
cd yugabyte-lab/
3. Adapt the hosts file to your environment
[yugabytedb]
yugabyte1 ansible_ssh_host=192.168.10.81 placement_zone=pve1
yugabyte2 ansible_ssh_host=192.168.10.82 placement_zone=pve2
yugabyte3 ansible_ssh_host=192.168.10.83 placement_zone=pve3

[yugabytedb:vars]
ansible_user=root
yugabytedb_folder=/opt/yugabytedb
yugabytedata_folder=/opt/ybdata
yugabytedb_url="https://downloads.yugabyte.com/releases/2.14.3.1/yugabyte-2.14.3.1-b1-linux-x86_64.tar.gz"
placement_cloud=pve
placement_region=be
4. Install the Servers
If you use Proxmox VE, you can edit and adapt the ./generate_pvesh_commands.py to your needs and IPs. You’ll get the servers online in a minute.
If you use other solution, just create the Ubuntu 22.04 servers according to your IP address plan that you did set in the Ansible hosts file (above).
From now on, you should have
- 3 Ubuntu 22.04 Servers with public key SSH authentication
- ssh-agent running if you password protected your private key
- DNS or /etc/hosts entries to ensure you can log in without password to any of the 3 servers with a command similar to:
ssh root@yugabyte1
P.S. The Ansible hosts file and the OS /etc/hosts mentioned above are different files for different purposes. Use /etc/hosts only if you cannot configure DNS.
5. Deploy the cluster
ansible-playbook -i hosts yugabyte-lab.yml6. Set the replica placement policy
From one of the hosts, set the replica placement policy (adapt with your IPs). You can get the line master addresses line from:
grep master_addresses /etc/systemd/system/yb-master.service./bin/yb-admin --master_addresses 192.168.10.81:7100,192.168.10.82:7100,192.168.10.83:7100 modify_placement_info pve.be.pve1,pve.be.pve2,pve.be.pve3 37. Checks
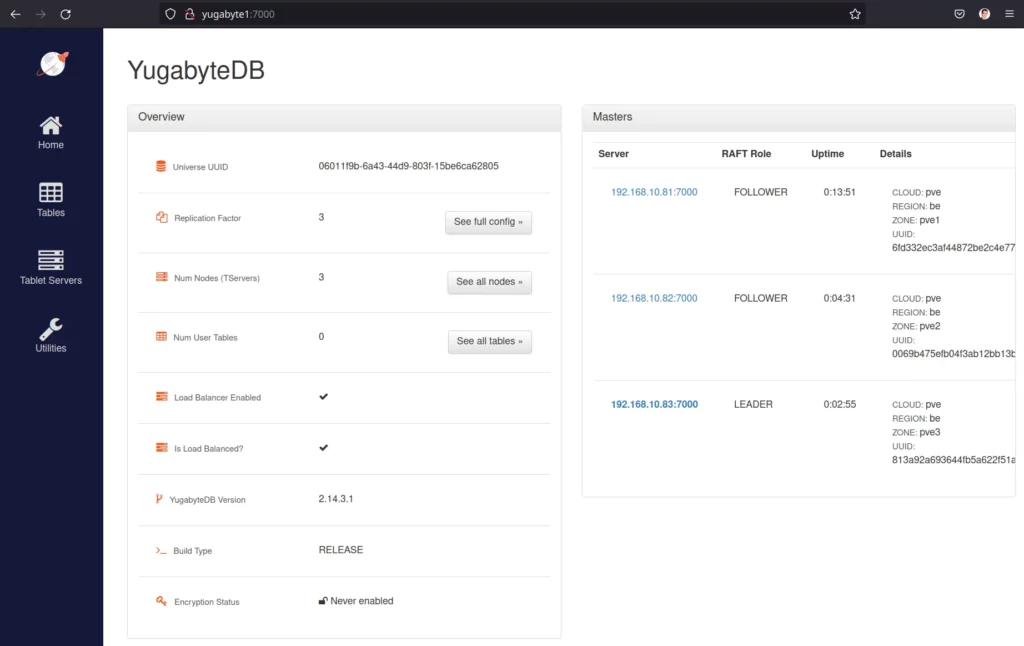
If everything went fine, you can connect to the web UI on any of the 3 nodes:
http://<any-master-ip>:7000/cluster-configAnd get
8. Troubleshooting
In case things did not go as expected, check the output of the Ansible playbook.
Also check the 2 services on each server. Example of commands:
systemctl status yb-master.service
systemctl status yb-tserver.service
journalctl -u yb-master.service
journalctl -u yb-tserver.service
You can also use the destroyyugabyte-lab.yml playbook to delete YugabyteDB and Data from the 3 servers
9. Benchmarks
You can run the benchmarks from the nvimdocker, or from any other workstation.
If you’re using nvimdocker, sudo won’t work. But you can use su - to get a shell as root and be able to install dependencies.
Keep in mind that if you leave nvimdocker, the packages will have to be re-installed. The nvimdocker is not persistent.
sudo apt install python2
sudo apt install default-jre
Install the benchmark tool, and edit the db.properties to replace with your IP settings.
Do not forget to exit to standard user if you su - before.
cd $HOME
curl -sSL https://downloads.yugabyte.com/get_clients.sh | bash
export PATH=$PATH:$HOME/yugabyte-client-2.6/bin/
wget https://github.com/yugabyte/YCSB/releases/download/1.0/ycsb.tar.gz
tar -xzf ycsb.tar.gz
cd YCSB
vim db.properties
Here are the lines to adapt in the db.properties
db.driver=org.postgresql.Driver
db.url=jdbc:postgresql://192.168.10.81:5433/ycsb;jdbc:postgresql://192.168.10.82:5433/ycsb;jdbc:postgresql://192.168.10.83:5433/ycsb;
db.user=yugabyte
db.passwd=
Then, you’re ready to run a workload test :
./run_ysql.sh --ip 192.168.10.81The IP is required as it’s the one that will be used to CREATE DATABASE/TABLES, …
Do you need a Load Balancer ?
It depends on the protocol or the client used by your application.
If you use PostgreSQL client, then yes you will need a load balancer since you can only provide a single IP address in the connection string.
Conclusion
YugabyteDB is definitely an option for cloud ready SQL apps, especially if you need fast writes.