

Vim is there for decades and widely used. It continues to progress with regularly updated versions and forks such as Neovim.
The problem: we can’t learn Vim by just using it. It requires a minimum training.
We won’t talk about Vi, the Vim ancestor which might be there for half century. But if you know Vim, you’ll also find some comfort with Vi. The biggest difference is that Vim has no visual selection, nor text object selection such as iw for “inner word”.
Vim is not that complicated but requires a bit of attention.
I want this guide to just get the regular Vim user get away of his “Notepad” thinking when using Vim. Newbies will also enjoy the guide as a reference. The only prerequisite is to understand the modes in Vi(m).
It’s easy to break habits when you replace them with another one.
This post is nothing about completeness, but just about getting you in comfort with the Vim editor as fast as possible, providing tips to remember each shortcut.
Vim is everywhere, and vim keybindings can be installed in web browsers or any good editor, including Microsoft VS Code with the excellent vim plugin.
You know how to start vim, and know the first modes : Insert, Normal and Command (with :). We will skip that and go straight to the point.
For each command, you can find a highlighted tip or word letter to better remember them. I will focus only to the most used ones, eventually going a bit deeper at the end.
Let’s start
- First, forget about the arrow key. Use
j k h lfor up/down/left/right to keep your hands on the keyboard. - It’s all about optimization, so when you realize that you moved or typed using poor key repetitions, force yourself go back to your previous position and restart the same move with efficient keys. It’s all about practice.
- When you find yourself nervously repeating keystrokes, something is wrong. Go back to your previous position, and think. The only way to break bad habits.
- Practice the actions as you read them with your vim. It’s only by trying them that you’ll understand and memorize them.
The basics
Here is a least of commands that are super easy to remember because they match with English words initials, that really the first ones everyone should know.
ufor undo. You’ll use it a lot. The friend is incommandmode to:redoor just:o- Use
:to enter command mode ::q!quit force (!):qquit (if the file wasn’t modified):e!re-edit current file, discarding all changes since last save (! force).:help redoget help on theredocommand, or any other command:closecloses the current window pane. Useful if you’re in help or any other pane, and want to get back to your file. And yes, in vim, windows are called panes, and «tabs» are called «windows», but this is for another post.:wwrites the file (save to disk):xshould be used in place of the same:wqto write the file and quit the vim editor<Esc>key is used to escape to the normal mode. Use it anytime after edit or to exit thecommandmode.
Most editing commands takes benefits from the moves, so it’s important to understand basic moves to get the power of them later.
Unless specified, they are all used in Normal mode, so after hitting <ESC> key if you’re in Insert mode.
Move horizontally – w e b W E B ^ 0 $
- w moves to the next word beginning
- e moves at the end of the current word
- b moves at the beginning of the current word
- The high caps alternatives W E B do the same with high power: it matches any non-blank character instead of just letters.
0and$moves to the first character (column zero), or to the end^also moves at the begining of the line, but unlike0it will stop before the first non blank character
Find horizontally – f F t T , ;
Those four commands search for a single character. I’ll take : as example, but try with any character in the line.
f:finds and move to the next:charactert:moves until the next:characterF:andT:the upper case versions search backwards- Bonus :
,and;are less used, but can repeat your last character search.,searches in the same direction, while;in the opposite. (try them after one of thef F t Tcommands)
Move vertically – H L M gg G
H L Mkeys are used to move within the current screen High (at the top), Low (at the bottom) and Middle.Gandgggo to the end of the file or the beginning.- Bonus: I’ll add the
zzshortcut here to scroll so the current line is displayed in the middle of the screen, it’s very handy when you look or show something.zzfriends areztandzbfor scroll top and scroll bottom.
Edit
That’s the purpose of a text editor, isn’t it ? Let’s check the very basic ways to enter insert mode first:
iprobably the first you learned to enter the insert mode, the friendIinserts before the first non-blank in the line.ois very handy to open a new line below.Ois the friend, it opens a new line before the current lineais likei, but append text after the cursor.Ato append at the end of the linerdstands for replace and delete. They are usually used with a move, but can be used alone :ddto delete the current linerxto replace the current character with x, or any other character instead of x. Very useful for single letter typos.
Visual selection, copy and paste
vto enter the visual selection mode, then move with the above commands to select.Vselects line by line instead of character by character.yto yank selected text while in visual mode. In vim, copy is called yank !yyyanks the current line (likedddeletes the current line)pto put (or paste) previously yanked text at the current position. (paste is called put in vim)Pis the friend to put before the current line or position
If you want to paste while ininsertmode you have two options :- Hit <Esc> to exit to
normalmode thenp(Boring in my opinion) <Ctrl>+r0to enter in paste mode and insert the content of the last yank (copy) register named0.
- Hit <Esc> to exit to
oto move cursor to the other end of the selection
yyp is very often used to duplicate the current line.
Similarly, ykp or yP are used to duplicate current visual selection (from visual mode).
Edit with power
ciw«change inner word» is extremely useful – try it when anywhere in the word. Unlike the shortercwwhich will change the word from the cursor position to the end of the word, theciwwill change the whole word. You must learn that one quickly since it’s so often used once we get the habit of it.cawdiwanddaware the same moves/selections to «delete inner word» or «delete a word».
I insist on those commands, since there are many useful variations that will come to your mind.
It’s just a combination of an action such as a «change», a «delete», a «yank» or a «visual» selection, and a move such as «word» or «a word».
For instance :
vawvisually selects a word. But you can repeat while in visual mode. Tryvawawaw. You should have 3 words selected.vapvisually selects a paragraphyi}yank whats inner curly brackets pair like } (Try toyi}while between to {}, oryi)while between parenthesis, oryitwhile between twohtmlorxmltags.
Multiply
Most of the commands above can be repeated by just prefixing with a number. For instance :
v3iwwill select 3 words, including the current with the inner.v3wwill also select 3 words, but since the inner is not specified, it will only select from the current cursor position. Can be annoying if you’re not at the begining of the word.- V4j visually selects 4 lines in the j direction (down)
bv3wis equivalent ofv3iwsince the b first moves to the first character of the word.25pwill paste the content of the current register 25 times. (usually containing the last yank or delete)
Registers
Vim has several registers, very useful to yank and put (copy/paste) and also many other things such as Macros. The registers are named by a single letter or character.
The most importants :
"is the unnamed register, used by default for any delete and copy.0is one of the 10 numbered registers, usefull it you want to paste the last yank (copy), even if you did some deletes after the yank (copy).- To use them, just prefix your command with
"and the register character before the yank or put :"aywill yank into the register a instead of the default unnamed (") register.""yis similar to justysince it explicitly yank into the unnamed register."xpwill paste the content of the x register"byiWwill yank inner Word (notice the capital letter to extend the copy to any non-blank character)
- Check
:help registersto know more about them, or just:registersto see their content
The power of dot
The . command will repeat last modification. Combined with the / search it’s very powerful :
Imagine you have to replace the ‘few three words’ at many places in the file, but not all.
- fist, you search for the 3 words :
/few three words - Press
nfor next match orNfor the previous - Once on the first word of a match you want to change, you can «change 3 a words» :
c3aw(then <Esc> to go back to normal mode) - Then continue by pressing
nto cycle through next matches, and.if you want to repeat the lastc3aw.
Progressively try to use edit commands that you can repeat with . – It’s powerful if combined with :
- Search
/<regex n N - Find
f F t T , ;
Move with marks
Sometimes you have to move quickly between two positions in the same file. Or just want to memorize a position to easily come back to it later.
mawill set the mark a at the current position- Move somewhere in the file
mbwill set the mark b at the current position'amoves cursor to mark a- `’b` moves cursor to mark b
:marksto display marks
Macros
When «the power of dot» is not enough, you can record macros using the above commands. It’s very easy, try it.
qmstarts a macro recording in registerm(don’t use a register you use for yank / put)qstops the recording@mto execute the macro stored in registerm,20@mwill repeat themmacro 20 times
Tips
- If you have several lines to run the macro on, try to start the macro with an absolute move such as
0, and stops the macro recording at the beginning of next line. - You can use any command above in macros, including searches (
/), yank, put, … It’s a kind of script. - When you don’t know how many times you want to replay the macro, just use a huge number :
999@m
Other useful commands
- Start vim and search at the same time :
vim ./Deployments.yaml +/^spec - Use
viewto just view a file, you can always for write with:w! - You can pipe any output in bash to vim. Example :
tail -n100 /var/log/syslog | vim -(or view), you can use the powerful vim navigations in the pipe output, possibly edit, then:w pipeoutputeditedfile.txt 33%moves the cursor to 33% of the file, or any provided percentage.50Gmoves the cursor to line 50, or any provided line number. Best used with:set nuto display line numbers.- With the
!you can send the file or a visual selection to an external command. For instance::%!grep etcwill pipe the whole file (%) throughgrep etcand will replace the content with grep output.
You can apply any external command to a Visual selection like:!sort -nwill numerically (-n) sort the current Visual selection (V)
Regular expressions
Regex are at the heart of Vim. The default mode (magic) requires to escape most regex characters.
It’s a good default since a search like /myfunc(.*a_param.*).*| will effectively match () as parenthesis and | as a pipe.
Prefix your regex with \v to enable the «very magic» option when want more power from regexes with fewer escapes (\).
For instance, the search /^\(\s\+\d\+\|\u\{3,}\) will search for lines starting with either:
- spaces followed by digits
- 3 or more lowercase letters without any leading space
The regex is almost unreadable. But with the «very magic» \v option, it becomes /\v(\s+\d+|\u{3,}) which is definitely more user-friendly.
Since vim might be used to work with files containing a lot of /, you can use an alternate regex separator such as ! or #.
Check :help regex for details
Substitutions
- substitute on the whole file
:%s/<regex>/<replacement>/(% means the whole file) - substitute on a visual selection
:s/<regex>/<replacement>/on the lines selected visually (withVmode).
Advanced substitution example with a back reference in very magic mode, a \L lower case modifier, !as alternate regex separator and 2 regex modifiers (gi for general and insensitive)
:%s!\v/etc/(bind9?)/!/etc/named_\L\1/!gi will change any occurrence (general) of bind or bind9 (case insensitive) by prefixing the first (\1) parenthesis match with named_, and turn the case to low for the whole word (\L)
Original file content
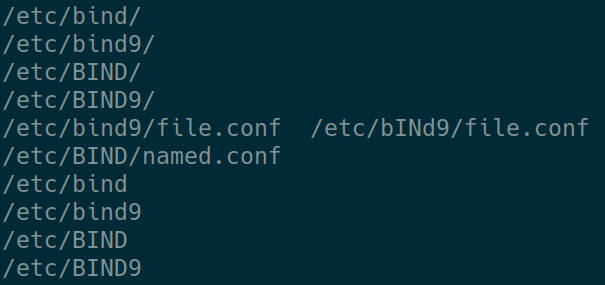
After substitution

Control key
You learned about <ctrl>r in insert mode already, but vim has several commands with <ctrl> key.
The most important :
<ctrl>fand<ctrl>bto scroll forward and backward. (do not use<pageup><pagedown>anymore)<ctrl>ato add 1 to the number at the cursor position. (15<ctrl>awill add 15 to the current number) –<ctrl>xis the friend to decrement.<ctrl>gdisplays general info such as file name and current location in file.<ctrl>omoves the cursor out (back) in the last positions history.<ctrl>iis the friend to move in the position’s history. – Nice if you forgot to mark your previous position.<ctrl>wis for all «window pane» commands. Useful if you have several panes, such as help, other files in the same window, or a vimdiff with 2 panes :<ctrl>wfollowed byj k h lmoves the cursor into the pane pointed by thej k h ldirection<ctrl>wocloses other panes to keep only the active one<ctrl>wvsplits vertically the current pane in 2,<ctrl>wsis the friend for the default horizontal split
Conclusion
With the above about 50 commands, you should already be very efficient with Vim editing.
While :help might not be the first place to learn Vim, you should now use it frequently. You can check any command with it. Try for instance :help !
In order to train on the above, any Vim will work. If you want to go to the next level, you can use my pivert/seashell docker image to get a preconfigured Vim with many plugins, intelligent autocomplete, regex previews, code help and linters… The first plugin to check in my opinion is the «surround» vim plugin. The «surround» plugin is also immediately available in the vim key bindings for VS Code.