
With the high bandwidth and CPU available nowadays, it’s common to see webmasters that forgot to compress their images for web use.
Image size is the first and easiest optimization that can be done on any website.
The consequences of poor image optimization:
- Slow or unusable websites on low bandwidth connections, especially on mobile or poor mobile signal.
- Major increase is data consumption and possibly costs for mobile users
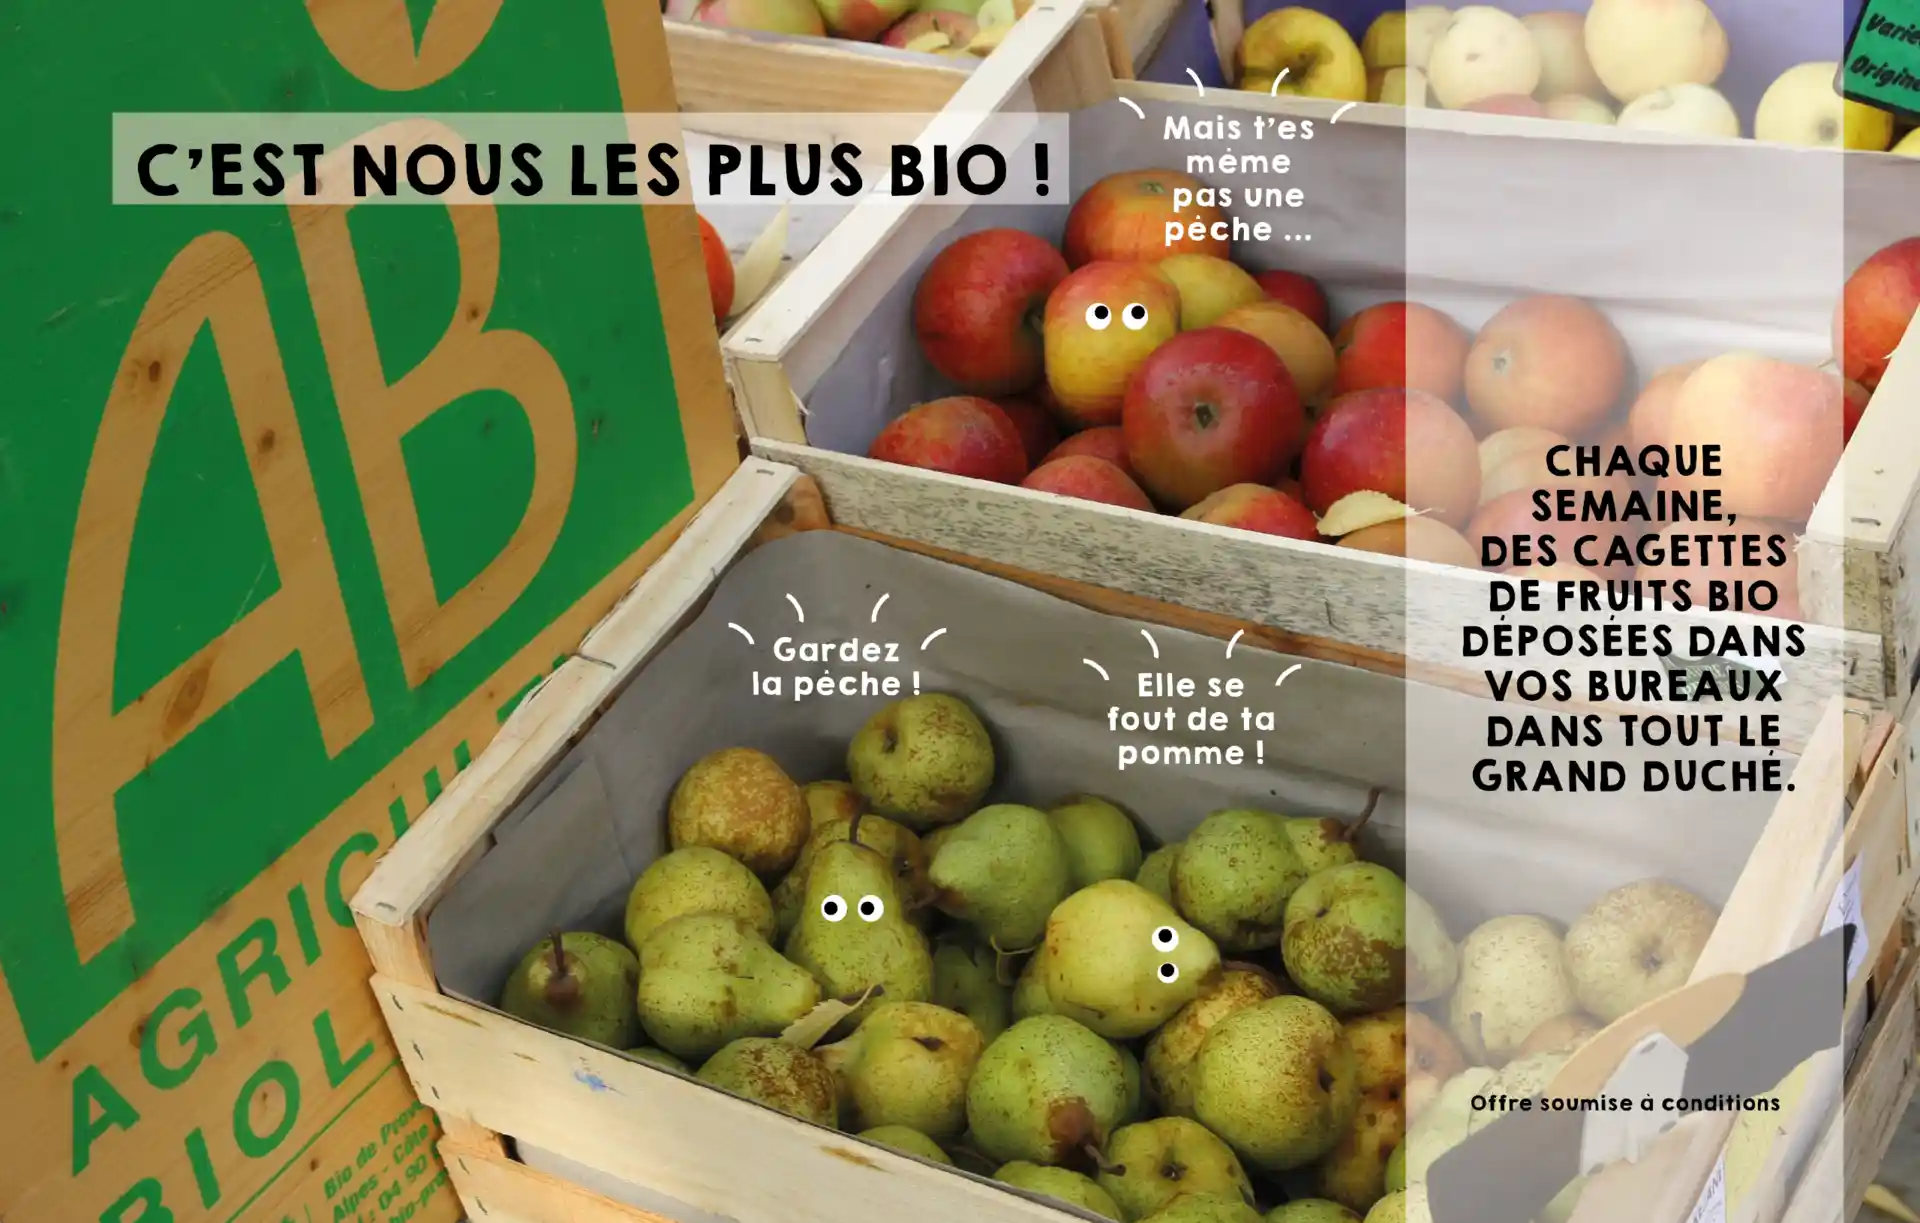
Thanks Samir for letting me use your website as example. Below, we will go up to 100X smaller image, and check the quality.
I’ll use Firefox in screenshots, but most browsers have similar “Developer tools”.
This is a 2 steps approach:
- Identify the biggest images
- Re-Compress them
Image size recommendations
- Full screen images should be between 60KB and 200KB
- Smaller images should be below 25KB
- Thumbnails or small pictures around 8KB should be enough
Tutorial
Measure the website performance
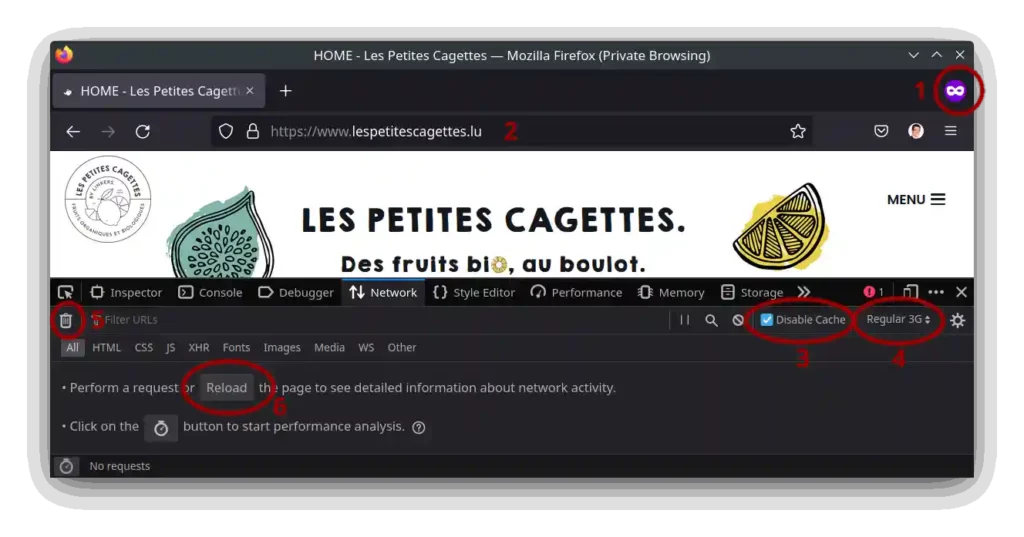
- Open a private navigation window to get possible extensions out of the way (<CTRL><Alt>P) and press F12 to get the developer tools. Go to the “Network” tab in the developer tools
- Go to the website you want to check or optimize
- Click “Disable cache”, to ensure your local browser cache is not used
- Select “Regular 3G” as throttling option. This will give you a better sense of loading time for mobile users with average bandwidth, or equivalent cost for people running out of “mobile data pack”. According to Firefox documentation, the “Regular 3G” limits performances to:
- 750 Kbps download (The most relevant here)
- 250 Kbps upload (No effect since we’re just downloading the home page)
- 100 ms latency (Low effect because browsers download elements in parallel)
- Ensure you clear the stats and start fresh
- Click reload
Analyse
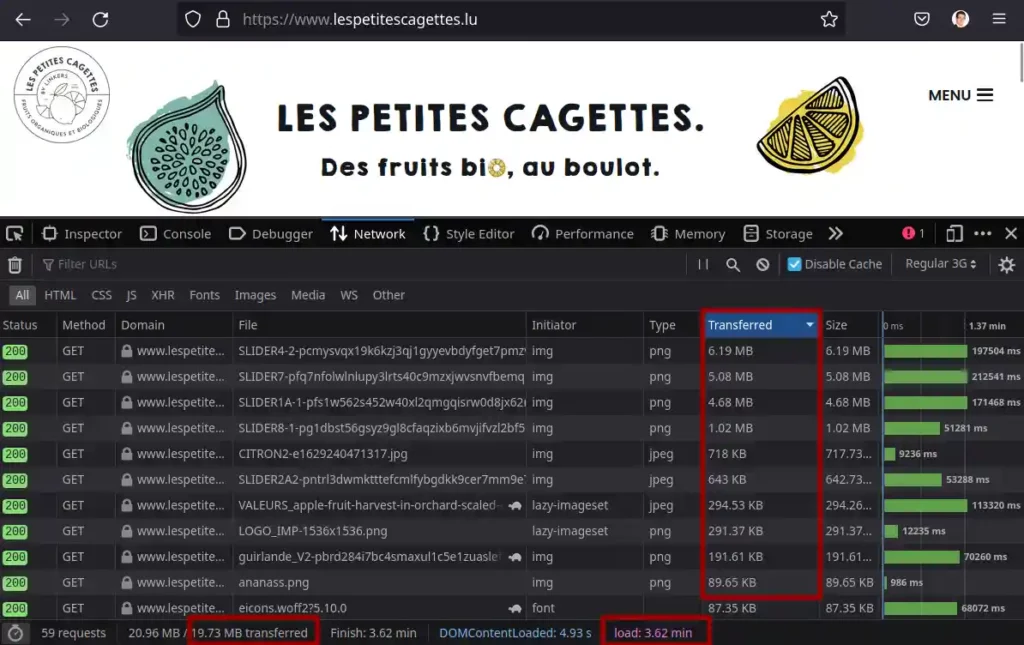
- Check the “transferred” volume. It should be below 1MB, possibly up to 2MB for highly graphic websites designs, especially if it’s intended to be available on mobiles. With 19.73 MB this probably gives huge room for optimization.
- In the above example, the “load” time is a matter of minutes instead of seconds
- Descending sort the “Transferred” column to get the details of the volume. We can see that most of the volume is taken by few images.
- We also see that PNG format is used. PNG format are good for small logos or diagrams requiring fine detail, but it compresses far less than JPEG, and more recent formats such as WEBP or AVIF.
Optimize
We will focus on images since it’s the very first thing to optimize on a website.
You mainly need to adapt to the use of the image and select the most appropriate
- Resolution
- Format
- Compression or quality level
1. Resolution
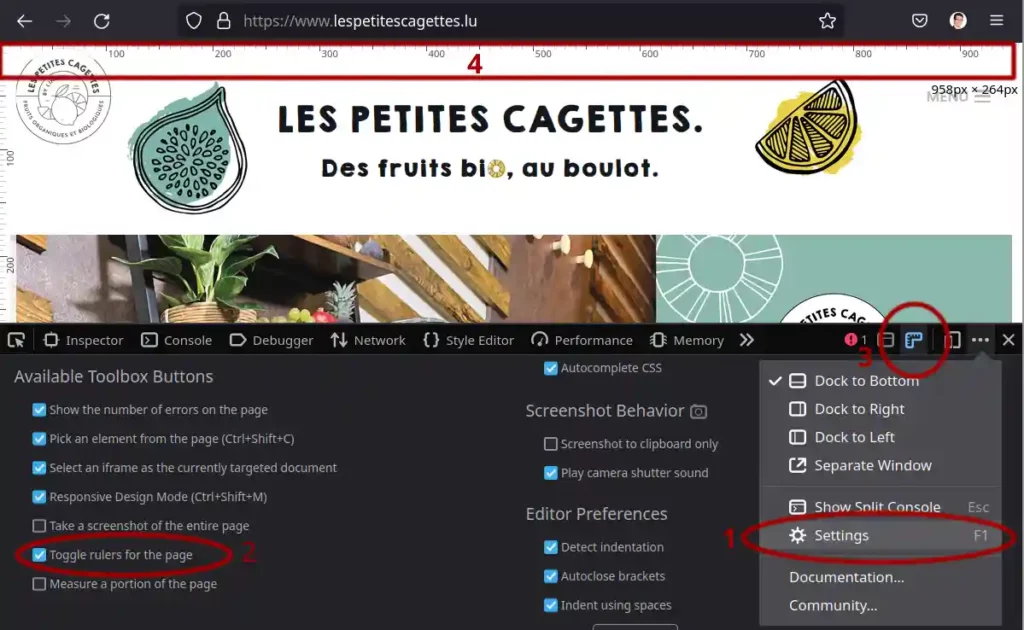
The most relevant is the width in pixels for the image and should not exceed the displayed width.
You can use the Firefox “Ruler” tool to help you, but you need to enable the button first :
- In the developer tools, go to settings or press F1
- Enable the “Toggle ruler for the page” option in the “Available Toolbox Buttons” section
Another option is to right-click on the image, select “Inspect” and check the “Box Model”. The width is the first number.
You can use other tools such as kruler or equivalent on your OS.
Or just pick an image width according to the approximation that a full width image should be about 1920 pixels which is the standard full HD width. So, an image that is about 25% of the width should be about 400-500 pixels wide.
For better compression, feel free to use even lower width. Anyway, the browser will expand it as required by the page.
2. Format
You need a format with high compression that is supported by the standard browsers.
The best formats for big web images could be AVIF or JPEG XL, unfortunately they are not yet widely supported in web browsers. The best before choosing a format is to check on caniuse.com : https://caniuse.com/?search=avif
WebP has finally been added by most browsers some 3 years ago. It offers 10-26% more compression than JPEG, and has now excellent browser compatibility.
As a more recent format, WebP combines the benefits of Gif (for animations), PNG (for transparency), and JPEG for photo compression.
In short, use WebP whenever possible. From Wikipedia:
WebP is an image file format developed by Google intended as a replacement for JPEG, PNG, and GIF file formats. It supports both lossy and lossless compression,[6] as well as animation and alpha transparency.
3. Compression or quality level
That might be more time-consuming since might want to try different quality levels, but first try with 20% quality for big images, and increase by 5% if you need more quality.
Practice
I will use the free command-line tool “convert” that is part of the ImageMagick open source tool. On Linux, it’s often already installed by default and can easily be installed on any platform. I did try a couple of online tools, but no one did compete, especially because most of them just compress regardless of resolution or quality requirements.
Check if installed, and also check it has built-in webp support:
$ convert --version
Version: ImageMagick 6.9.11-60 Q16 x86_64 2021-01-25 https://imagemagick.org
Copyright: (C) 1999-2021 ImageMagick Studio LLC
License: https://imagemagick.org/script/license.php
Features: Cipher DPC Modules OpenMP(4.5)
Delegates (built-in): bzlib djvu fftw fontconfig freetype heic jbig jng jp2 jpeg lcms lqr ltdl lzma openexr pangocairo png tiff webp wmf x xml zlib
If not installed, or no WebP support, install it: https://imagemagick.org/script/download.php
In order to download the image, just right-click on it in the sorted list of files from the Firefox dev console network tab, and select Save Image As. You can also “copy as curl” command :
~/tmp$ curl 'https://www.lespetitescagettes.lu/wp-content/uploads/elementor/thumbs/SLIDER4-2-pcmysvqx19k6kzj3qj1gyyevbdyfget7pmzvjrdjzg.png' -H 'User-Agent: Mozilla/5.0 (X11; Linux x86_64; rv:101.0) Gecko/20100101 Firefox/101.0' -H 'Accept: image/avif,image/webp,*/*' -H 'Accept-Language: fr-BE,en-GB;q=0.7,en;q=0.3' -H 'Accept-Encoding: gzip, deflate, br' -H 'DNT: 1' -H 'Connection: keep-alive' -H 'Referer: https://www.lespetitescagettes.lu/' -H 'Cookie: pll_language=en' -H 'Sec-Fetch-Dest: image' -H 'Sec-Fetch-Mode: no-cors' -H 'Sec-Fetch-Site: same-origin' -H 'TE: trailers' -o original.png
  % Total    % Received % Xferd  Average Speed   Time    Time     Time  Current
                                 Dload  Upload   Total   Spent    Left  Speed
100 6341k  100 6341k    0     0  5594k      0  0:00:01  0:00:01 --:--:-- 5596k

~/tmp$ convert original.png small.webp
~/tmp$ convert original.png -resize 1920 smaller.webp
~/tmp$ convert original.png -resize 1920 -quality 30 smallest.webp

~/tmp$ ls -ltr --block-size=K
total 6816K
-rw-rw-r-- 1 pivert pivert 6342K Jun 19 16:40 original.png
-rw-rw-r-- 1 pivert pivert  241K Jun 19 16:41 small.webp
-rw-rw-r-- 1 pivert pivert  147K Jun 19 16:42 smaller.webp
-rw-rw-r-- 1 pivert pivert   80K Jun 19 16:42 smallest.webp
~/tmp$
Let’s see the results with a screenshot of a part of the rendered image for each full file size.
Original file of 6342 kB

From small.webp file of 241 kB

From smaller.webp file of 147 kB

From smallest.webp file of 80 kB
From smallest2.webp file of 64 kB
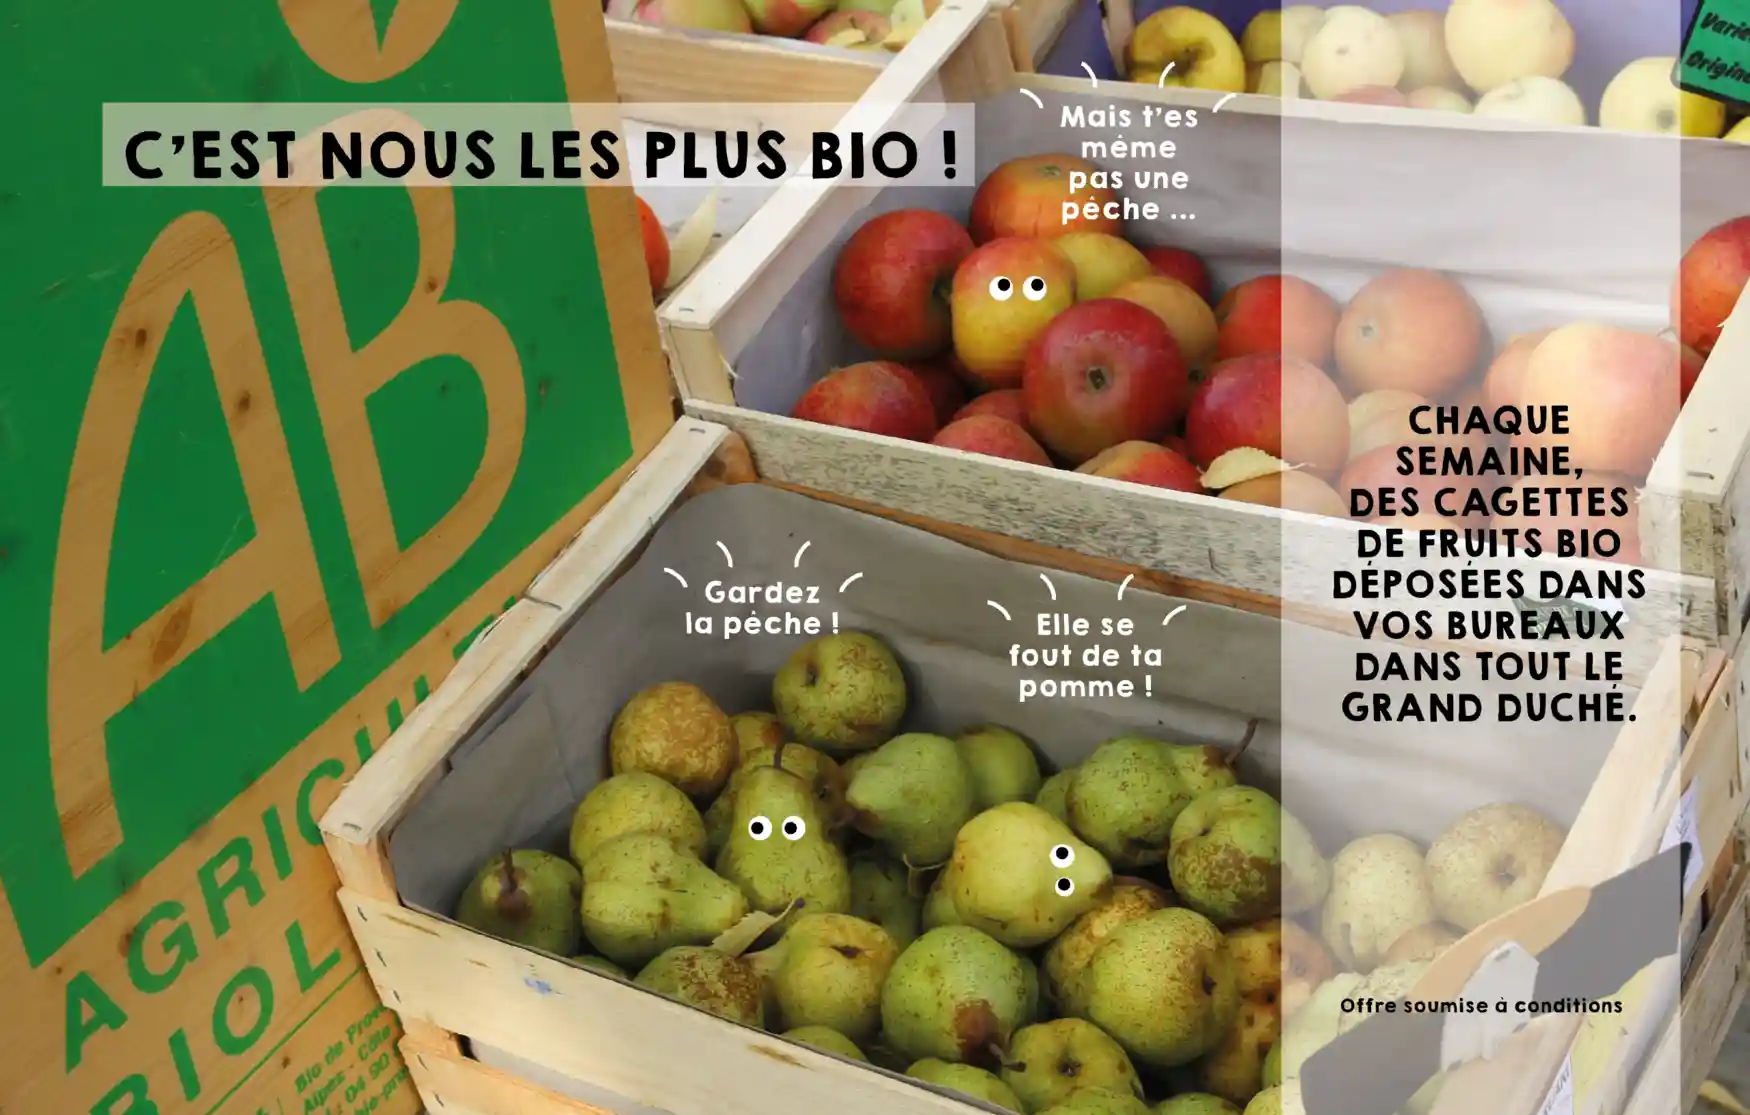
Click on each image to get it full size. Also I added a toosmall.webp (38 kB) image that is in my opinion too much compressed for the use case.
As you can see, a file of more than 6 MB that was consuming more than 25% of the page load data transfer can be re-compressed up to 100 times with reasonable quality loss. For this website, I would use the “smallest.webp” file (80 kB) or the smallest2.webp (64 kB) as a good quality/size tradeoff.
Feel free to use -resize and -quality options to further reduce the size. In this case, the best compromise is the -resize 1920 because the image was just too big in pixels, and we want to keep a very high quality. It provides an extra compression ratio of 43 compared to the original.png file.
What’s next ?
OK now that your image size is good and probably very small, you can still decrease your website load time and improve user experience. Here are some recommendations:
- Ensure compression is enabled on the server (usually it is). You can check if the transferred volume is much lower than the web page size, and check that some compression such as gzip is being used for HTML and JS files. Usually you will find “content-encoding: gzip” in the headers of those files.
- Use Wolf fonts if possible, they are well compressed
- Ensure cache is enabled in the headers (a bit technical), so the browser will keep a good cache.
- Use responsive design to load smaller version of images on smaller displays. This can be very technical challenging, but mandatory if your main audience is on mobile devices.
- Use a CDN, personally I use Hostry CDN. They have a good free offer, and are not expensive if you need more. Especially relevant if you have poor upload bandwidth or high traffic with big files.