

Introduction
High availability is paramount for stateful applications like MariaDB in Kubernetes (K8S). While our primary focus is MariaDB, these principles can be applied to various high-availability clusters such as MySQL, Kafka, Elasticsearch, Redis, or PostgreSQL with Operator to name few. This also applies to any workload not requiring strong persistence such as cache proxies.
In Kubernetes, local volumes provide Best-in-Class Cost-Performance Balance, but until recently, dynamic provisioning was a challenge. This is where the OpenEBS ZFS CSI Driver comes to the rescue, providing a solution that bridges the gap while leveraging ZFS’s advanced capabilities.
High Availability with Galera for MariaDB
MariaDB, a popular open-source database system, relies on high-availability clusters such as Galera to ensure data resilience and continuous service. Kubernetes is an ideal platform for achieving this level of availability.
Challenges of Local Volumes in Kubernetes
Local volumes offer low latency and high performance, ideal for stateful applications. However, dynamic provisioning was historically complex, hindering the agility required for maintaining high availability.
Leveraging ZFS for High Availability
The OpenEBS ZFS CSI Driver is instrumental in enabling high availability for MariaDB in Kubernetes. By utilizing ZFS as the underlying storage, you gain numerous advantages:
- Dynamic Provisioning: ZFS-based storage, coupled with the OpenEBS ZFS CSI Driver, enables dynamic provisioning of local volumes, simplifying scaling and reducing manual intervention.
- Low Latency and Performance: ZFS on local drives guarantees high performance and low-latency storage, vital for demanding applications like MariaDB.
- Simplified Management: The driver abstracts the complexities of local volumes, streamlining storage management for MariaDB in Kubernetes.
- Cost Efficiency: Utilizing local drives with ZFS and OpenEBS provides high availability without the cost overhead of remote storage solutions.
- Advanced Features: ZFS brings additional advantages, including data compression, encryption, dynamic volume resizing, and the ability to create snapshots of volumes, which can be used for creating clones and backups. This simplifies data management and protection.
Summary
Highly available stateful applications like MariaDB rely on resilient and high-performance storage. Kubernetes, in combination with the Galera cluster and OpenEBS ZFS CSI Driver, offers a robust solution. Leveraging ZFS for underlying storage ensures continuous MariaDB availability, low latency, high performance, simplified storage management, and advanced features like compression, encryption, dynamic resizing, and snapshots for cloning and backup creation. This powerful combination sets the stage for a reliable and efficient data platform in Kubernetes, ensuring your MariaDB clusters are always accessible and protected.
Implementation
Prerequisites
- A working K8S cluster with at least 3 worker nodes. In the example we will use a cluster of 6 RKE2 nodes with K8S v1.28.2+rke2r1 :
- 3 masters
- 3 workers
- Local block devices
Infrastructure
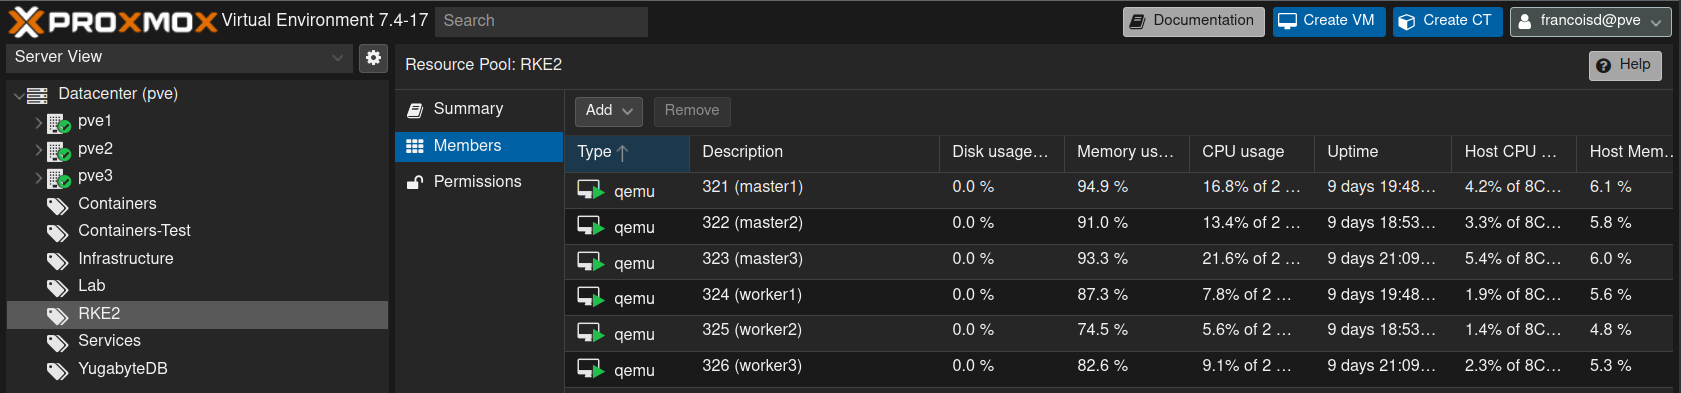
The infrastructure we will use is based on 3 Proxmox VE (pve) physical servers. Each of these servers runs :
- 1 Master node in VM
- 1 Worker node in VM
- Local LVM and an SSD backed
VolumeGroupwith 512 GB free storage we can pass through to each worker node
To ease the setup, we will use ansible ad-hoc commands with this inventory file:
[pve]
pve1
pve2
pve3

[masters]
master1 rke2_type=server
master2 rke2_type=server
master3 rke2_type=server

[workers]
worker1 rke2_type=agent
worker2 rke2_type=agent
worker3 rke2_type=agent

[k8s_cluster:children]
masters
workers
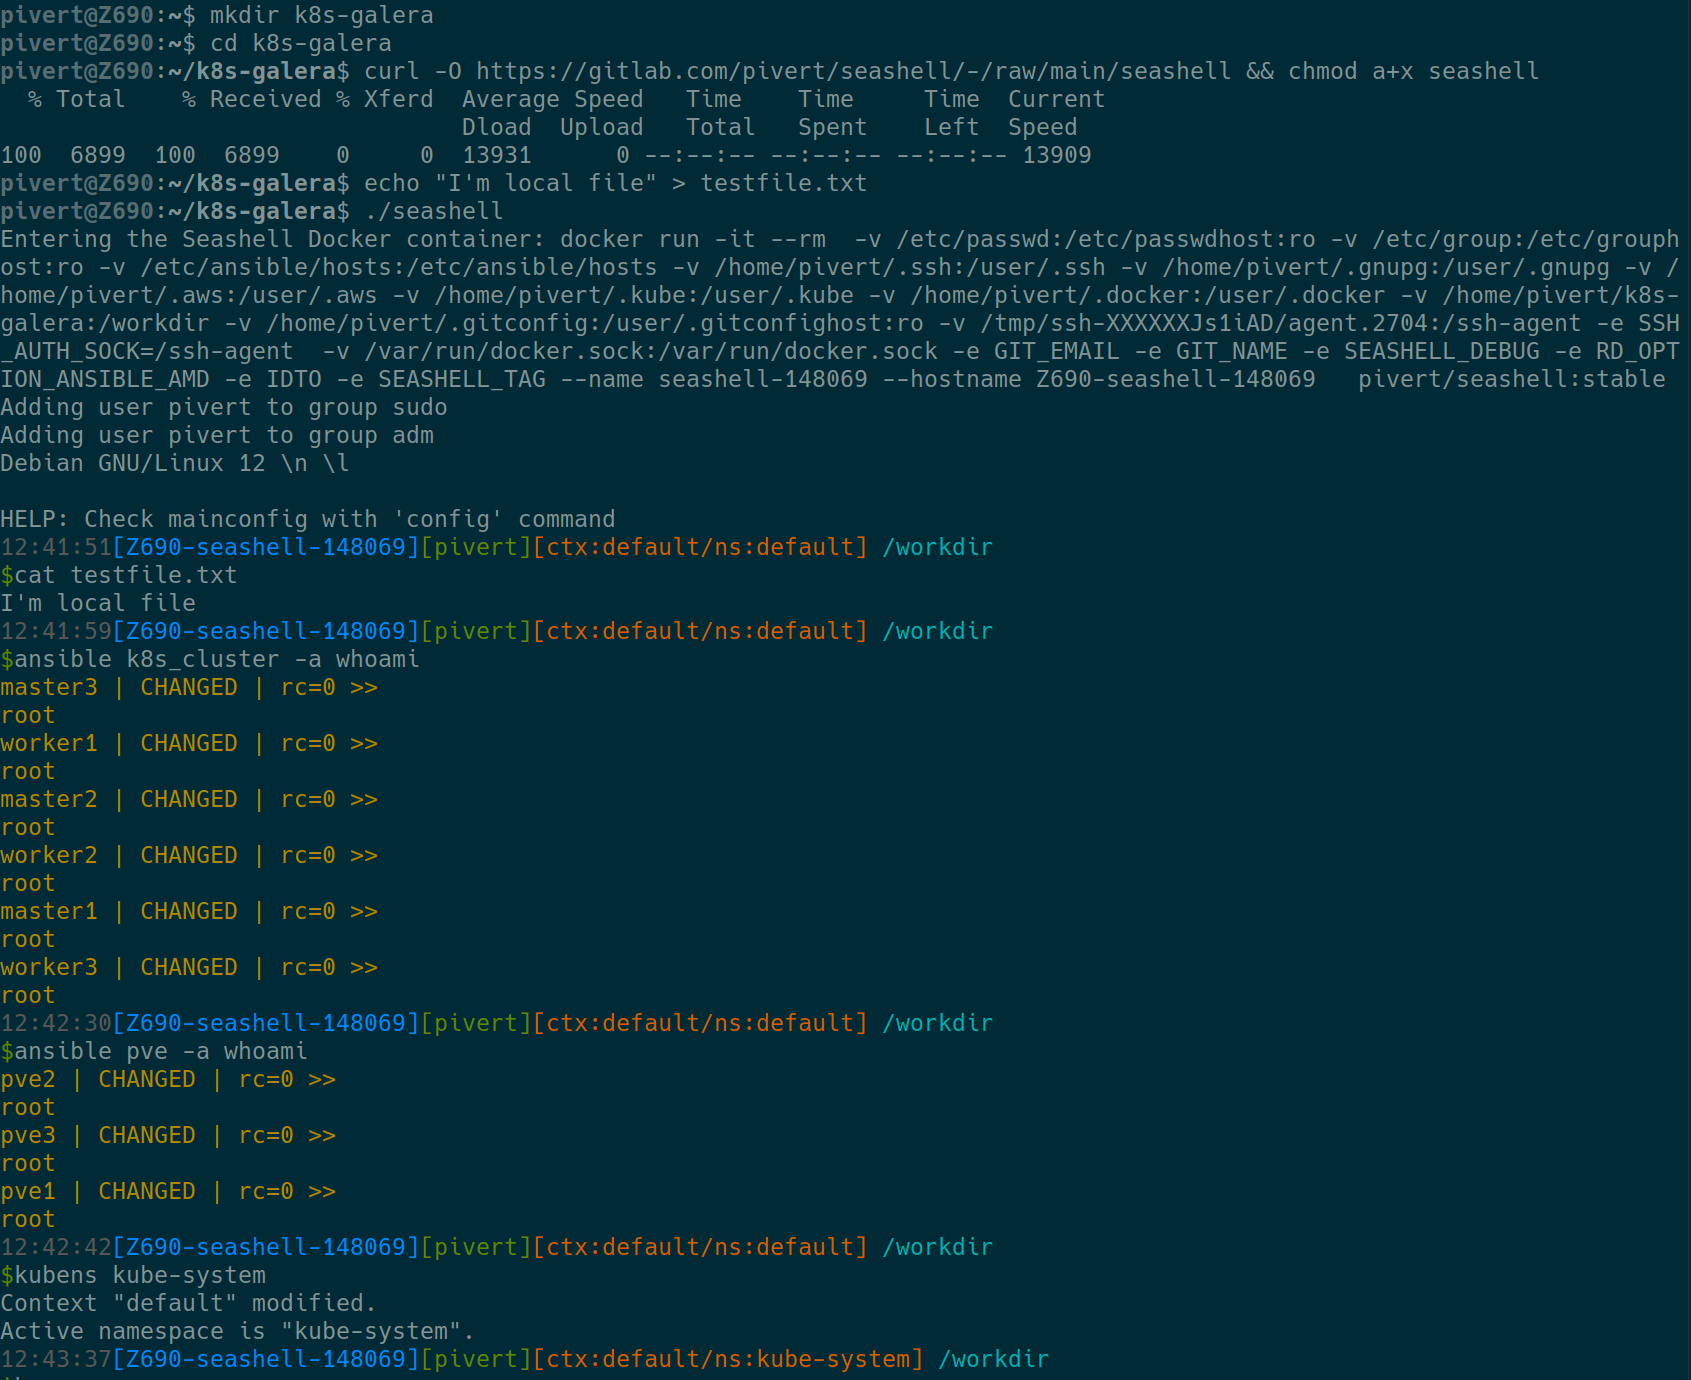
Optional: use Seashell toolbox
I’ll use the pivert/seashell docker container remotely, since it contains all the required tools and commands, including helm, ansible, ssh, kubectl, jq, yq, rg, k9s and many more. Before starting the pivert/seashell startup script, make sure that:
- You have docker installed (if not seashell script will propose you to install it)
- You have ssh-agent running locally, and you did the ssh-add to unlock your key for SSH into your VMs and PVE hosts.
- You have a valid
~/.kube/configto access your K8S cluster (You do not need local kubectl) - You have a valid
/etc/ansible/hostsfile such as the one shown below. (You do not need local ansible) - You use a dark console theme such as Solarized dark, and preferably use patched fonts such as Hack Nerd Font
- You preferably are in a newly created folder that will be mounted under /workdir in the container.
You should have exactly what is shown below.
This boils down to
curl -O https://gitlab.com/pivert/seashell/-/raw/main/seashell && chmod a+x seashell
./seashell
Example
The check you have admin rights

Provide local fast storage to the Workers
Create the new volumes on the PVE hosts
On each host on which a worker is running, we must provision or provide a big and fast block device. Since I cannot dedicate a full disk, I’ll provide a new LV from an existing patriot-vg VolumeGroup.
Check that we have the space
ansible pve -a vgs
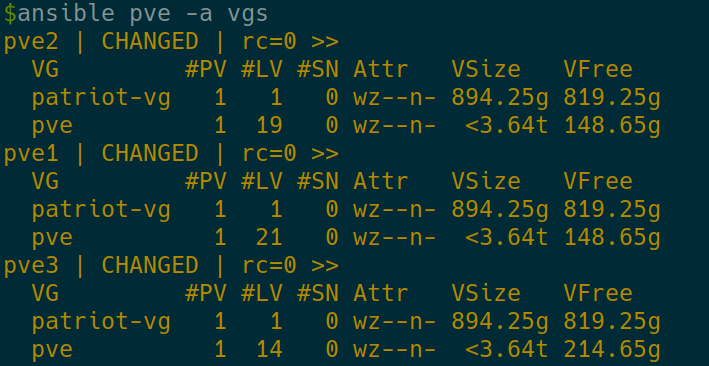
OK, we have 819.25GB free on the patriot-vg on each PVE host.
Create the new LogicalVolumes
lvcreate -L 512G -n openebs-local-zfs /dev/patriot-vg

Attach each LogicalVolumes to the local Worker VM
P.S.: I can’t remember is I did this online. If possible shut-down the workers first.
In Proxmox, there are many ways to attach storage to VMs with the UI, but since the newly created volume is not in ProxmoxVE config, we have to add it manually.
To do this on Proxmox, we must first identify the numerical vmid, then pass the volume to the VM with the qm command
You should be able to match both the disks (LV) and the Proxmox vmids with the below commands. Make sure there’s exactly one match per node.
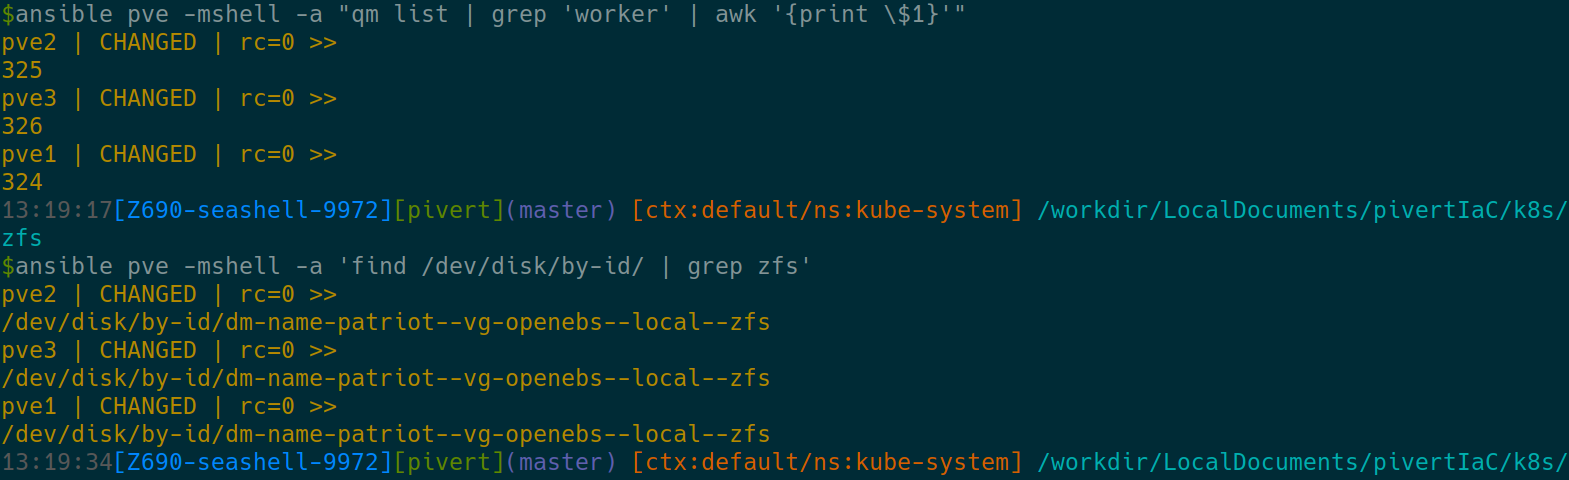
We can now attach the disks. First do the command starting with echo to ensure it does what you want. (take care of the escapes, so it’s not interpreted by the local shell)
ansible pve -mshell -a 'echo qm set $(qm list | grep "worker" | awk "{print \$1}") -scsi2 $(find /dev/disk/by-id/ | grep zfs)'

If satisfied, remove the leading echo, and of course, make sure the scsi2 is not already existing in your worker Proxmox configuration. I.E.

In the VMs you should end up with this
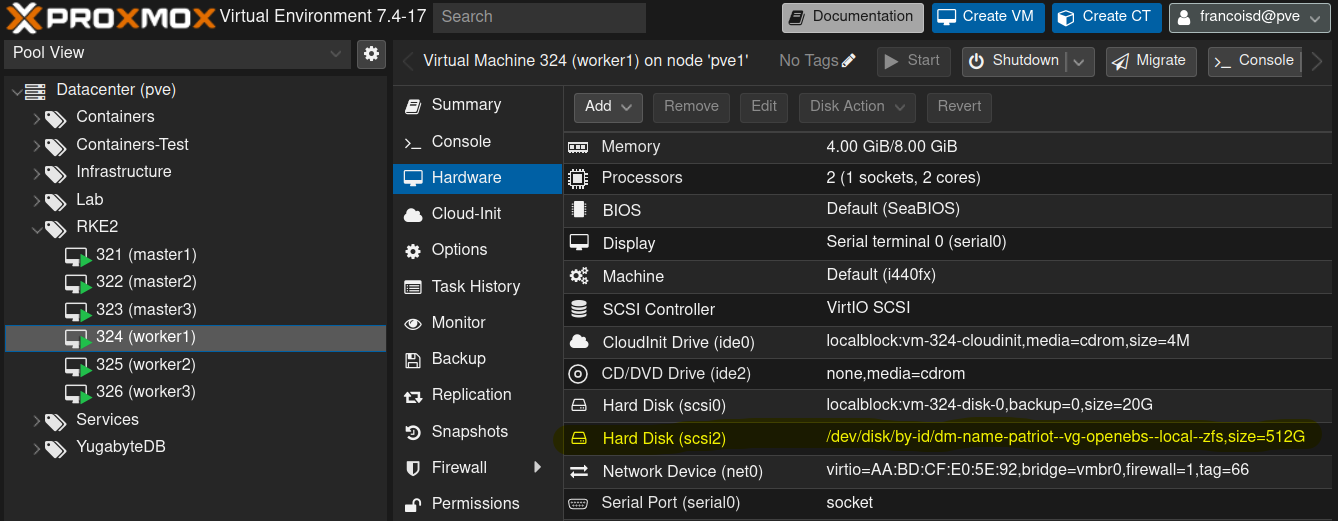
From that screen, also ensure that :
- All other storages use local disks (localblock is a thinpool)
- You use the VirtIO SCSI driver for performance
Setup ZFS in the worker nodes
Step 1: Prepare the ZFS
Before you set up the operator you need to create a local ZFS zpool in each worker VM.
Execute the following commands using Ansible on all worker nodes:
- Install ZFS utilities:
ansible workers -m apt -a "name=zfsutils-linux state=present"
- Check the available block devices:
ansible workers -m shell -a 'lsblk'
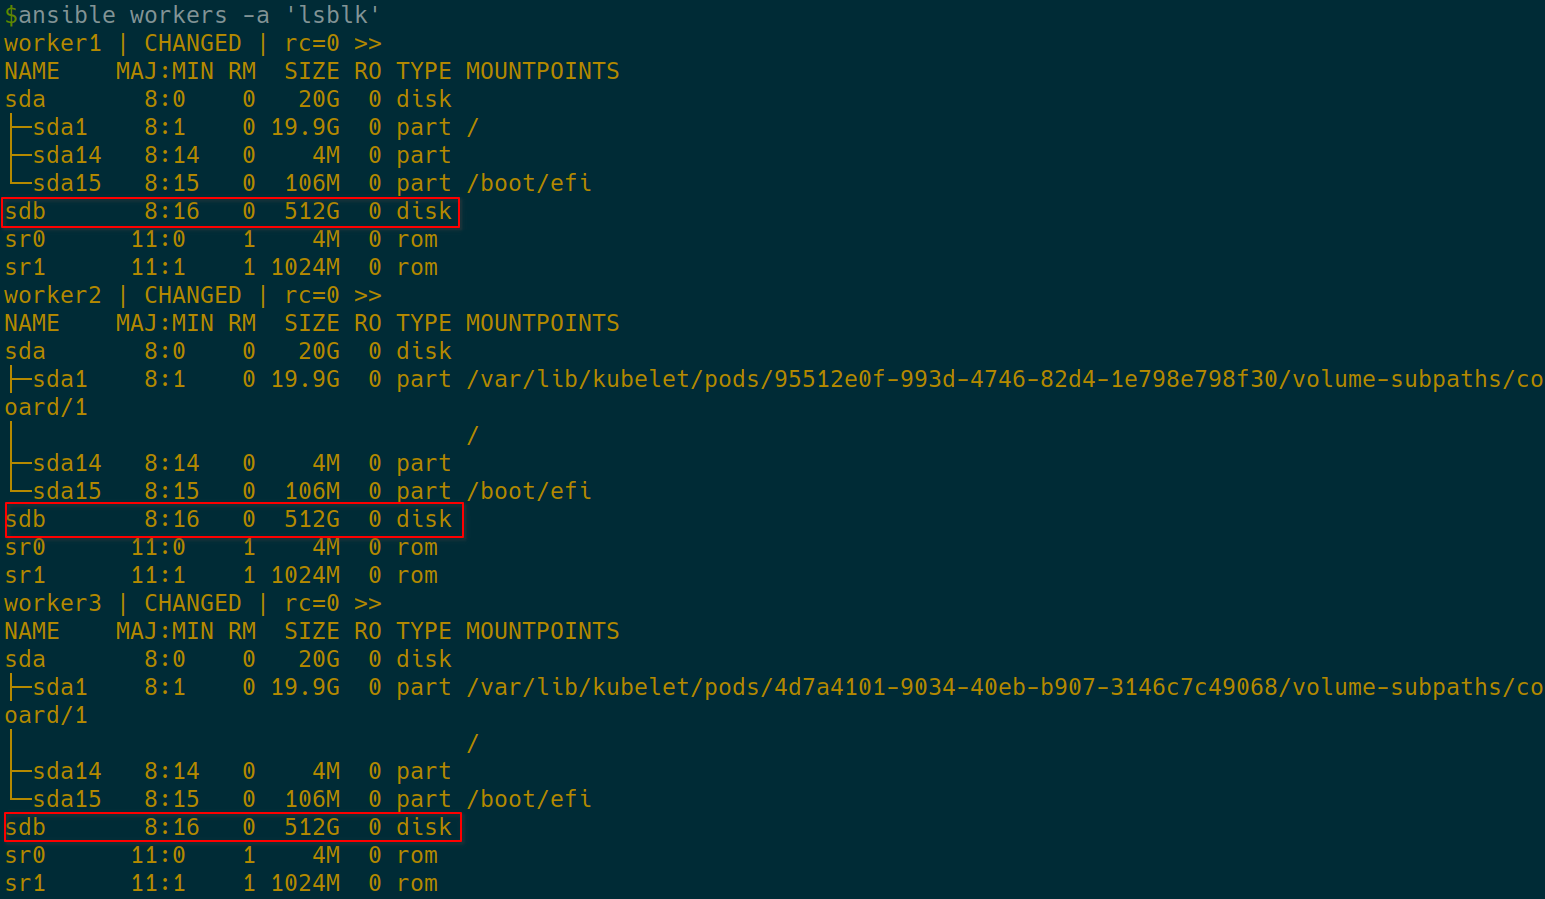
OK. The new 512 GB disks are at /dev/sdb on each worker.
- Create a ZFS pool named
zfspv-poolusing a suitable block device (e.g.,/dev/sdb):
ansible workers -m shell -a 'zpool create zfspv-pool /dev/sdb'

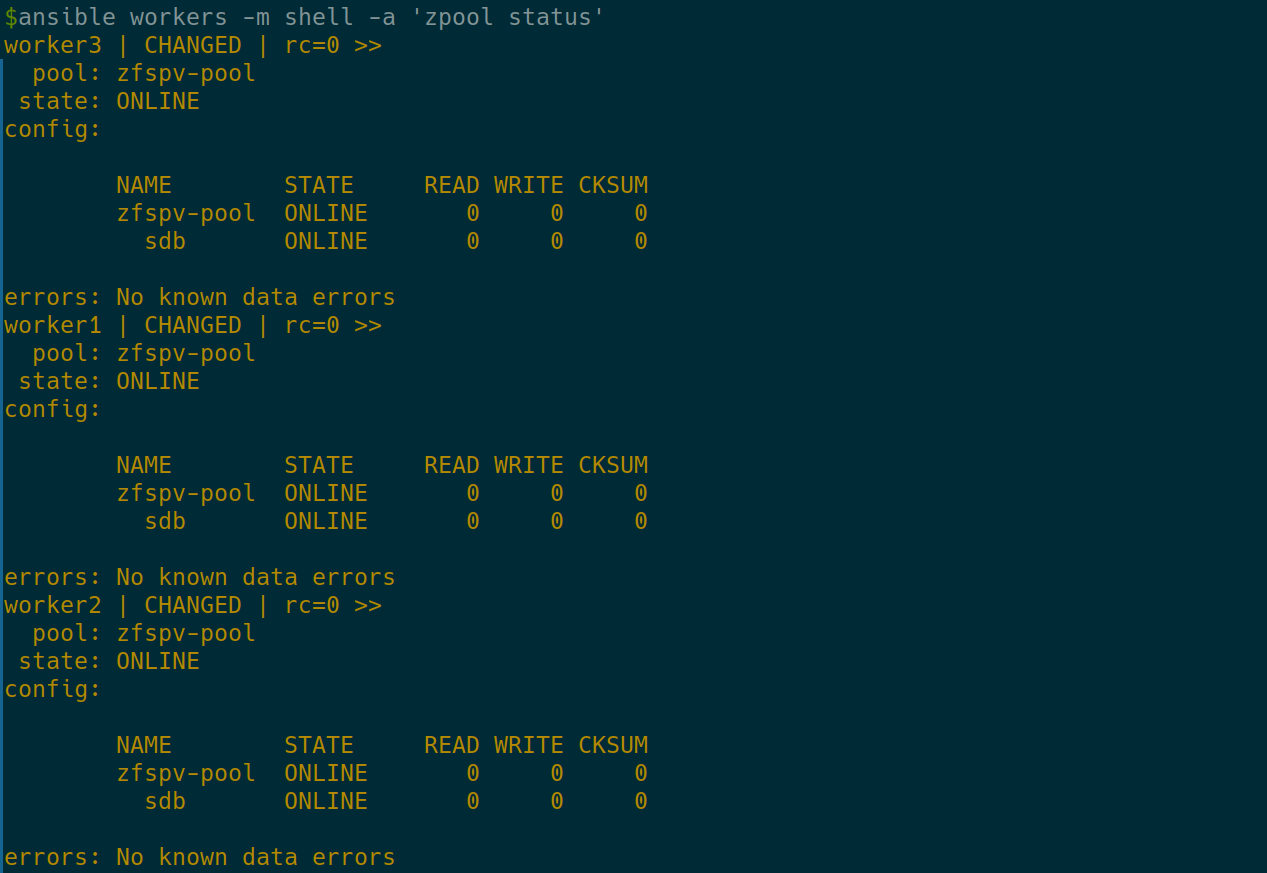
- Verify the ZFS pool status:
ansible workers -m shell -a 'zpool status'
Deploy the OpenEBS ZFS Operator
The ZFS Operator manages ZFS local storage on worker nodes in your Kubernetes cluster.
Check the existing kubelet directory:
ansible workers -m shell -a 'ls -l /var/lib/kubelet'
ZFS Operator will look for that folder, so in case it’s elsewhere on your K8S, you’ll have to modify the zfs-operator.yaml file.
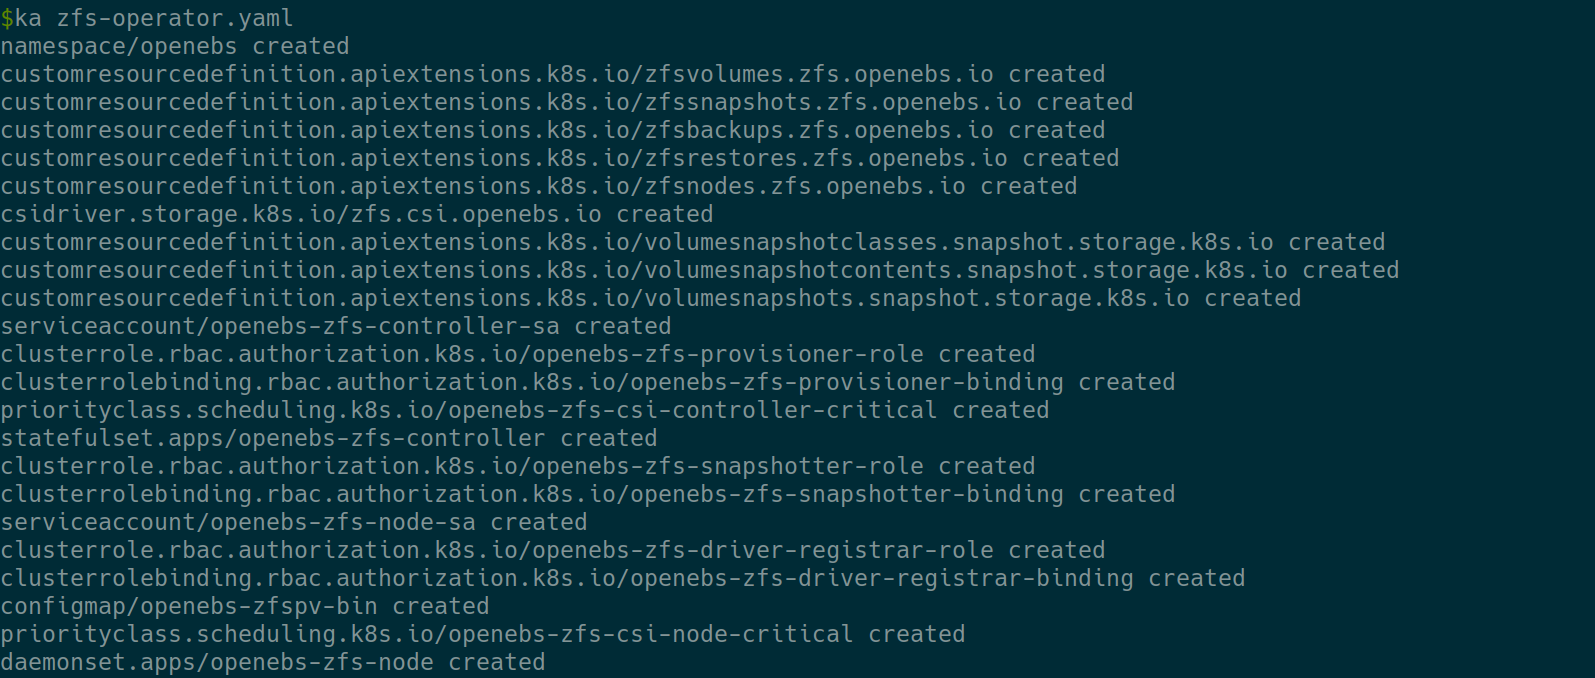
Apply the ZFS Operator manifest:
curl -LO https://openebs.github.io/charts/zfs-operator.yaml
kubectl apply -f ./zfs-operator.yaml
Now that we have OpenEBS ZFS Operator installed, we must create a StorageClass to match our ZFS above created zfspv-pool
Copy and paste the StorageClass definition to openebs-zfspv-sc.yaml
---
apiVersion: storage.k8s.io/v1
kind: StorageClass
metadata:
  name: openebs-zfspv
allowVolumeExpansion: true
parameters:
  recordsize: "128k"
  compression: "off"
  dedup: "off"
  fstype: "zfs"
  poolname: "zfspv-pool"
provisioner: zfs.csi.openebs.io
allowedTopologies:
  - matchLabelExpressions:
      - key: kubernetes.io/hostname
        values:
          - worker1
          - worker2
          - worker3
Make sure the poolname is correct. Note that I explicitly locked it to the worker nodes on which the ZFS pool is available.
Then apply and check

You can also check the pods. The 2 commands below are identical (<ctrl>+j to expand). The first is just one of the many shortcuts provided in pivert/seashell
Add the VolumeSnapshotClass
Create a snapshotclass.yaml file with
kind: VolumeSnapshotClass
apiVersion: snapshot.storage.k8s.io/v1
metadata:
  name: zfspv-snapclass
  annotations:
    snapshot.storage.kubernetes.io/is-default-class: "true"
driver: zfs.csi.openebs.io
deletionPolicy: Delete
Then ka snapshotclass.yaml to apply this CRD. It will allow us to easily take Zfs snapthots of the volumes as described in the troobleshooting section.
Install Galera Cluster using Helm
Next, you need to deploy the Galera Cluster on your Kubernetes environment. Helm is a package manager for Kubernetes that simplifies the deployment process. You can use the Helm chart to install Galera.
Check the possible values
helm show values oci://registry-1.docker.io/bitnamicharts/mariadb-galera > mariadb-galera-values.yaml
Here is my mariadb-galera-custom-values.yaml file
---
global:
  storageClass: "openebs-zfspv"
service:
  type: LoadBalancer
  ports:
    mysql: 3306
  loadBalancerIP: "192.168.66.195"
persistence:
  size: 12Gi
metrics:
  enabled: true
  service:
    type: LoadBalancer
    port: 9104
    annotations:
      prometheus.io/scrape: "true"
      prometheus.io/port: "9104"
    loadBalancerIP: "192.168.66.195"
The minimum you have to ensure, is that you use the proper StorageClass configured.
Also check the MariaDB Galera Helm chart documentation for more options
Then check how you want to expose the service.
In my case, I have KubeVIP in place with an IP range, so I prefer to use the LoadBalancer service and provide a fixed IP address to the service.
Since my Prometheus is not (yet) in K8S, I also enabled it, and exposed it via the KubeVIP LoadBalancer.
Install Galera Cluster using Helm and your values file by executing the following command:
k create ns galera
kubens galera
helm install galera oci://registry-1.docker.io/bitnamicharts/mariadb-galera --values ./mariadb-galera-custom-values.yaml
This command deploys Galera Cluster with MariaDB as its core database engine.
From pivert/seashell, you can use
k9s -n galera -c 'xray sts'
to monitor the deployment. Feel free to move to a starting pod, and press l (for logs) or d (for describe). If you type :helm you can see the chart and the help message.
Checks
Here is a bunch of commands and checks you can make to ensure everything is OK or possibly debug if something went wrong.
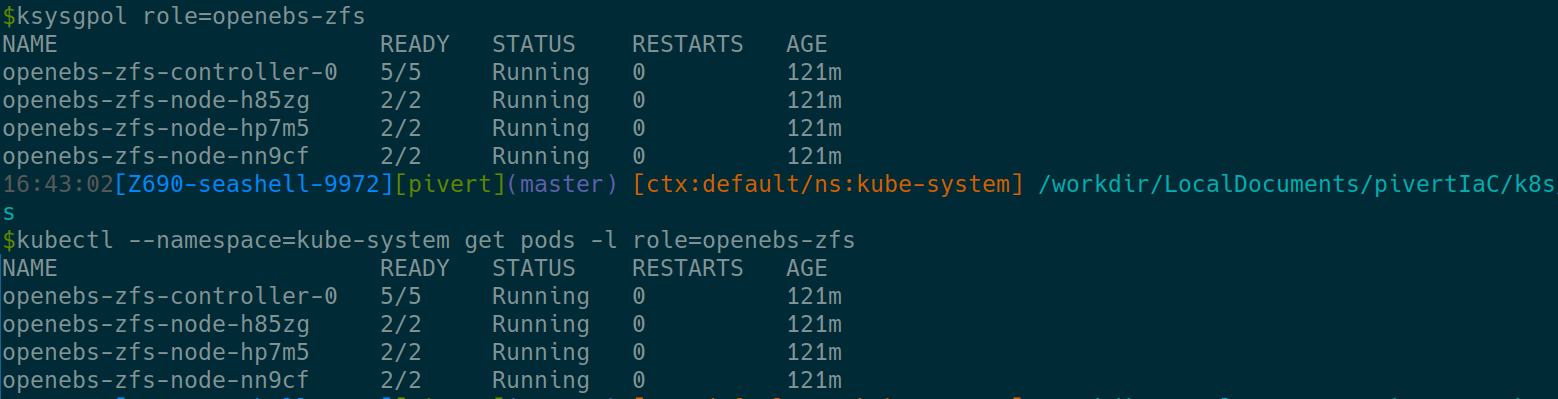
OpenEBS checks
kubectl logs -f openebs-zfs-controller-0 -n kube-system -c openebs-zfs-pluginkubectl logs -f openebs-zfs-node-[xxxx] -n kube-system -c openebs-zfs-pluginkubectl get pods -n kube-systemkubectl get zv -A -o yaml
To get the DB password (from the galera namespace)
export PASSWORD=$(kubectl get secret galera-mariadb-galera -o jsonpath="{.data.mariadb-root-password}" | base64 --decode)
Other checks (using the kubectl aliases from Ahmet included, also explained on the pivert/seashell page. Almost all are self explanatory, if it ends with n, it means the first argument is the namespace.
helm show readme oci://registry-1.docker.io/bitnamicharts/mariadb-galera
helm show all oci://registry-1.docker.io/bitnamicharts/mariadb-galera
kgsts
kgpoowide
kgsvc
kg pv
kg pvc
export PASSWORD=$(kubectl get secret galera-mariadb-galera -o jsonpath="{.data.mariadb-root-password}" | base64 --decode)
k scale statefulset galera-mariadb-galera --replicas 2
mariadb -uroot --password=${PASSWORD} -h 192.168.66.195 <<< "SHOW GLOBAL STATUS WHERE variable_name REGEXP 'wsrep_(cluster|apply|provider|incoming|received|local_state_comment|desync)'"
curl 192.168.66.195:9104/metrics
kgsvcojson galera-mariadb-galera | jq -r '.spec.loadBalancerIP'
export DBHOST=$(kgsvcojson galera-mariadb-galera | jq -r '.spec.loadBalancerIP')
Example
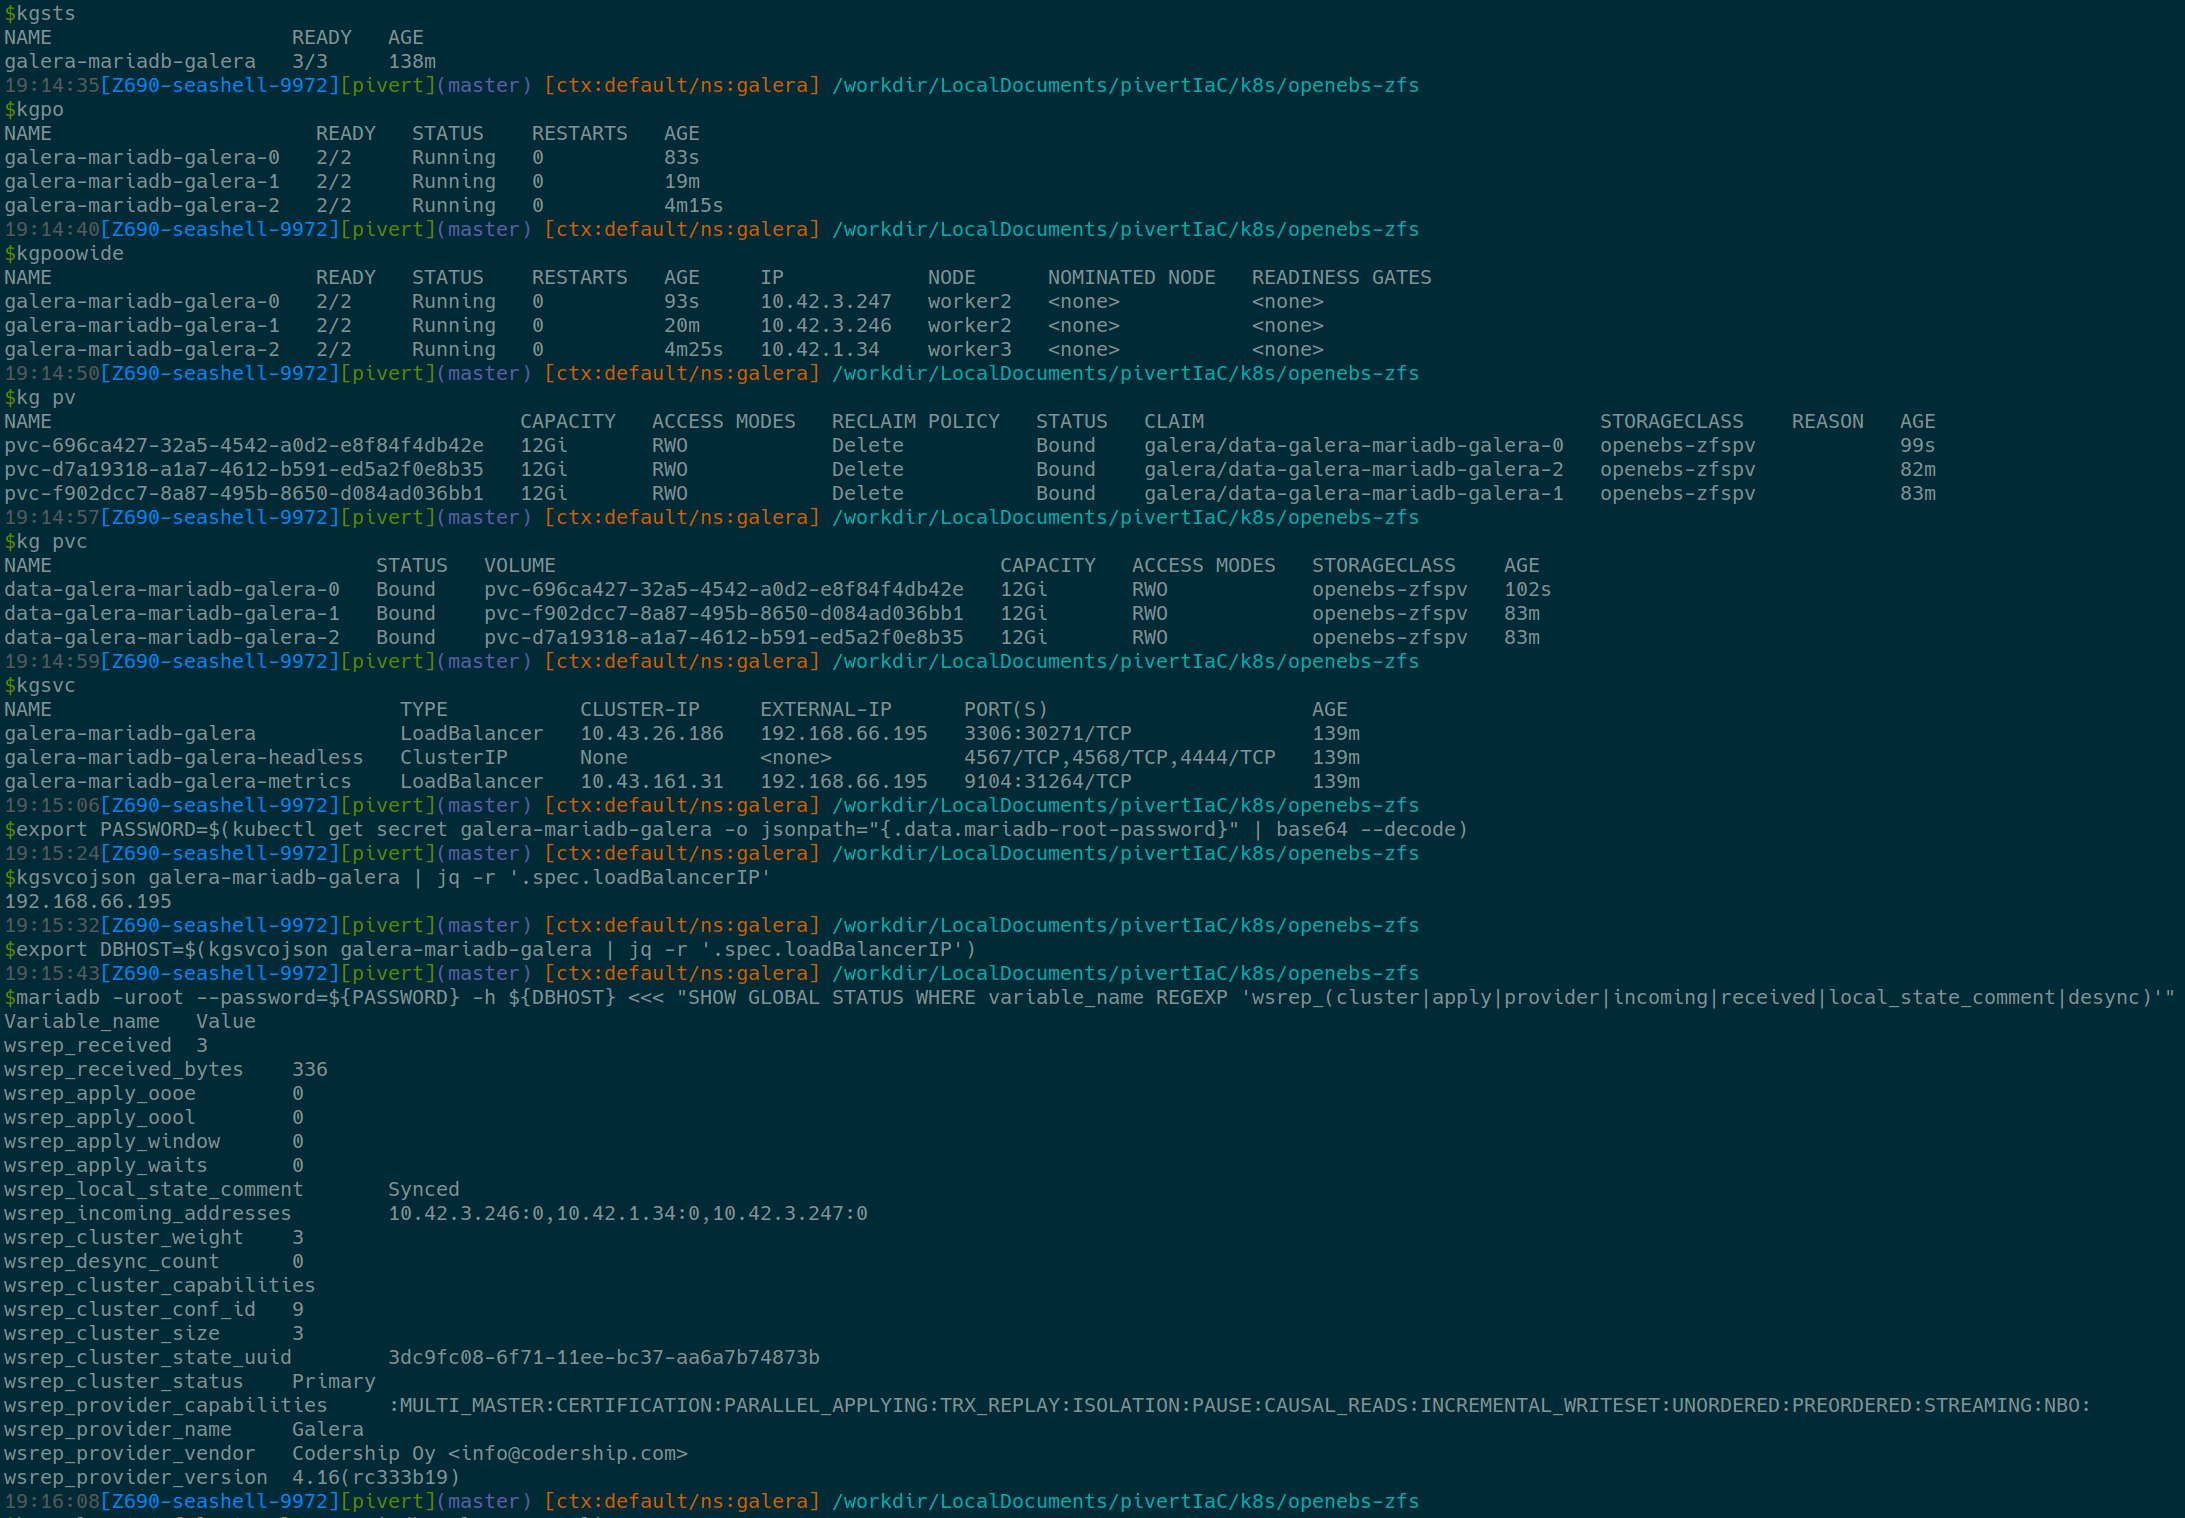
Always make sure the wsrep_local_state_comment is Synced, and check the size and cluster weight.
Also observe the incoming_addresses.
Stress test
Either using k9s, either manually, start to kill pods, reduce replicas, delete PVs, … and check how the Operator is dealing with the situation.
Example (you might have to open the image in full screen)
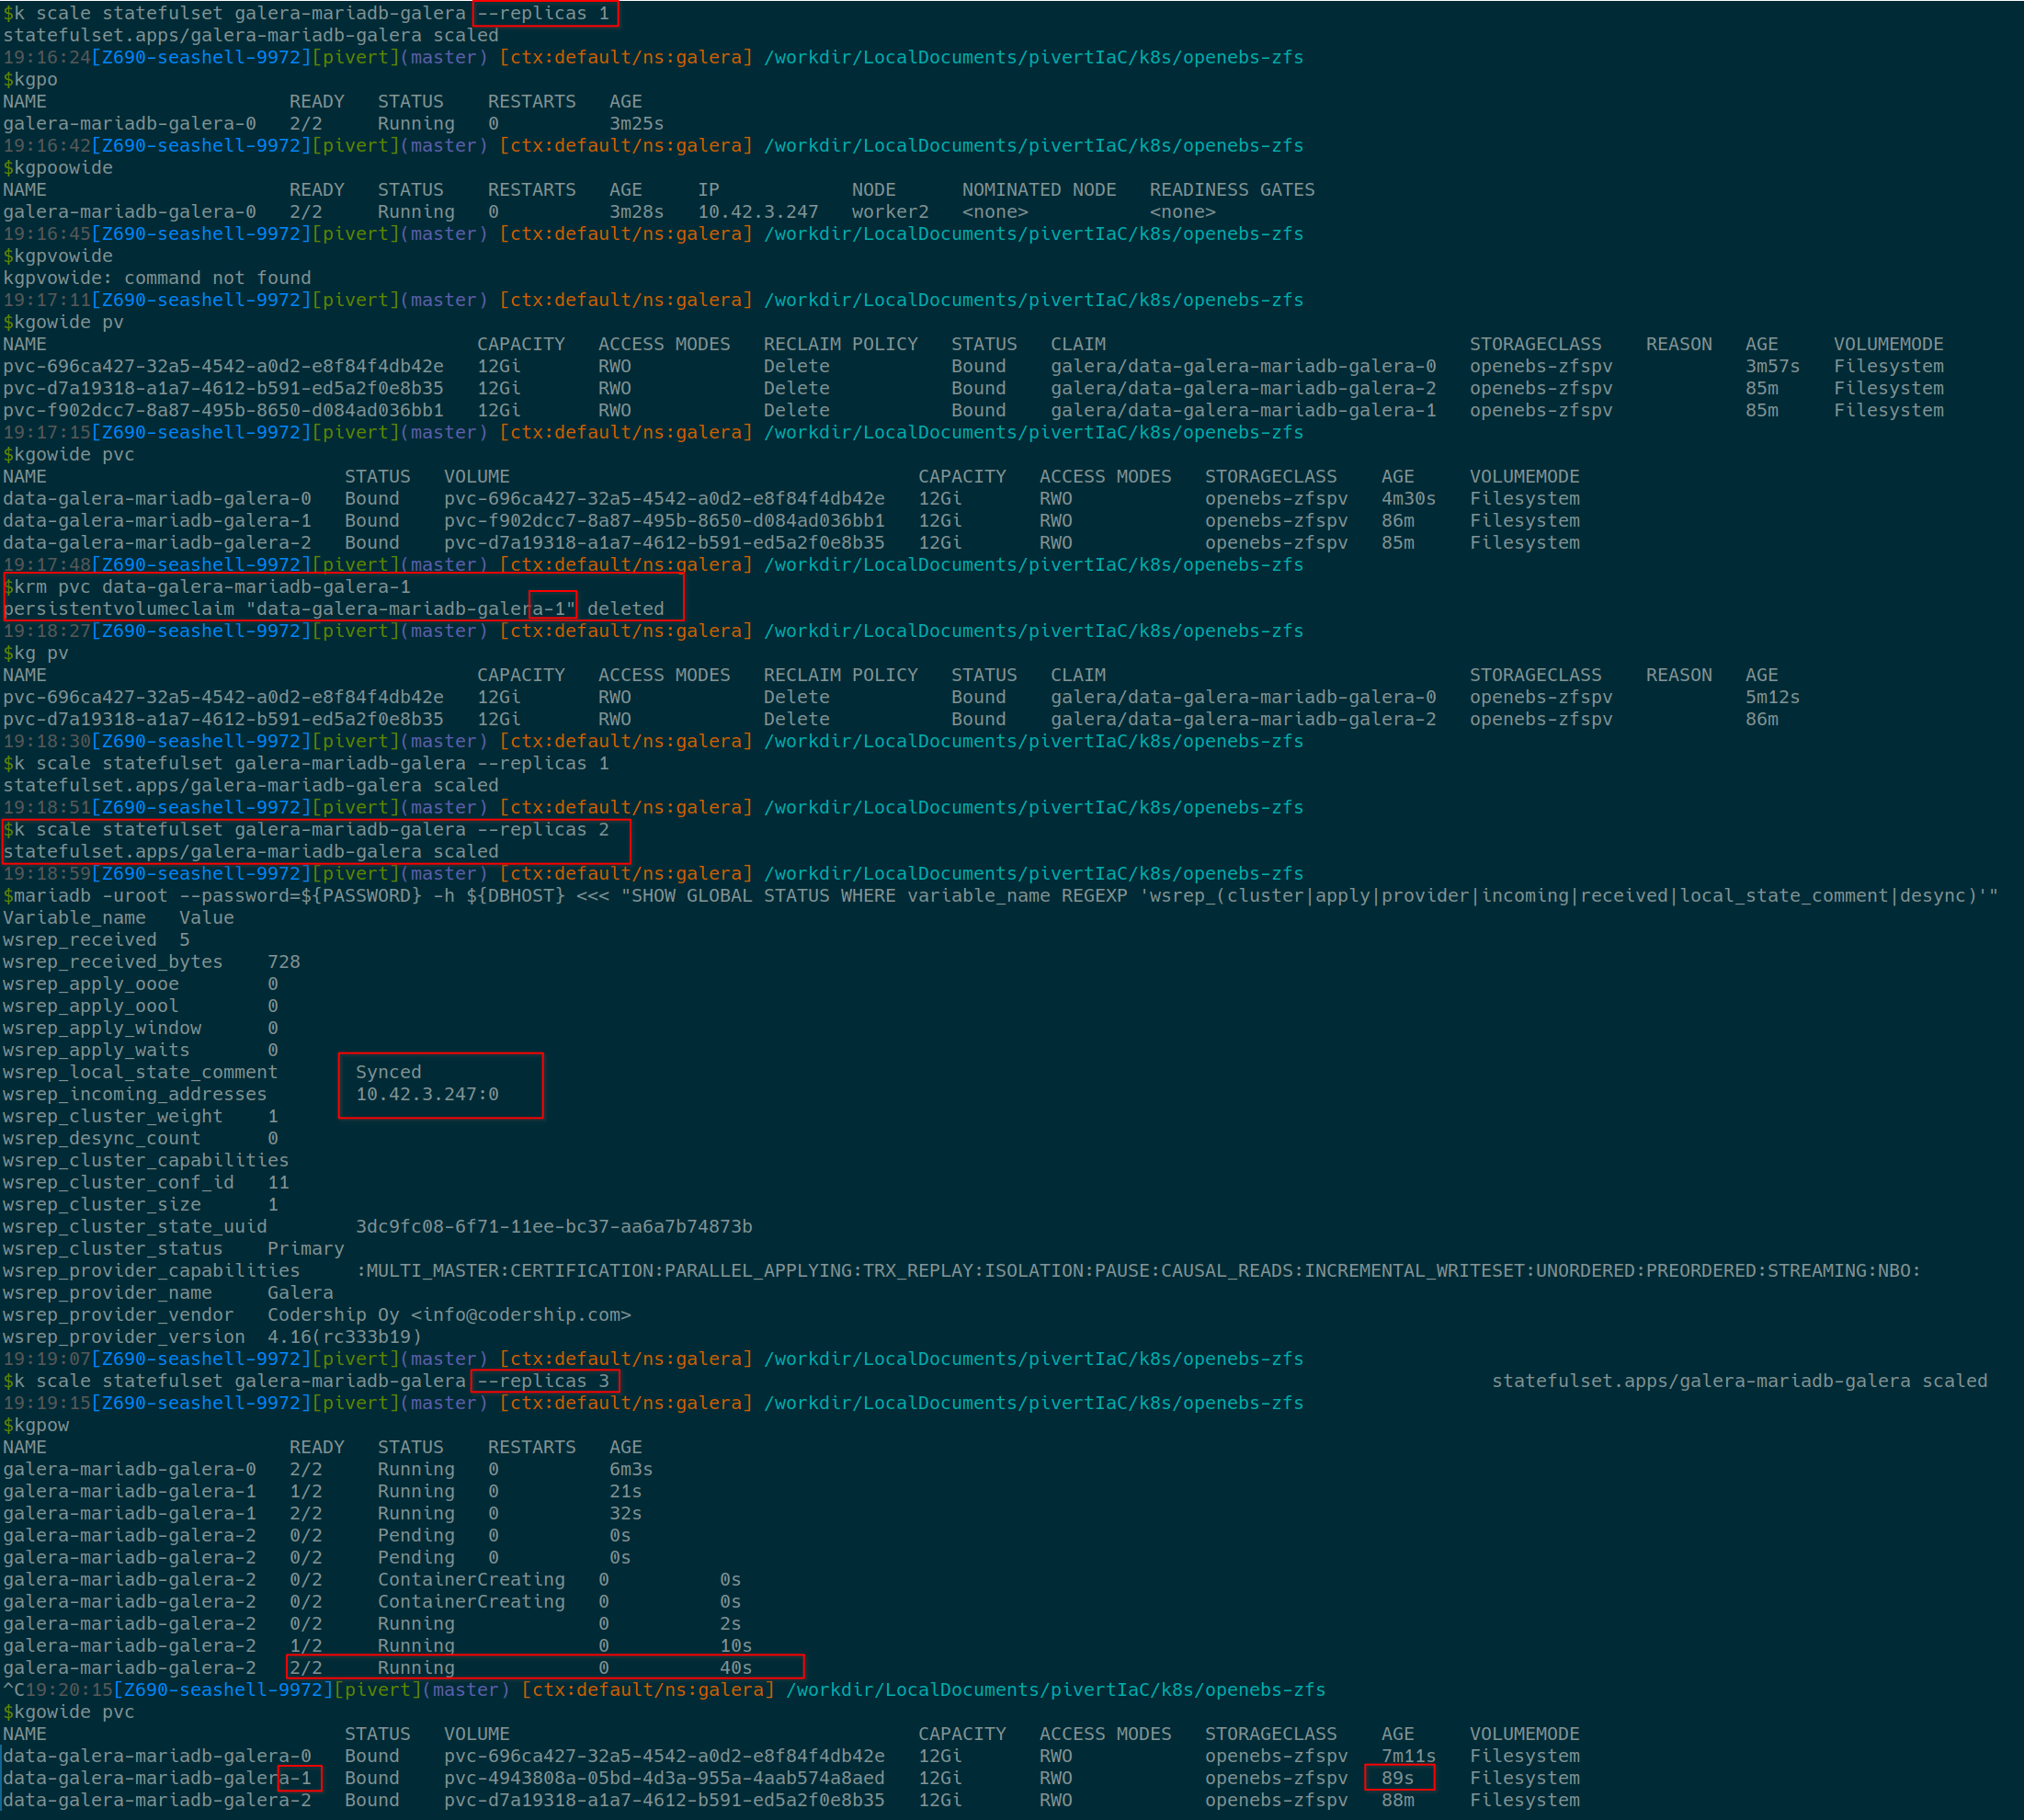
During these operations, it’s always nice to check the DB logs (pod logs), and to evidence that the zfs PV is completely deleted (DELETE policy) with zfs ls on the concerned worker node.
Also, I highly encourage you learn to use k9s, you can easily do all the above from the ui. The few commands you will need are: :ns :sts :pods :pvc :pv, and the other shortcuts are displayed on top of the window. To start it direcly with the xray explorer : start k9s -n galera -c 'xray sts' from pivert/seashell
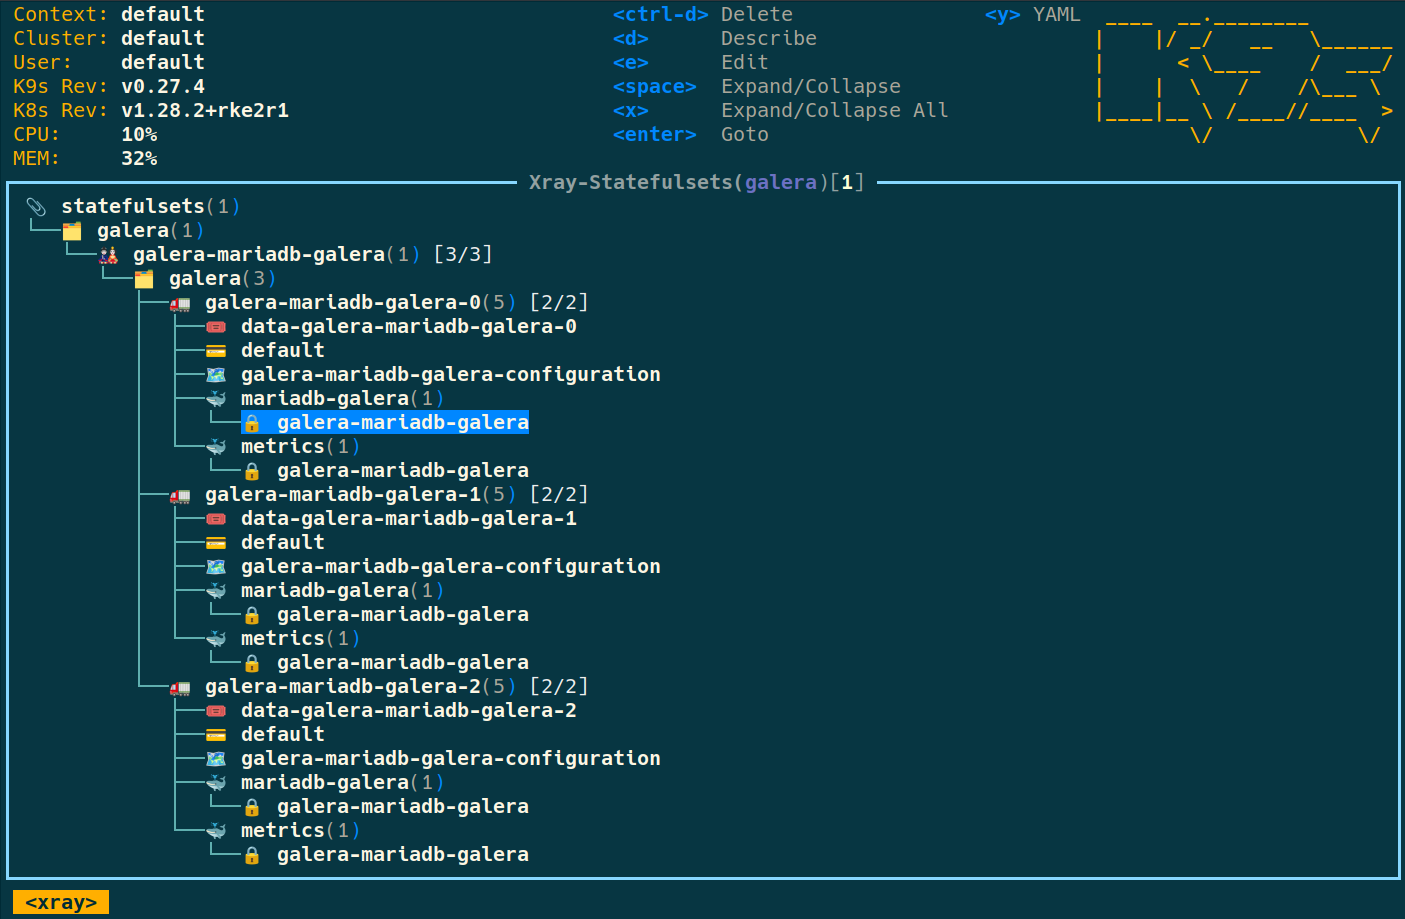
For instance, press Enter then x to get to the secret decoder

To delete the MariaDB Galera installation
If you need to reinstall or just delete the installation, you will need those commands
kubens galera                                  # ensure you're in the galera namespace (or the one you choose)
k scale sts galera-mariadb-galera --replicas 0
kgpow                                          # ensure all pods are killed
helm uninstall galera
krm pvc data-galera-mariadb-galera-0           # delete all PVCs
krm pvc data-galera-mariadb-galera-1
krm pvc data-galera-mariadb-galera-2
# krm ns galera                                # Delete the namespace if you do not want to reinstall
As you can see when uninstalling the helm chart, the PVC won’t be deleted. This can be useful in case you must debug or re-install to force bootstrap for instance. Let’s talk about that in the «Troubleshoot and Fix» section.
Migrate the databases
Be careful not to migrate the mysql database nor the root user, it will break the Galera cluster.
Dump data from the source server
I lost the root password, so I do it from one of the source VM called galera1 😉 using OS/socket authentication (so no password).
Use xz to get an excellent compression.
mysql -uroot <<< 'show databases'                                             # List databases you would like to export
mysqldump -u root --databases db1 db2 db3 | xz > databases.sql.xz             # Dump the DB you want to export
Also export the users and privileges. I used a script from this post that did a great job.
mysql -u<user> -p<password> -h<host> -e"select concat('show grants for ','\'',user,'\'@\'',host,'\'') from mysql.user" > user_list_with_header.txt
sed '1d' user_list_with_header.txt > ./user.txt
while read user; do  mysql -u<user> -p<password> -h<host> -e"$user" > user_grant.txt; sed '1d' user_grant.txt >> user_privileges.txt; echo "flush privileges" >> user_privileges.txt; done < user.txt
awk '{print $0";"}'  user_privileges.txt >user_privileges_final.sql
rm user.txt user_list_with_header.txt user_grant.txt user_privileges.txt
Adapt the above to your needs, and edit the user_privileges_final.sql file to keep only the users you want to keep.
Import the data into the new Galera cluster
Install the mariadb client since it’s not in seashell by default
sudo apt install mariadb-client-core -y
scp galera1:/root/databases.sql.xz ./
export DBHOST=$(kgsvcojson galera-mariadb-galera | jq -r '.spec.loadBalancerIP')
export PASSWORD=$(kubectl get secret galera-mariadb-galera -o jsonpath="{.data.mariadb-root-password}" | base64 --decode)
xz -d -c /databases.sql.xz |mariadb -uroot --password=${PASSWORD} -h ${DBHOST}
mariadb -uroot --password=${PASSWORD} -h ${DBHOST} <<< 'show databases'
As another option, you can also do the above extract and load in a single command through ssh. Useful if you need frequent refresh.
ssh -l root galera1 'mysqldump -u root --databases db1 db2 db3' | mariadb -uroot --password=${PASSWORD} -h ${DBHOST}
mariadb -uroot --password=${PASSWORD} -h ${DBHOST} <<< 'show databases'
Import the users
Connect to the DB on the `mysql` database and copy/paste the users privileges from the modified user_privileges_final.sql file above.
mariadb -uroot --password=${PASSWORD} -h ${DBHOST} mysql
By following these steps, you can migrate your databases from MariaDB to the Galera Cluster running on your Kubernetes environment with OpenEBS ZFSPV storage.
Backup
Here is an example of a backup staging on CephFS (using the CephFS CSI). It goes like this:
- Create a
galera-backup-pvcPVC on a highly available CephFS - Create a
galera-backup-cronjob
Example definitions
apiVersion: v1
kind: PersistentVolumeClaim
metadata:
  name: galera-backup-pvc
spec:
  accessModes:
    - ReadWriteMany
  resources:
    requests:
      storage: 5Gi
  storageClassName: csi-cephfs-sc
apiVersion: batch/v1
kind: CronJob
metadata:
  name: galera-backup-cronjob
  namespace: galera
spec:
  schedule: "0 6 * * *" # Runs daily at 6 AM
  jobTemplate:
    spec:
      template:
        spec:
          initContainers:
            - name: setup-permissions
              image: busybox
              command:
                - sh
                - "-c"
                - "chown -R 1001:1001 /backup"
              volumeMounts:
                - name: backup-data
                  mountPath: /backup
          containers:
            - name: galera-backup
              image: docker.io/bitnami/mariadb-galera:11.1.2
              command:
                - /bin/sh
                - -c
              args:
                - |
                  /opt/bitnami/mariadb/bin/mariadb-dump -h galera-mariadb-galera -uroot --password=${MARIADB_ROOT_PASS} --all-databases | gzip > /backup/MariaDB-Galera-AllDB_$(date +%Y%m%d-%Hh%M).sql.gz
              env:
                - name: MARIADB_ROOT_PASS
                  valueFrom:
                    secretKeyRef:
                      key: mariadb-root-password
                      name: galera-mariadb-galera
              volumeMounts:
                - name: backup-data
                  mountPath: /backup
          restartPolicy: Never
          volumes:
            - name: backup-data
              persistentVolumeClaim:
                claimName: galera-backup-pvc
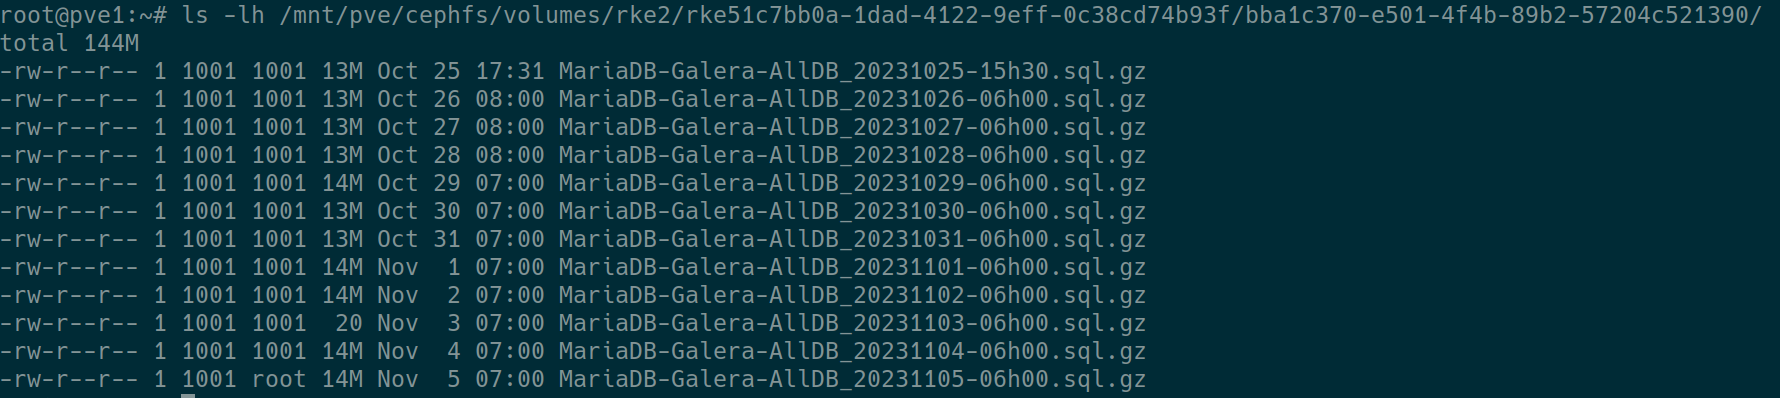
After few days, you can check directly from the CephFS
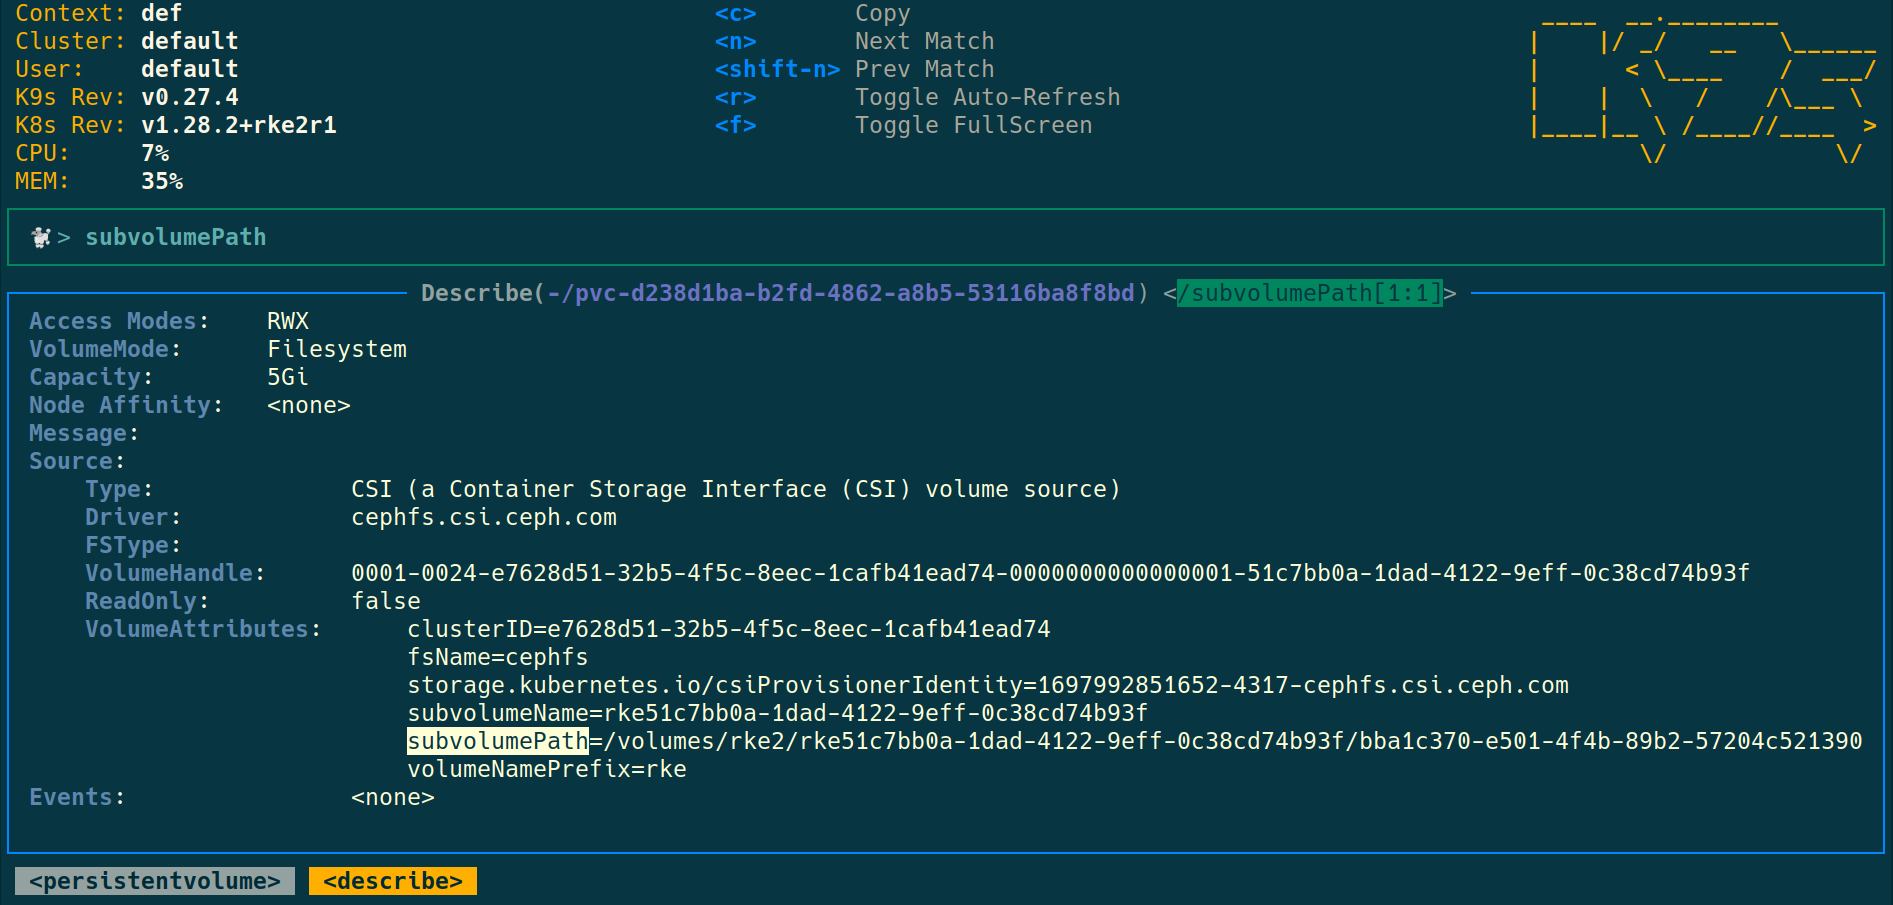
Get the subvolumePath from the PV description with CLI or k9s

Troubleshoot & fix
There are too many cases to cover, you must check Galera documentation and MariaDB documentation.
Nodes in CrashLoopBackOff
The 3 nodes can end up in a CrashLoopBackOff state for instance if you reboot all underlying Kubernetes nodes too fast or at the same time.
We will cover this case here, as this introduce general steps to troubleshoot Galera Helm. Check bootstraping a node other than 0
0. Check
You can start from k9s -n galera -c 'xray sts' or any other method.
- All Galera pods are in
CrashLoopBackOff - Check the PV & PVCs are bound
- Check the logs to find out which node has the
safe_to_bootstrap: 1
You can use the method from bootstraping a node other than 0, but most of the time you should easily find it by filtering onsafe_to_bootstrapin the logs withk9sorklo.
You identified the node it’s safe to bootstrap from.
1. No node has safe_to_boostrap: 1
This happens, and has been quite frequent for me. The fastest way to identify the node is by editing the sts, and checking the logs. Here is an example using stern and ripgrep.
Scale down and update the sts command of the first container
k scale sts galera-mariadb-galera --replicas 0
      - command:
        - bash
        - -ec
        - |
          mysqld --wsrep-recover --datadir=/bitnami/mariadb/data/; sleep 900; exit 0;
          exec /opt/bitnami/scripts/mariadb-galera/entrypoint.sh /opt/bitnami/scripts/mariadb-galera/run.sh
Actually, you just have to add the mysqld --wsrep-recover --datadir=/bitnami/mariadb/data/; sleep 900; exit 0; line, so you keep the other lines and can restore the sts by just removing it.
Scale up and check the logs
k scale sts galera-mariadb-galera --replicas 3
After some time, check the logs, you should have somthing like:
k stern -l app.kubernetes.io/instance=galera --no-follow 2>/dev/null |rg -i sequence
galera-mariadb-galera-1 mariadb-galera 2024-10-21 19:51:56 0 [Note] InnoDB: log sequence number 19233082498; transaction id 15688166
galera-mariadb-galera-0 mariadb-galera 2024-10-21 19:52:05 0 [Note] InnoDB: log sequence number 19233265111; transaction id 15686343
galera-mariadb-galera-2 mariadb-galera 2024-10-21 19:52:02 0 [Note] InnoDB: log sequence number 19232870148; transaction id 15688562
As you can see here, we have to bootstrap from the node 0.
Do not forget to scale down, and remove the wsrep-recover line.
2. Snapthot the PVs
Make sure you have a fresh backup of the DB. You can also take a snapshot of the local PVs before uninstalling the Galera helm chart. Make sure you have added the VolumeSnapshotClass CRD (kg volumesnapshotclass) as described above or do it now.
For each worker/node, create a VolumeSnapshot definition such as the example data-galera-mariadb-galera-0-snapshot.yaml here:
---
apiVersion: snapshot.storage.k8s.io/v1
kind: VolumeSnapshot
metadata:
  name: data-galera-mariadb-galera-0-snap
spec:
  volumeSnapshotClassName: zfspv-snapclass
  source:
    persistentVolumeClaimName: data-galera-mariadb-galera-0
Create a snapthot nof each of the 3 nodes PVCs with the above template.
ka data-galera-mariadb-galera-0-snapshot.yaml
ka data-galera-mariadb-galera-1-snapshot.yaml
ka data-galera-mariadb-galera-2-snapshot.yaml
Or if you prefer to do all at once, create all 3 `VolumeSnapshot` in a single file and apply with a bash command like:
for x in {0..2}; do cat <<EOF >> data-galera-mariadb-galera-VolumeSnapshots.yaml; done;
---
apiVersion: snapshot.storage.k8s.io/v1
kind: VolumeSnapshot
metadata:
  name: data-galera-mariadb-galera-$x-snap
spec:
  volumeSnapshotClassName: zfspv-snapclass
  source:
    persistentVolumeClaimName: data-galera-mariadb-galera-$x
EOF
ka data-galera-mariadb-galera-VolumeSnapshots.yaml
Then check with for instance:
kgn openebs zfssnap
ansible workers -a 'zfs list -t all'  # You should see PVCs with ...@snapshot-... and the current diff size close to 0
kubectl get volumesnapshot.snapshot
kgoyaml volumesnapshot.snapshot data-galera-mariadb-galera-0-snap
kgoyaml volumesnapshot.snapshot data-galera-mariadb-galera-0-snap | yq '.status.readyToUse'
Make sure the volumesnapshots are in READYTOUSE state.

3. Re-install Galera Helm chat
Store the passwords (Important)
This step is really important, since you won’t be able to get them after you uninstall galera, and you must re-use the same passwords because it’s also stored in the DB.
export MARIADB_ROOT_PASSWORD=$(kubectl get secret --namespace "galera" galera-mariadb-galera -o jsonpath="{.data.mariadb-root-password}" | base64 -d)
export MARIADB_GALERA_MARIABACKUP_PASSWORD=$(kubectl get secret --namespace "galera" galera-mariadb-galera -o jsonpath="{.data.mariadb-galera-mariabackup-password}" | base64 -d)
Re-install Galera helm chart and force Bootstrap from a healthy node
Make sure you saved the passwords !!! (above step)
In this case this is the node 0 I need to bootstrap from:
helm uninstall galera
helm install galera oci://registry-1.docker.io/bitnamicharts/mariadb-galera  \
  -f mariadb-galera-custom-values.yaml \
  --version 10.0.1 \
  --set rootUser.password=$MARIADB_ROOT_PASSWORD \
  --set galera.mariabackup.password=$MARIADB_GALERA_MARIABACKUP_PASSWORD \
  --set db.name=galera \
  --set galera.bootstrap.forceBootstrap=true \
  --set galera.bootstrap.bootstrapFromNode=0 \
  --set podManagementPolicy=Parallel
The installation will take back the previous PVCs and data, but force the bootstrapFromNode=0
Check the logs and database state. Somme commands:
klo -l 'app.kubernetes.io/name=mariadb-galera'
mariadb -uroot --password=${MARIADB_ROOT_PASSWORD} -h ${DBHOST} <<< "SHOW GLOBAL STATUS WHERE variable_name REGEXP 'wsrep_(cluster|apply|provider|incoming|received|local_state_comment|desync)'"
Remove the bootstrap options (important)
When the server is back in Sync again, remove the forceBootstrap and bootstrapFromNode options.
If you forget to do that, you’ll experience a split brain on the next node you bootstraped from node. (check below)
helm upgrade galera oci://registry-1.docker.io/bitnamicharts/mariadb-galera \
  -f mariadb-galera-custom-values.yaml \
  --set rootUser.password=$MARIADB_ROOT_PASSWORD \
  --set galera.mariabackup.password=$MARIADB_GALERA_MARIABACKUP_PASSWORD \
  --set db.name=galera \
  --set podManagementPolicy=Parallel
4. Remove the snapshots
After some days, feel free to remove the snapshots

One node in CrashLoopBackOff
You can restart a single Pod and/or reduce StatefulSet to the health Pod. When scaling down, StatefulSets by default delete pods in reverse order of their creation. So make sure the healthy Pod is the oldest one, or delete others accordingly.
If the scale down and scale up of the cluster does not heal the cluster, you might have to force the bootstrap.
Make sure first the cluster is not already in a force bootstrap mode : check the current values if the following parameters are set:
galera:
  bootstrap:
    bootstrapFromNode: 0
    forceBootstrap: true
I had a case where those settings were forgotten from a previous forceBootstrap: https://github.com/bitnami/containers/issues/54037
To fix, remove from values and helm upgrade as described above. The cluster should heal by itself.
Split Brain
Split brain is a dramatic situation where you are at high risk of loosing consistency. You experience a split brain when you have 2 independantly active clusters. This can happen on a Galera cluster if you forgot to remove the bootstrapFromNode option: when that node reboots, it will assume it’s the source node and will set itself as a primary, despite the 2 (or more) other nodes being in primary and quorum. Let’s assume a 3 nodes cluster. You can check with:
for pod in galera-mariadb-galera-{0..2}; do echo ""; echo "$pod"; echo "======================="; kubectl exec -i -t $pod -- mariadb -uroot --password=${PASSWORD} <<< "SHOW GLOBAL STATUS WHERE variable_name REGEXP 'wsrep_cluster'"; done;
This should output:
galera-mariadb-galera-0
=======================
Defaulted container "mariadb-galera" out of: mariadb-galera, metrics, preserve-logs-symlinks (init)
Unable to use a TTY - input is not a terminal or the right kind of file
Variable_name   Value
wsrep_cluster_weight    2
wsrep_cluster_capabilities
wsrep_cluster_conf_id   6
wsrep_cluster_size      2
wsrep_cluster_state_uuid        1ce9e8b6-e089-11ef-b7e2-062f7c924d57
wsrep_cluster_status    Primary

galera-mariadb-galera-1
=======================
Defaulted container "mariadb-galera" out of: mariadb-galera, metrics, preserve-logs-symlinks (init)
Unable to use a TTY - input is not a terminal or the right kind of file
Variable_name   Value
wsrep_cluster_weight    1
wsrep_cluster_capabilities
wsrep_cluster_conf_id   1
wsrep_cluster_size      1
wsrep_cluster_state_uuid        1ce9e8b6-e089-11ef-b7e2-062f7c924d57
wsrep_cluster_status    Primary

galera-mariadb-galera-2
=======================
Defaulted container "mariadb-galera" out of: mariadb-galera, metrics, preserve-logs-symlinks (init)
Unable to use a TTY - input is not a terminal or the right kind of file
Variable_name   Value
wsrep_cluster_weight    2
wsrep_cluster_capabilities
wsrep_cluster_conf_id   6
wsrep_cluster_size      2
wsrep_cluster_state_uuid        1ce9e8b6-e089-11ef-b7e2-062f7c924d57
wsrep_cluster_status    Primary
As you can see, we have 2 active clusters. One of 2/2 nodes, and one of 1/1 node. I experienced this situation after forgetting to remove the bootstrapFromNode option, not sure which configuration could trigger that. In this case it’s obviously the 1/1 cluster to remove (with the cluster_weight of 1). If you do not care about the data that could have been written to that cluster or if you already reconciled the writes you needed and have a backup, it’s all about removing the bootstrapFromNode option, and deleting the pod:
helm upgrade galera oci://registry-1.docker.io/bitnamicharts/mariadb-galera \
  -f mariadb-galera-custom-values.yaml \
  --set rootUser.password=$MARIADB_ROOT_PASSWORD \
  --set galera.mariabackup.password=$MARIADB_GALERA_MARIABACKUP_PASSWORD \
  --set db.name=galera \
  --set podManagementPolicy=Parallel
kubectl delete pod galera-mariadb-galera-1 # Since it's the one running the extra cluster of 1 node
k stern galera-mariadb-galera-1   # Monitor the node to ensure WSREP initiate a STATE EXCHANGE
You should also see in the logs
galera-mariadb-galera-1 mariadb-galera 2025-02-09 15:10:42 3 [Note] WSREP: Recovered view from SST:
galera-mariadb-galera-1 mariadb-galera   id: 1ce9e8b6-e089-11ef-b7e2-062f7c924d57:314400
galera-mariadb-galera-1 mariadb-galera   status: primary
galera-mariadb-galera-1 mariadb-galera   protocol_version: 4
galera-mariadb-galera-1 mariadb-galera   capabilities: MULTI-MASTER, CERTIFICATION, PARALLEL_APPLYING, REPLAY, ISOLATION, PAUSE, CAUSAL_READ, INCREMENTAL_WS, UNORDERED, PREORDERED, STREAMING, NBO
galera-mariadb-galera-1 mariadb-galera   final: no
galera-mariadb-galera-1 mariadb-galera   own_index: 2
galera-mariadb-galera-1 mariadb-galera   members(3):
galera-mariadb-galera-1 mariadb-galera  0: df4dd184-df54-11ef-a121-8af5953fc294, galera-mariadb-galera-0
galera-mariadb-galera-1 mariadb-galera  1: e5946d32-e6f7-11ef-a57f-d620b95009c7, galera-mariadb-galera-2
galera-mariadb-galera-1 mariadb-galera  2: ec943b14-e6f7-11ef-bb76-dfa5a9856b23, galera-mariadb-galera-1
Further reading
- Backups
- Get familiar with Galera semi-syncrhonous replication & wsrep documentation
- Kubeapps is a fantastic tool, and we could have deployed the mariadb-galera stack with it. If not already using it, check it.
Conclusion
Migrating databases from one server to another can be a complex task, but with the right tools and careful planning, it can be accomplished efficiently. In this article, provided new local block storage to each worker, prepared the ZFS Operator, installed the Galera Cluster using Helm, and outlined the general steps to migrate the data from a MariaDB server to the new Galera Cluster on a 3-node Kubernetes server. This process can provide you with a highly available and scalable database solution for your containerized applications.