
Context:
Add slower & higher latency HDD to an SSD only Ceph cluster. I’ve chosen to add the slow disks to the existing cluster instead of creating another dedicated cluster. But since HDD and SSD are mixed, we need some tuning in order to limit the impact on cluster performance.
In the below example, I’ll use the HDD exclusively for a cephfs pool. The other pools needs to be allocated to SSD.
This is possible since Ceph has several features to manage this case, and especially:
- Create RADOS rules to allocate each pool to a storage class
- Create and enable SSD cache tiering for the pools that have been allocated to HDD
Some months ago, I had a cluster completely stuck because of pg relocation filled remaining nodes after a node failure. I needed to start the cluster in order to free up some space, but the cluster refused to start. I’ve been saved by LVM and the option to just add a bit of space to the underlying volume. So the configuration here uses LVM for all underlying volumes. If interested, check the full case.
In the below example, we have 3 LVM volume groups:
- pve : This is the default volume group created by Proxmox VE on 512GB NVMe M.2 SSDs. NVMe is the hardware boot device, the fastest, but also the smallest. In order to balance IOs and get better performances, I always create a small volume for the Ceph DB for each OSD. This is an extra step detailed below that can give you extra performances. Reserve about 1 to 4% of the main volume size, and Ceph will use it to store the DB and WAL (write ahead logs). This is especially important here, since we’re adding slower disks. Check documentation for sizing and more.
- patriot-vg : A volume group with 1TB SATA SSDs
- USB : The new volume group with 5TB HDDs we’re adding to the Ceph cluster in the following procedure
You might want some GUI to monitor the cluster, there are several options including:
- If you’re using Proxmox VE, you already have a nice integrated interface. It’s basic, but usually good enough.
- If you have Prometheus, you can enable Ceph mgr exporters, and use pre-defined Grafana dashboards. That’s my favourite.
- You can enable the Ceph included dashboard. I never felt the need for it, but it’s also an excellent option with lots of details.
Update 202305
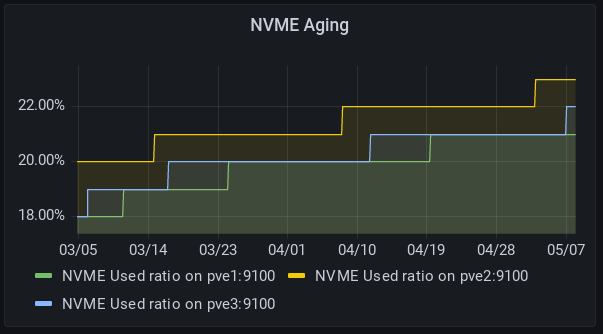
After using this solution successfully for months, I decided to switch to full NVMe, and remove the cache tier because it was aging my low-end SSDs quite quickly, and even if it worked well, there was still some slow IOs. SSD Aging:
But I got into trouble to remove the tier cache. C.f. reported Ceph Issue. Finally, I took a fresh backup, then
cephfs-journal-tool journal inspect --rank=cephfs:all     # To check that the journal was sill OK, and it was.
ceph osd tier cache-mode cephfs_data_cache readproxy
rados -p cephfs_data_cache cache-flush-evict-all
ceph osd tier remove-overlay cephfs_data                  # Despite the errors (c.f. issu), and immediately after.
Then took a second backup to check all files are readable, then
ceph osd tier remove cephfs_data cephfs_data_cache
The ceph cache tiering seems not much maintained, nor documented. So, I would not recommend this solution any more. Go for full SSDs or create different pools on different storage classes.
0. Prerequisites
- You already plugged the HDD on each node, you created the physical volume (pvcreate), and a vggroup for them. In the below example, the vggroup is named USB since I added USB drives. So on each node, something like:
pvcreate /dev/disk/by-partuuid/bde9f1bc-6b64-d448-90f9-4a13e14e8545
vgcreate USB /dev/disk/by-partuuid/bde9f1bc-6b64-d448-90f9-4a13e14e8545- You have some free RAM to run an additional OSD. Each OSD consumes RAM. In my case, I limited the OSDs to 4GB of RAM. You can get or set for each osd:
ceph config get osd.x osd_memory_target_autotune
ceph config get osd.x osd_memory_target
1. Add the HDD to the Ceph cluster and allocate pools to storage classes (on each node)
If not already done, create the logical volume (on each node) with the desired size. For future flexibility, I never create LV that are more than half of the size of the underlying storage device. Let’s create a new cephusbdata1 volume of 2TB in the USB volume group:
lvcreate -L 2000G -n cephusbdata1 USBAlso create a smaller volume on NVMe fast storage to be used as DB. If you do not provide any block.db volume, ceph will store the DB and WALs on the same device. So this is optional, but I highly recommend it if you can. Here 80 GB is 4% of 2000 GB
lvcreate -L 80G -n bluestore-db-usb1 pveLet’s prepare the Ceph volume with the –data and optionally the block.db
ceph-volume lvm prepare --data USB/cephusbdata1 --block.db pve/bluestore-db-usb1Write down the osd number. It’s different for each node.
From now, you can optionally set the ‘norebalance’ flag to prevent PG to be rebalanced to the newly added drives before setting the CRUSH map rules.
ceph osd set norebalanceThis will turn the ceph health to WARN
root@pve3:~# ceph status
  cluster:
    id:     e7628d51-32b5-4f5c-8eec-1cafb41ead74
    health: HEALTH_WARN
            norebalance flag(s) set
In order to “Activate” the new ceph volume, you must get the fsid from the osd config folder. (Replace the {x} with the osd number)
cat /var/lib/ceph/osd/ceph-{x}/fsidThen activate the the volume
ceph-volume lvm activate <osd number> <fsid>
Example for one of my OSD (the number 8)
root@pve2:~# cat /var/lib/ceph/osd/ceph-8/fsid
affe1803-8d02-4301-84b1-11f6d7716138
root@pve2:~# ceph-volume lvm activate 8 affe1803-8d02-4301-84b1-11f6d7716138
If you did not set the ‘norebalance’ flag, the cluster will start rebalancing the PGs. You can monitor with ceph status or GUI.
Allocate the pools to device class hdd/ssd (on one of the mgr nodes)
Now create the device classes and rules. In my case, the classes were properly detected and created by Ceph. Check:
root@pve2:~# ceph osd crush class ls
[
    "ssd",
    "hdd"
]
root@pve2:~# ceph osd crush class ls-osd ssd
0
1
2
3
4
5
root@pve2:~# ceph osd crush class ls-osd hdd
6
7
8
root@pve2:~#
We can see the 3 new OSD numbers in the hdd device class
Now, let’s give a device class for each pool. In my case, only the cephfs-data needs to be in the hdd class, the others must be in the ssd class. First create the new rules named hot and warm:
ceph osd crush rule create-replicated hot default host ssd
ceph osd crush rule create-replicated cold default host hdd
Then allocate the new rules to pools according to your needs in the example, only the “cephfs_data” pool will use the “cold” rule :
ceph osd lspools # To just list pools
ceph osd pool set cephblock crush_rule hot
ceph osd pool set cephfs_metadata crush_rule hot
ceph osd pool set device_health_metrics crush_rule hot
ceph osd pool set cephfs_data crush_rule cold
Optional – Create a cache tiering
ceph osd pool create cephfs_data_cache 32
ceph osd tier add cephfs_data cephfs_data_cache
ceph osd tier cache-mode cephfs_data_cache writeback
ceph osd tier set-overlay cephfs_data cephfs_data_cache
From now, you should see read/write on the new cephfs_data_cache.
Configure it to use only SSDs (using the hot RADOS rule)
ceph osd pool set cephfs_data_cache crush_rule hotAdd the parameters
ceph osd pool set cephfs_data_cache hit_set_type bloom
ceph osd pool set cephfs_data_cache hit_set_count 6
ceph osd pool set cephfs_data_cache hit_set_period 7200
ceph osd pool set cephfs_data_cache hit_set_fpp 0.02
ceph osd pool set cephfs_data_cache cache_target_dirty_ratio 0.6
ceph osd pool set cephfs_data_cache cache_target_dirty_high_ratio 0.7
ceph osd pool set cephfs_data_cache cache_target_full_ratio 0.85
ceph osd pool set cephfs_data_cache target_max_bytes 200000000000
ceph osd pool set cephfs_data_cache min_read_recency_for_promote 0   # Any read will be cached, including when running backups
ceph osd pool set cephfs_data_cache min_write_recency_for_promote 0  # Any write will be cached
I do not use the same, but the parameters are described in the excellent video from Daniel Persson
The above settings are just a first option to try. It depends mainly on your RAM, and the size of your cache. If you have more RAM, you can adapt for instance
ceph osd pool set cephfs_data_cache hit_set_count 12
ceph osd pool set cephfs_data_cache hit_set_period 14400
ceph osd pool set cephfs_data_cache hit_set_fpp 0.01
With the above settings, I ended up with a lot of swap usage, so it all depends of your memory. With 64GB Ram and not too many processes, you can probably go for it. In my case, with 48GB shared across 3 OSDs with a target memory of 4GB, the caching, and several processes such as ElasticSearch, I was a bit too short on RAM. Anyway, check your cache pool usage, and your memory usage/swap.
From my understanding, the statistics to know if it’s cache or not a running for the about of hit_set_count * the hit_set_period. In this case, it’s about 2 days (12*14400s). So feel free to play with those numbers.
ceph osd unset norebalanceIf you did set the norebalance, do not forget to clear that flag