
OKD (previously known as OpenShift Origin) is the open-source, community-driven version of OpenShift.
It provides a platform for managing containerized applications and includes features such as a web console and command-line interface for easy management and monitoring of the cluster and applications.
If you want to run an OKD OpenShift cluster on bare-metal or manually provisioned VMs, you’re on the right page.
This tutorial, provided scripts & container is for you to get up and running with OKD as fast as possible.
Installing an OKD cluster can take a lot of time, so I wanted this guide to be as practical as possible. You should be able to get it up & running in a couple of hours.
The Installing a user-provisioned cluster on bare metal documentation is the closest reference for this tutorial.
I’ll use ProxmoxVE, and manual IP addressing (no DHCP). It’s similar to a bare-metal deployment with ISO images. So feel free to use any VM hypervisor or bare-metal.
Sizing
I faced a number of problems while installing OKD, mostly related to lack of resources.
OKD is greedy. If you can’t affort the minimum resources, just move to a resource friendly Kubernetes ochrestrator such as K3S, RKE or RKE2 from SUSE Rancher.
- 100 GB disk
- 4 vCPU
- 16 GB RAM
Keep in mind that unlike for other Kubernetes distributions, you really need those resources, otherwise the installation will fail in unpredictable way as all the pods won’t start (DiskPressure, MemoryPressure, …). The only resource that you can lower is the initial disk space if it’s just for testing. Also keep in mind that those resources are just for starting the cluster, you must add required resources for the workloads you want to run on it. Forewarned is forearmed.
Sizing for production
The main differences if you plan a production setup :
- Run dedicated workers (at least 2, better 5 or more), and make the masters «non-schedulable», but not too many. You need the balance between :
- A sufficient number of worker nodes to avoid too many re-balance in case of failure.
- But not too many small worker nodes that would make the scheduler unable to schedule a new workload requiring significant resources.
- In short, start with 3 or 5 Masters and 5 to 7 Workers, then monitor and grow vCPU and RAM instead of multiplying 16 GB Ram nodes. Only add new Worker nodes when you reach 20-25% RAM & Disk from the underlying hardware.
- Budget is finite. IMHO better spend it in high-end servers with plenty of ECC RAM and a bunch of good mid-range direct attached NVMe Disks than on virtualization solutions with high licences and replicated SAN costs. You do not need nor want any «live migration» or «replicated snapshots» here, nor any advanced functionality. Just space, CPU count & performance, high disk I/O, high network I/O, low latencies at each level, and local snapshots before upgrades. Still have budget ? Invest in a low latency network.
- If you’re still reading, you probably care about High Availability: 3 equivalent sites, 3 dedicated networks. Keep away from any stretch cluster/network/storage or whatever stretched. Backup only things you cannot rebuild quickly, to the next site or off-site. A DR test is everything but «VM migrations» and should succeed to a power off of each power feed alternatively to validate your power distribution, then power off of the 2 power feeds (total power off) to validate the components fail-over. Sorry, I’ve seen so many «DR» Tests miles away from a «D» and a «R», with reports just good enough to keep the myth alive or to justify unnecessary spendings.
Prerequisites
- An SSH public key
- Admin access to the local DNS with reverse DNS (examples for Bind9)
- RedHat account to get the Pull Secret, plase the key in a pullSecret.txt file.
- This tutorial can be used for OCP as well. In this case you also need the RedHat account to download software and the activation key from the bare-metal user-provisioned download page :
https://cloud.redhat.com/openshift/install/metal/user-provisioned - A Linux workstation (or VM) to run the
openshift-installinstaller. This workstation must also be accessible from the cluster, since you’ll run a web server on it to provide ignition files to the CoreOS and scripts. Preferably in the same network. - Hypervisor for 4-10 VMs
Description of the existing environment
- pve1-pve3 : 3 nodes running ProxmoxVE VM management platform, free version. Feel free to use any other or use bare-metal. Each node has a direct attach SSD that will be used for the 3 OKD nodes (one OKD node on each physical server). Each node has direct attach SSD for better performances. (
localblockdevice) - burns1-burns2 :2 VMs running HAProxy and Keepalived for failover. This won’t be described in this tutorial, but you’ll get the haproxy.cfg used as a template. You need at least 1 HAProxy node.
- dns1-dns3 : 3 VMs running DNS Server : Out of scope for this tutorial, only the Bind9 DNS configuration will be provided.
- 1 Linux workstation with docker.io (in a different network).
Description of the OKD setup
- 1 Bootstrap node in VM. The bootstrap node can be removed when the cluster is up.
- 3 Master Nodes in VMs. The Masters “Schedule-able” so we do not need additional workers, but we can add them later.
Each VM :
- Will run Fedora CoreOS – FCOS (or RedHat CoreOS – RHCOS if you’re installing OCP)
- 16GB RAM / 4 vCPUs / 30GB Disk Space
- In a dedicated VLAN with tag 66.
The Bootstrap node will run on cephblock device to save some direct attached SSD for the Masters, and maybe later for the Workers.
Setup of the DNS
It’s key to have both forward and reverse DNS resolution. Here is a bind9 configuration. Feel free to adapt to your network settings & DNS.
All the nodes must be in a subdomain with the same name as the cluster. I use okd as the cluster name and subdomain.
Zone files definitions
Example on a DNS cluster of 3 nodes (you can see the “also-notify” parameters to replicate the DNS zones to secondary servers).
root@dns1:~# egrep ^[^/] /etc/bind/named.conf.local
zone "home.pivert.org" IN {
        type master;
        file "home.pivert.org";
        allow-update { none; };
        notify yes;
        also-notify {192.168.10.32; 192.168.10.33;};
};
zone "168.192.in-addr.arpa" IN {
        type master;
        file "home.pivert.org.rev";
        allow-update { none; };
        notify yes;
        also-notify {192.168.10.32; 192.168.10.33;};
};
Forward DNS definitions
root@dns1:~# egrep -B1 -A1 192.168.66\.[67][[:digit:]] /var/cache/bind/home.pivert.org
; VLAN 66 - OKD or OCP / RedHat OpenShift Container Platform
haproxy                 IN      A       192.168.66.69
helper                  IN      A       192.168.66.69
helper.okd              IN      A       192.168.66.69
;
; The api identifies the IP of your load balancer.
api.okd                 IN      A       192.168.66.69
api-int.okd             IN      A       192.168.66.69
;
; The wildcard also identifies the load balancer.
*.apps.okd              IN      A       192.168.66.69
;
; Create an entry for the bootstrap host.
bootstrap.okd           IN      A       192.168.66.75
;
; Create entries for the master hosts.
master0.okd             IN      A       192.168.66.70
master1.okd             IN      A       192.168.66.71
master2.okd             IN      A       192.168.66.72
Reverse DNS
root@dns1:~# egrep ^[67][[:digit:]]\.66[[:space:]] /var/cache/bind/home.pivert.org.rev
69.66   IN      PTR     haproxy.home.pivert.org.
69.66   IN      PTR     helper.home.pivert.org.
69.66   IN      PTR     helper.okd.home.pivert.org.
69.66   IN      PTR     api.okd.home.pivert.org.
69.66   IN      PTR     api-int.okd.home.pivert.org.
75.66   IN      PTR     bootstrap.okd.home.pivert.org.
70.66   IN      PTR     master0.okd.home.pivert.org.
71.66   IN      PTR     master1.okd.home.pivert.org.
72.66   IN      PTR     master2.okd.home.pivert.org.
Prepare your workstation environment
We will use Seashell : a terminal workstation with preinstalled oc, kubectl, helm and many other tools, then clone the okd-install git repository.
P.S.: to get the same colour & font, configure your terminal for solarized dark colour scheme and use Hack font or a Nerd font.
mkdir tmp
cd tmp
curl -O https://gitlab.com/pivert/seashell/-/raw/main/seashell && chmod u+x seashell
./seashell -t 2.78 -o '-p 8000:8000'
You should get :

You should check that :
- You have kept your local user (pivert in this case)
- You can list the previously downloaded seashell script, this just means that the docker properly mounted your previous working diretory (tmp/) to /workdir.
- You passed the
-p8000:8000port to the docker container since this port will be used later to serve.ignandnet.shfiles.
DNS checks
Adapt the example commands to double check your DNS settings :
- Check forward entries (A records)
- Check reverse entries (PTR records)
- Check the cluster IP (on all your DNS servers, here from .31 to .33 since I have 3 DNS)
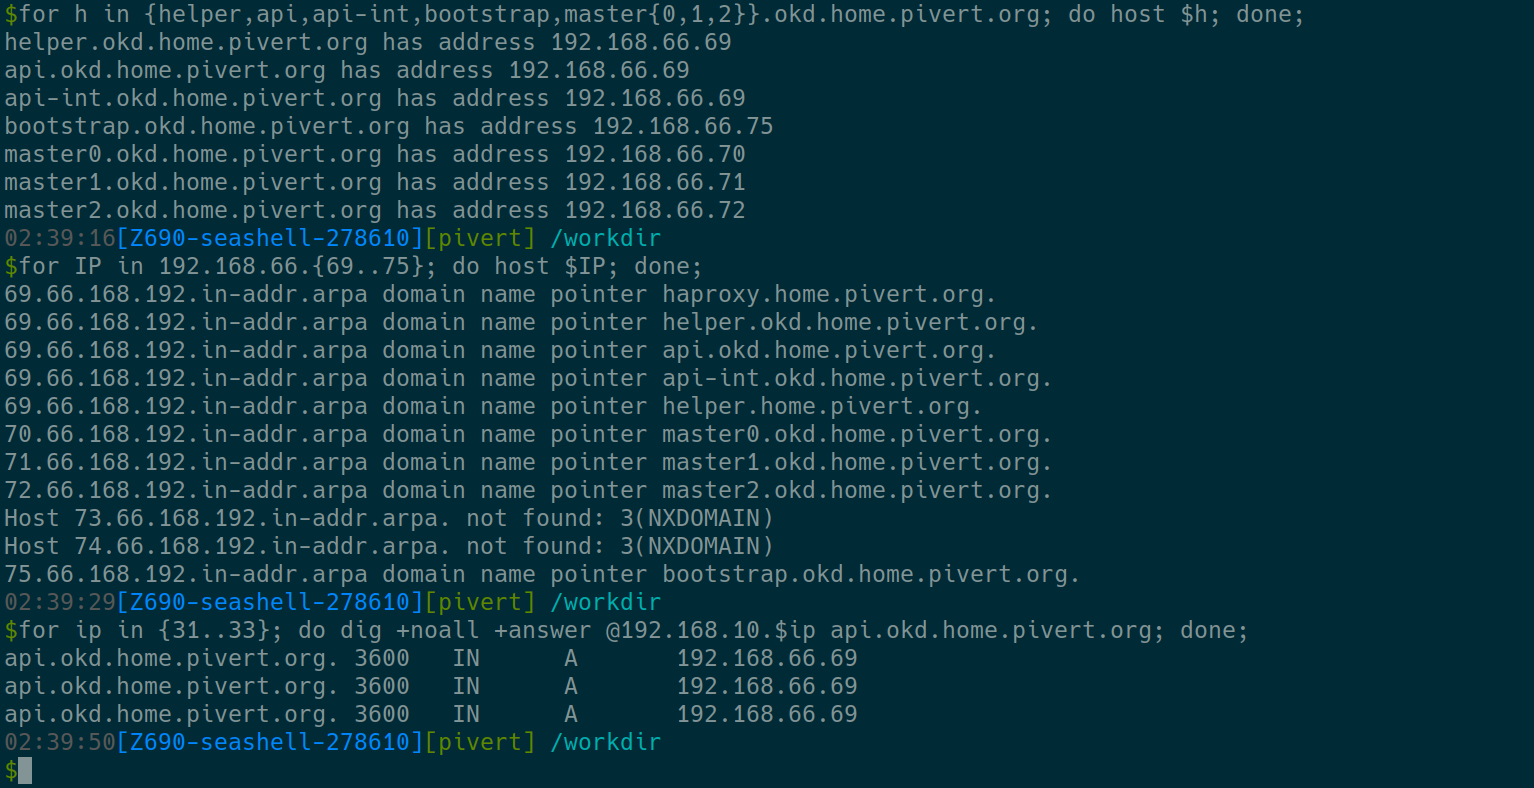
When you’re confident with your DNS settings, proceed to next step.
Set up the VMs and boot the Fedora CoreOS installation CD/DVD
Download FCOS for your HW or VM from https://getfedora.org/coreos/download?tab=metal_virtualized&stream=stable&arch=x86_64 and boot it on all the nodes. Since there is no DHCP, we will have to configure the first network settings manually using nmcli (Check below). If you’re using Proxmox, copy the ISO to your iso repository (i.e. /mnt/pve/cephfs/template/iso/ )
If you use PVE, you can either use the Web UI, or use the commands explained below.
Clone the git repository
git clone https://gitlab.com/pivert/okd-install.git
ProxmoxVE section (skip if you’re using another hypervisor)
First check for free vmids. I will use vmids from 310 to 315 for this lab, and I created a pool named «okd». You can also create it from command line : pvesh create /pools --poolid okd
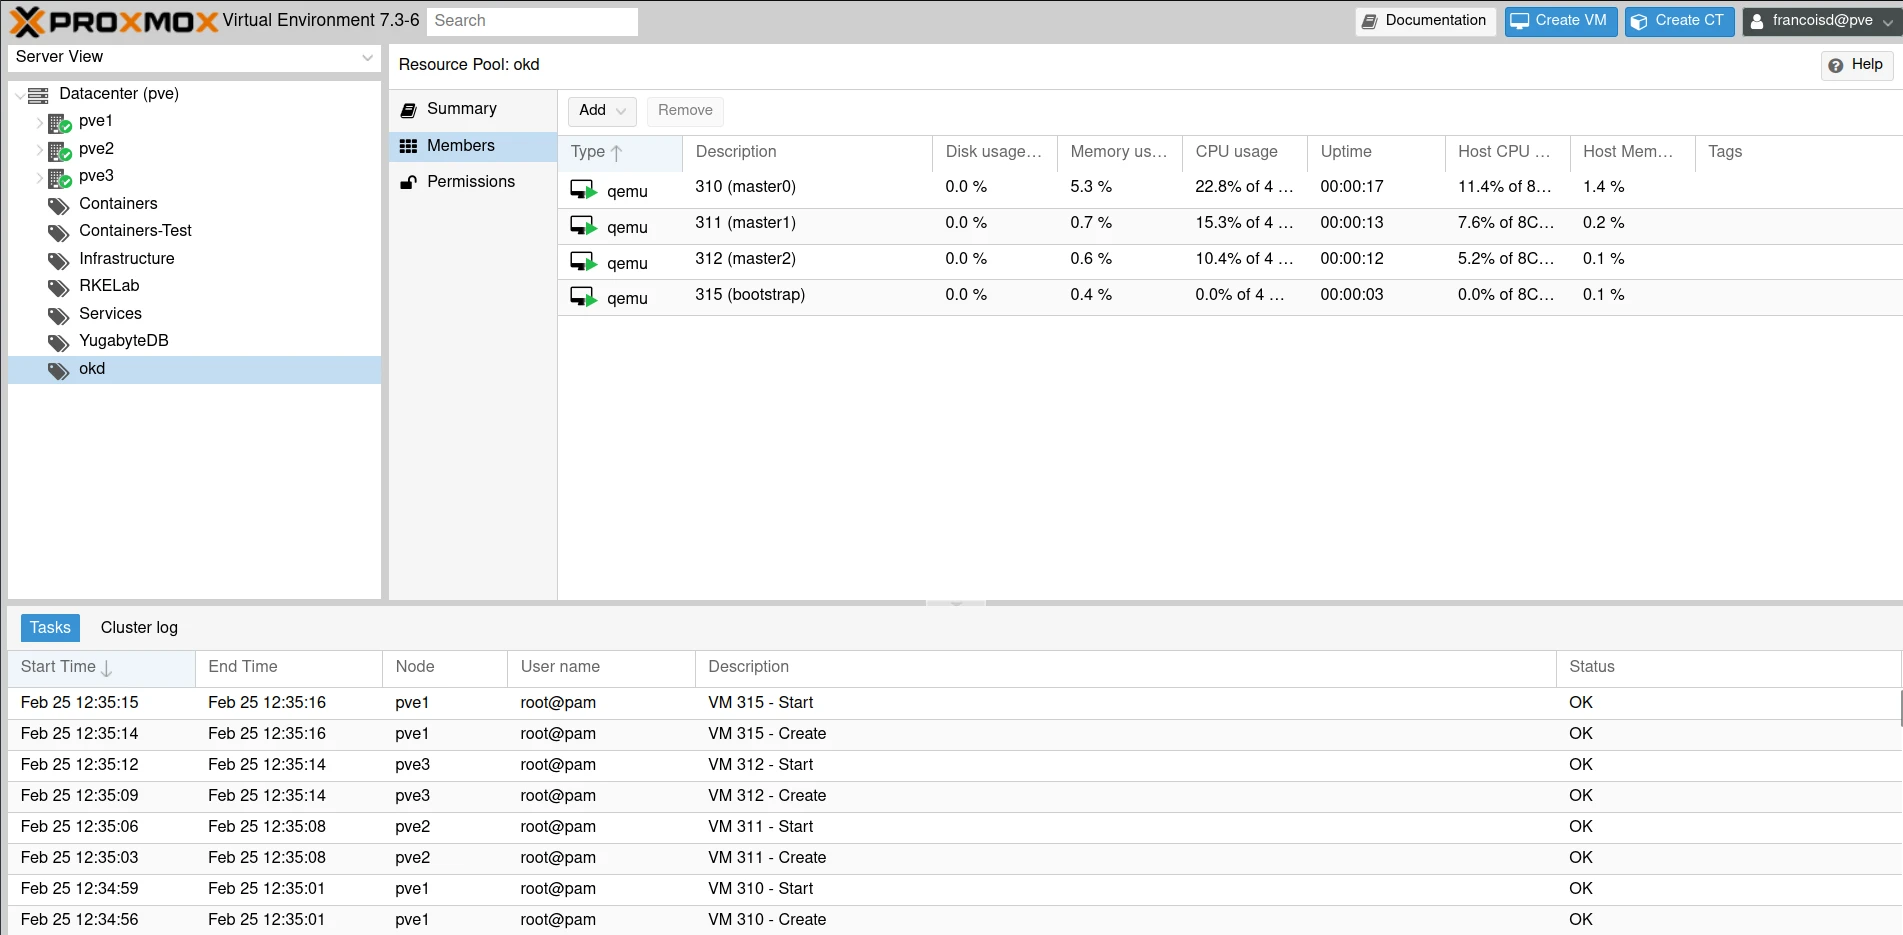
Now create the VMs and boot them, either via GUI or with a command like. The commands can be generated from the ./pvesh_commands.py script, and should be executed on one of the ProxmoxVE server. When satisfied with the output, you can pipe it through ssh. Here I send the commands to pve1, my first ProxmoxVE server.
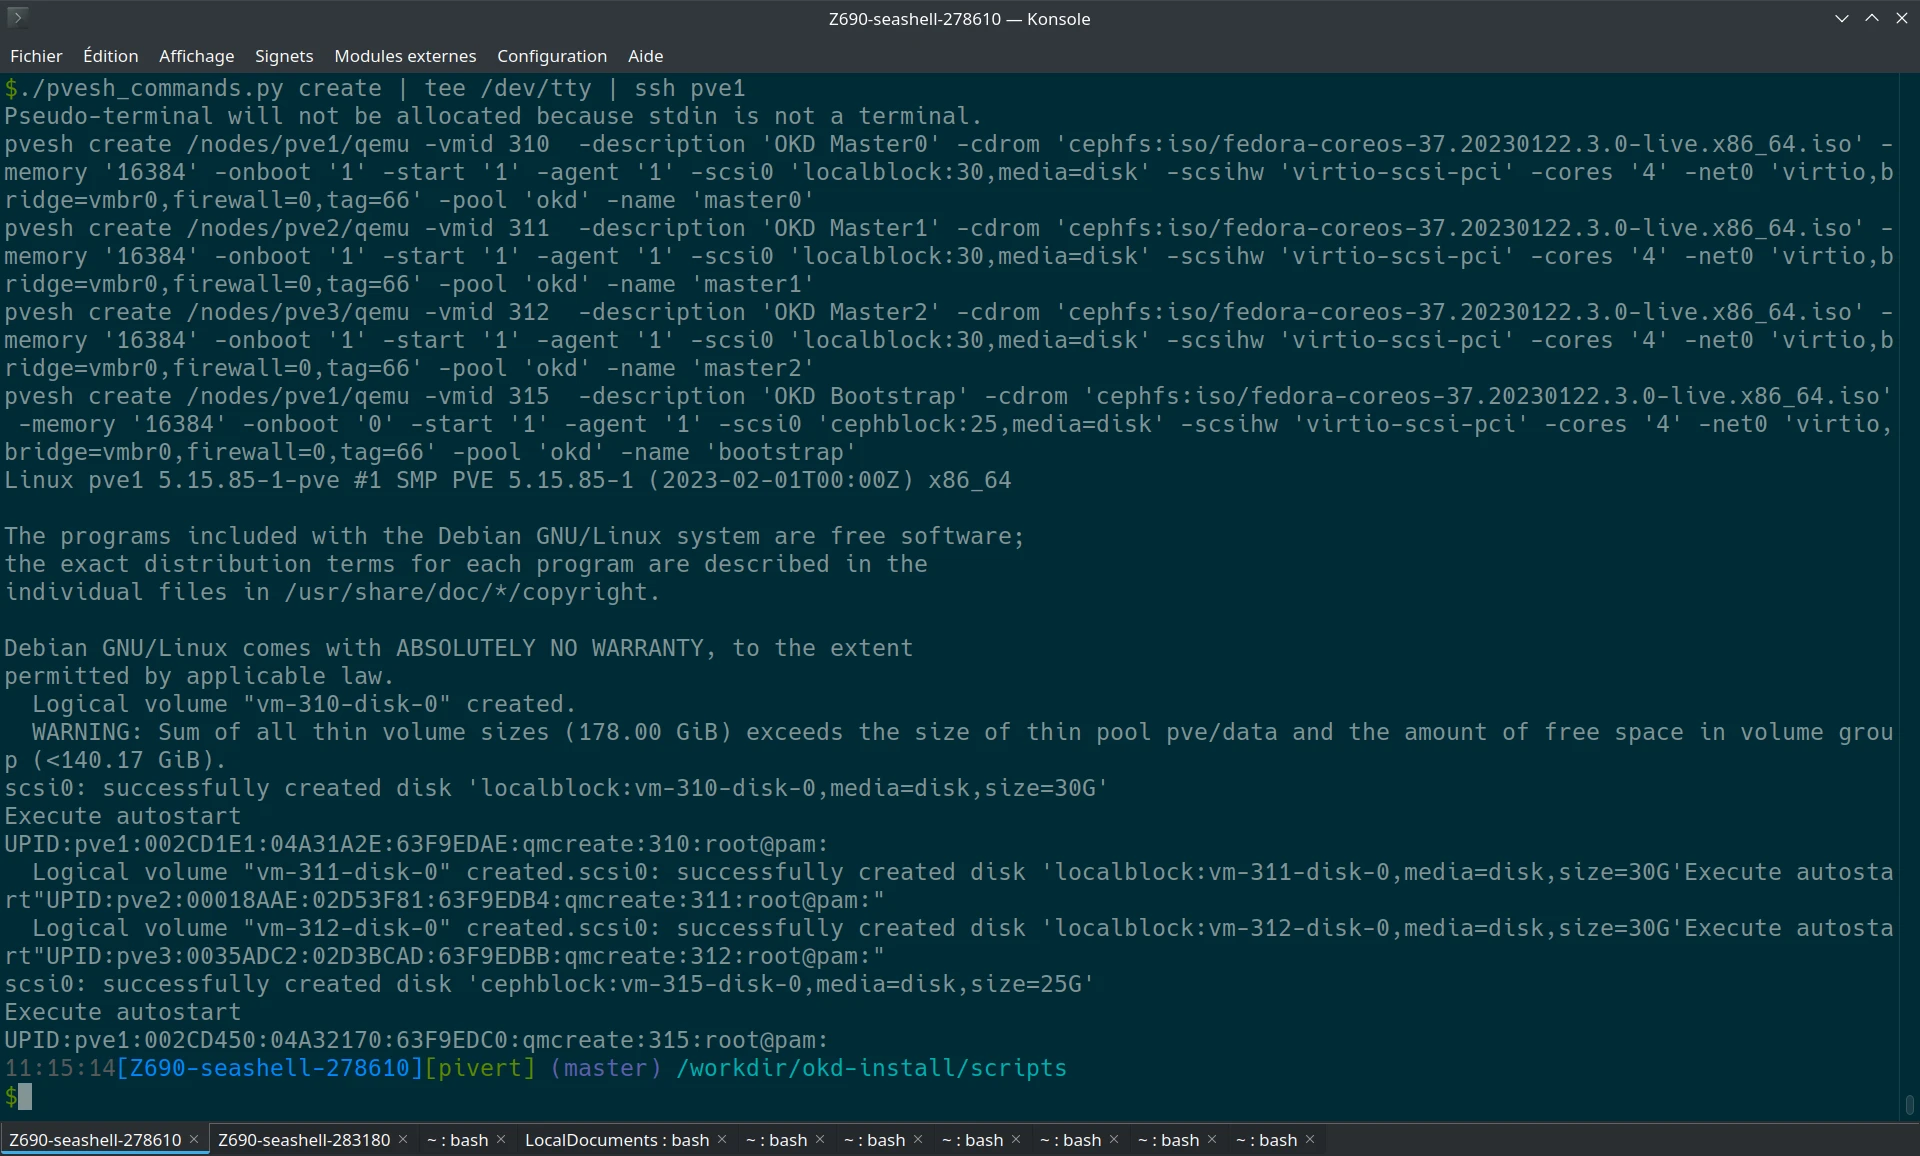
The qemu agent is enabled, it will start automatically on CoreOS and you’ll see the Guest Agent information in Proxmox.
If you want to restart from scratch later, you can delete all the VMs with similar command.
./pvesh_commands.py delete | tee /dev/tty | ssh pve1
As the VMs (or bare metal nodes) are booted and ready, we will postpone the configuration and installation to a later stage with some manual commands and a script.
Setup of the HAProxy load-balancer
Because of the TLS, it’s easier with a layer 4 configurations. For the port 6443, the service check must be https, even if the transport is TCP.
Start from HAProxy config in example/haproxy.cfg
Change the admin password.
global
  log         127.0.0.1 local2
  pidfile     /var/run/haproxy.pid
  maxconn     4000
  daemon
defaults
  mode                    http
  log                     global
  option                  dontlognull
  option http-server-close
  option                  redispatch
  retries                 3
  timeout http-request    10s
  timeout queue           1m
  timeout connect         10s
  timeout client          1m
  timeout server          1m
  timeout http-keep-alive 10s
  timeout check           10s
  maxconn                 3000
frontend stats
  bind :1936
  mode            http
  log             global
  maxconn 10
  stats enable
  stats hide-version
  stats refresh 30s
  stats show-node
  stats show-desc Stats for OKD cluster
  stats auth admin:zu6eiX2e
  stats uri /stats
listen api-server-6443
  bind 192.168.66.69:6443
  mode tcp
  option httpchk HEAD /readyz
  http-check expect status 200
  option ssl-hello-chk
  # Comment out the next line once the bootstrap process is finished
  server bootstrap 192.168.66.75:6443 check inter 1s backup
  server master0 192.168.66.70:6443 check inter 1s
  server master1 192.168.66.71:6443 check inter 1s
  server master2 192.168.66.72:6443 check inter 1s
listen machine-config-server-22623
  bind 192.168.66.69:22623
  mode tcp
  # Comment out the next line once the bootstrap process is finished
  server bootstrap 192.168.66.75:22623 check inter 1s backup
  server master0 192.168.66.70:22623 check inter 1s
  server master1 192.168.66.71:22623 check inter 1s
  server master2 192.168.66.72:22623 check inter 1s
listen ingress-router-443
  bind 192.168.66.69:443
  mode tcp
  balance source
  server master0 192.168.66.70:443 check inter 1s
  server master1 192.168.66.71:443 check inter 1s
  server master2 192.168.66.72:443 check inter 1s
listen ingress-router-80
  bind 192.168.66.69:80
  mode tcp
  balance source
  server master0 192.168.66.70:80 check inter 1s
  server master1 192.168.66.71:80 check inter 1s
  server master2 192.168.66.72:80 check inter 1s
Please note that I redirect the ports 80 and 443 on the master nodes, because we will run workloads on those nodes instead of dedicated workers.
If you have dedicated workers nodes, you must redirect those ports to the worker nodes.
Check config and restart
root@haproxy:~# haproxy -c -f /etc/haproxy/haproxy.cfg
Configuration file is valid
root@haproxy:~# systemctl restart haproxy.service
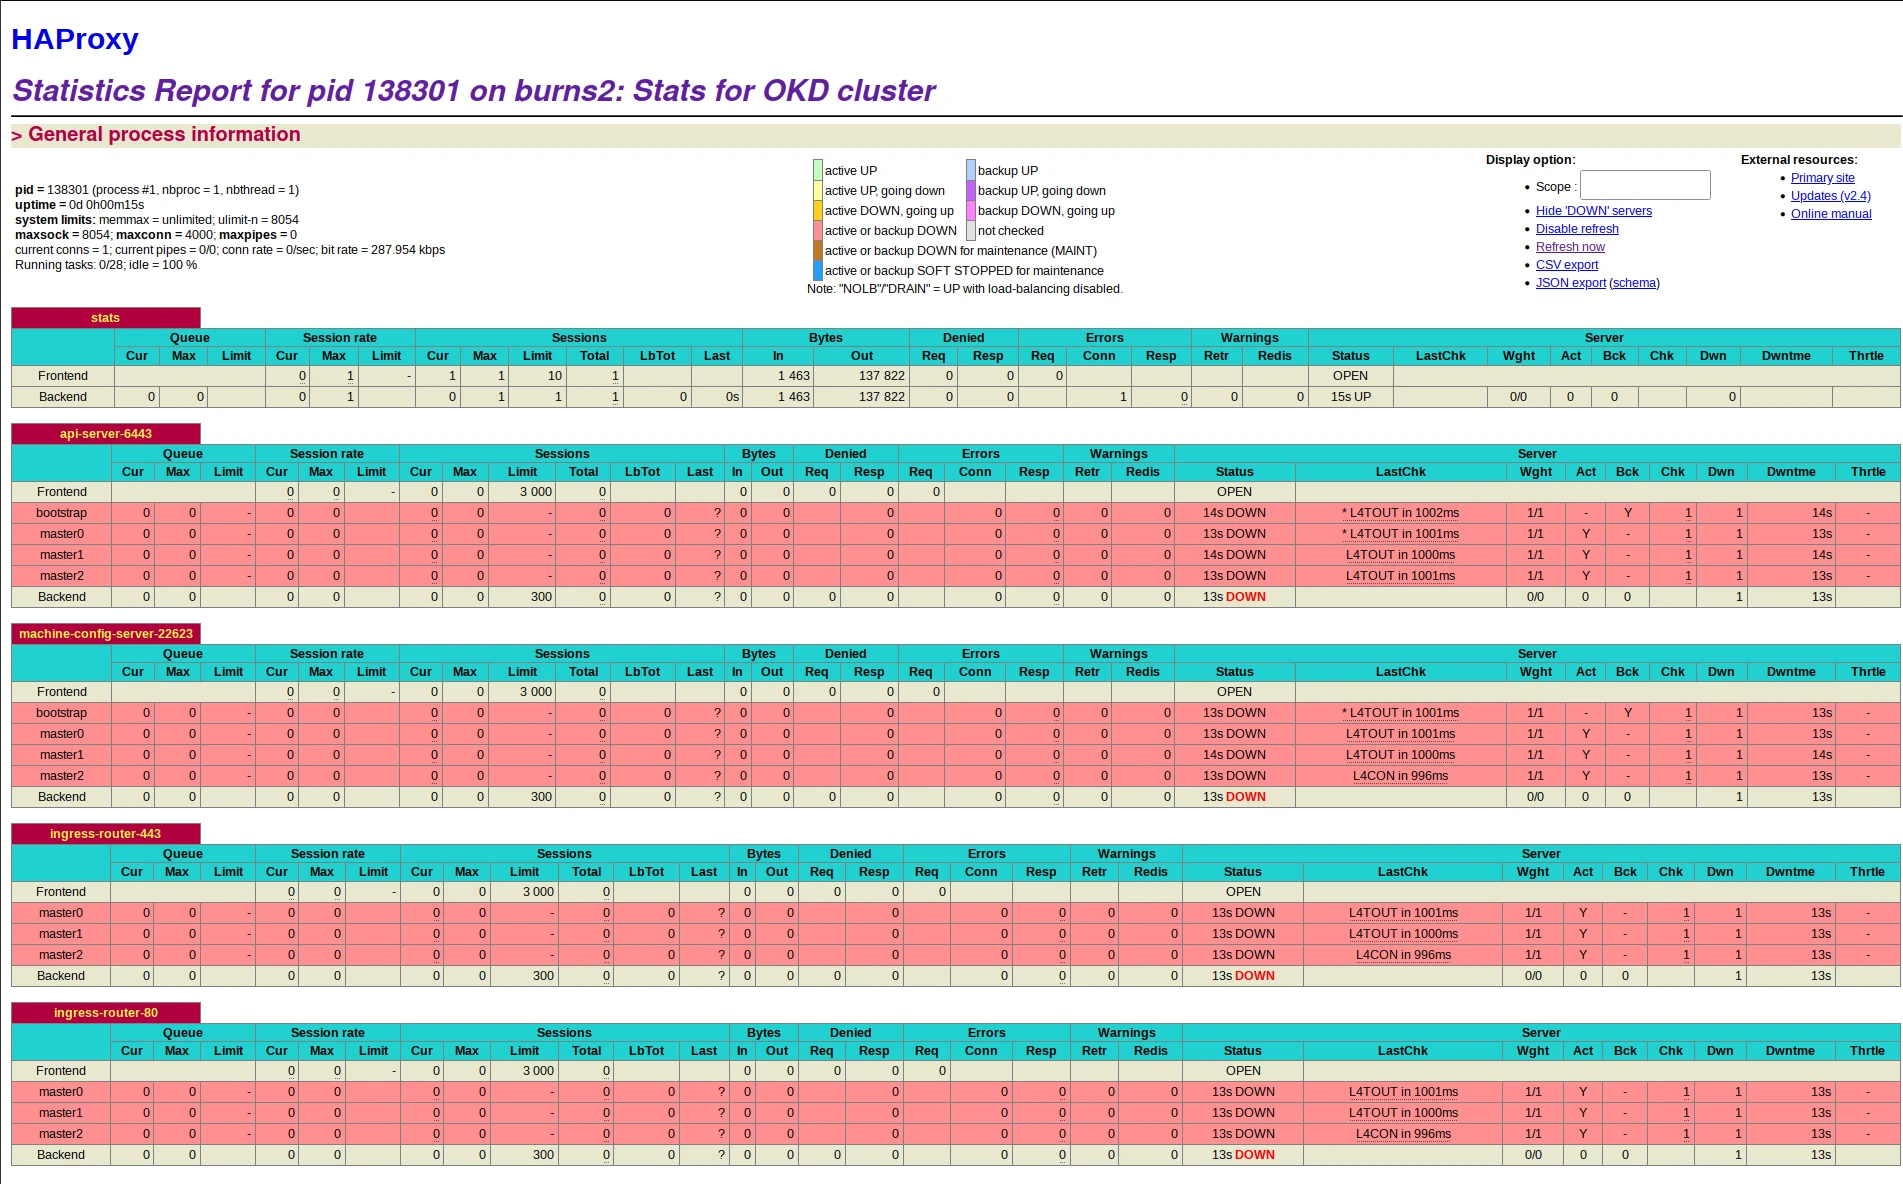
Connect to the haproxy dashboard
Use the credentials and uri from the config file
The install-config.yaml
Copy the install-config.yaml from example/
cp example/install-config.yaml ./
install-config.yaml
---
apiVersion: v1
baseDomain: home.pivert.org
capabilities:
  baselineCapabilitySet: v4.12
  additionalEnabledCapabilities:
    - CSISnapshot
    - Insights
    - Storage
compute:
  - name: worker
    replicas: 0
controlPlane:
  name: master
  replicas: 3
metadata:
  name: okd
networking:
  clusterNetwork:
    - cidr: 10.128.0.0/14
      hostPrefix: 23
  networkType: OpenShiftSDN
  serviceNetwork:
    - 172.30.0.0/16
platform:
  none: {}
pullSecret: '{"auths":{xxxxxxxxxxxxxxxxxxxxxxxxxxxxxxxxxxxxxxxxxxxxxxxxxx}}'
sshKey: "ssh-rsa xxxxxxxxxxxxxxxxxxxxxxxxxxxxxxxxxxxxxxxxxxxxxxxxxxxxxxxx== francoisd@francoisd-tuto"
Update
- pullSecret (from prerequisites) or
sed -i 's~pullSecret:.*$~pullSecret: "'"$(cat ./pullSecret.txt)"'"~' install-config.yaml - sshKey (from prerequisites) or
sed -i 's~sshKey:.*$~sshKey: "'"$(cat ~/.ssh/id_rsa.pub)"'"~' install-config.yaml - baseDomain
For install-config.yaml details, check the online docu800F92mentation.
So right now, we have :
- DNS configured and tested for forward (A) and reverse (PTR) records
- The bootstrap and the 3 master nodes booted from ISO image, not configured
- an
install-config.yamlfile ready to provision the cluster - HAProxy loadbalancer in TCP mode to redirect :
- ports 80 and 443 to master nodes since they will act as worker nodes
- ports 6443 (K8S API) and 22623 (ignition config port) to all 4 nodes :
| Port | Back-end machines (pool members) | Internal | External | Description |
|---|---|---|---|---|
6443 | Bootstrap and control plane. You remove the bootstrap machine from the load balancer after the bootstrap machine initializes the cluster control plane. You must configure the /readyz endpoint for the API server health check probe. | X | X | Kubernetes API server |
22623 | Bootstrap and control plane. You remove the bootstrap machine from the load balancer after the bootstrap machine initializes the cluster control plane. | X | Machine config server |
We can now configure and install the cluster. For this, we need to build an install-config.yaml, and use openshift-install command to auto-generate the ignition configuration for each node.
Download :
- The openshift-install for your platform : OKD (or for OCP)
- The openshift-client for your platform: OKD (or for OCP) (not needed if you use Seashell)
Generate the yaml configuration files
If not already added, add the keys to the install-config.yaml
sed -i 's~pullSecret:.*$~pullSecret: '"'"$(cat ./pullSecret.txt)"'"'~' install-config.yaml
sed -i 's~sshKey:.*$~sshKey: "'"$(cat ~/.ssh/id_rsa.pub)"'"~' install-config.yaml
Make sure you make a copy of the install-config.yaml since the one in the okd/ folder will be deleted on manifests creation
mkdir okd
cp install-config.yaml okd/
echo "# Create manifests"
./openshift-install create manifests --dir=./okd
find okd/
echo "# Create ignition-configs"
./openshift-install create ignition-configs --dir=./okd/
find okd/
You should see
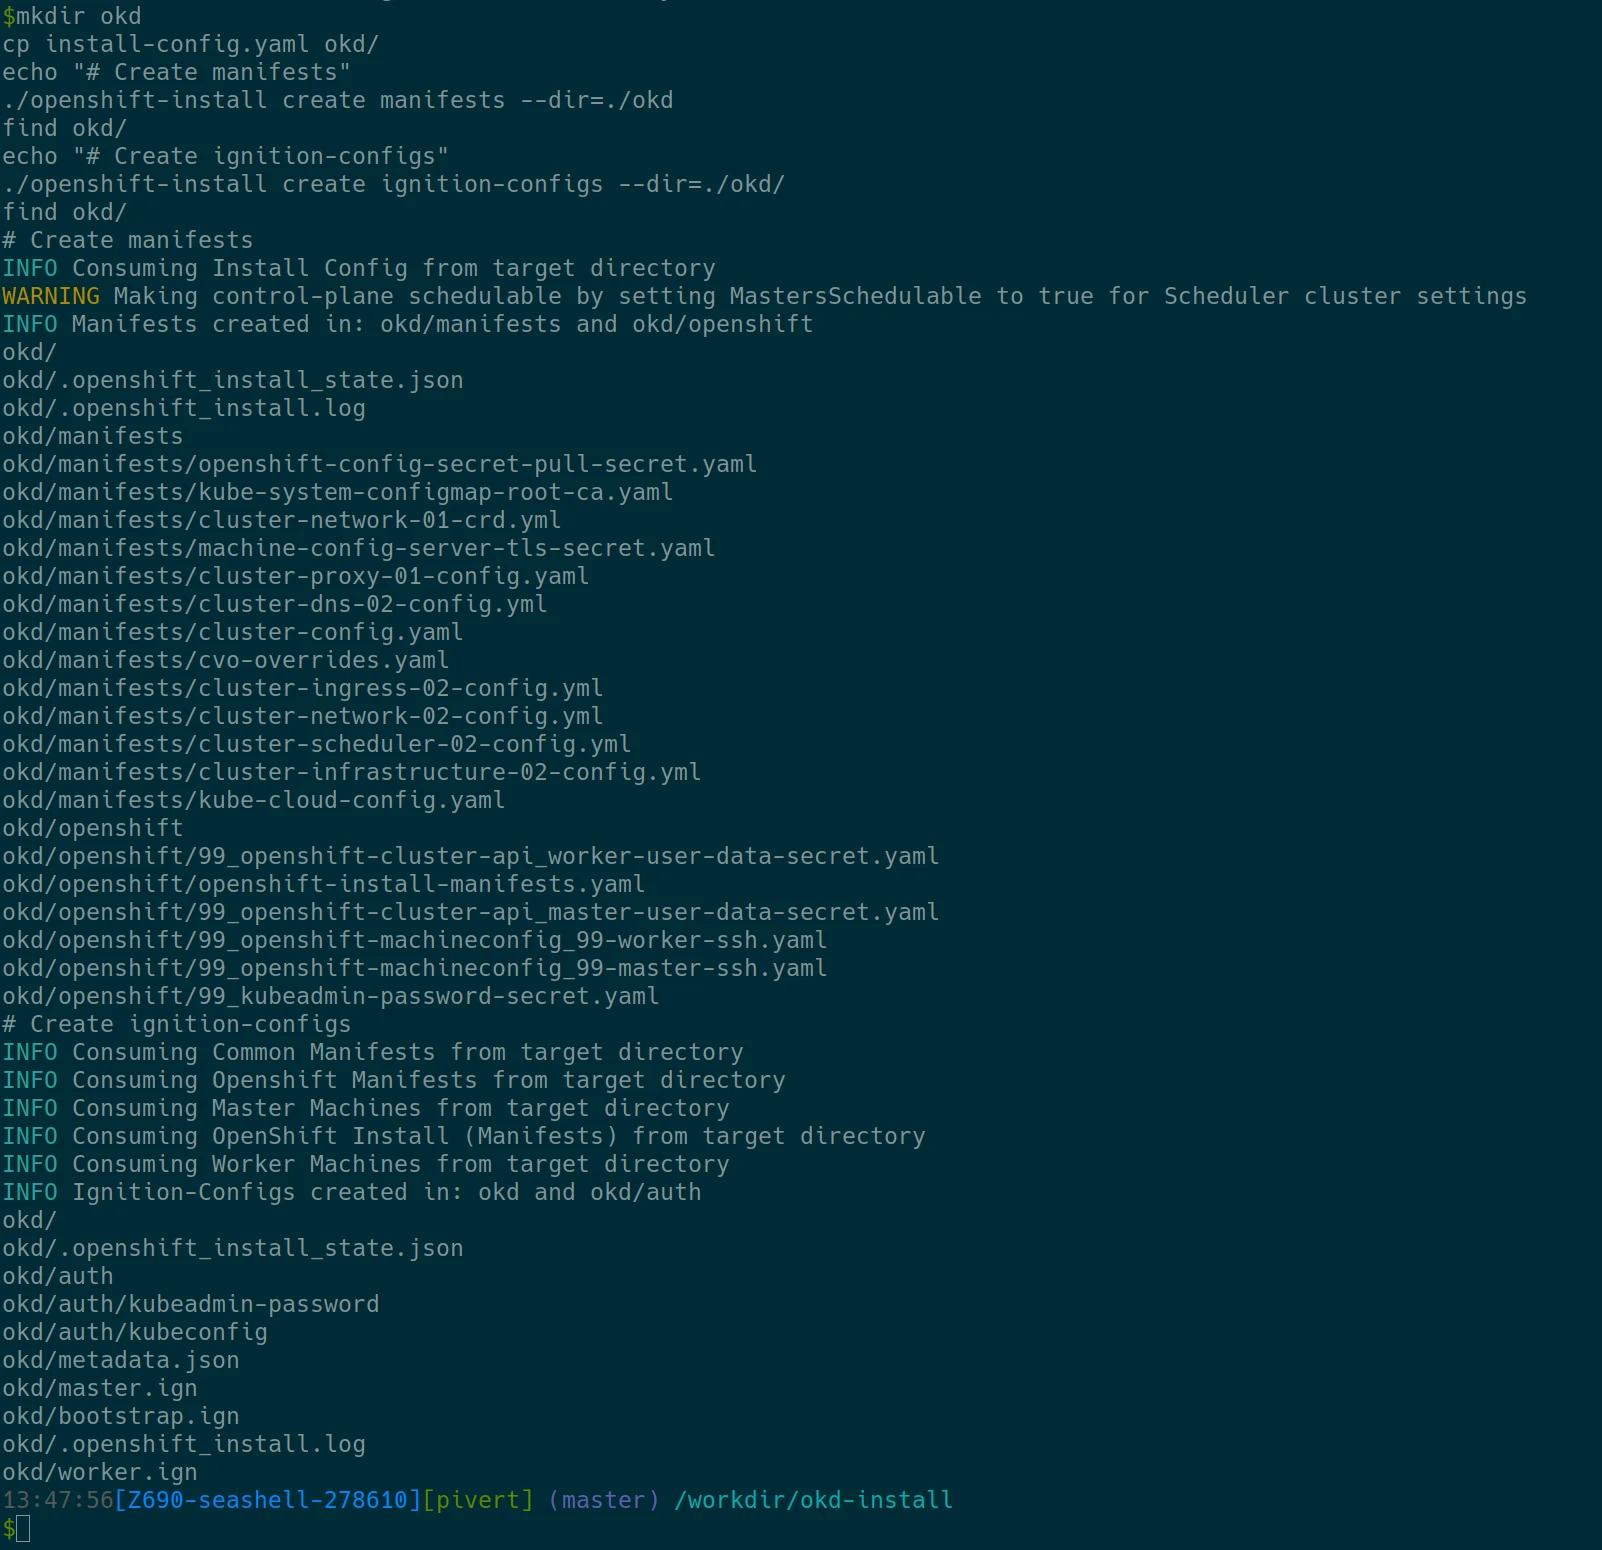
The WARNING is normal, that’s what we want here. The generated yaml files have been deleted and you should have the ign files.
Now copy the net.sh script in the okd/ folder, and update the WEB_SERVER_URL variable to match your workstation IP address.
You can get the IP address of the network card with default route with the below command. This command must be executed in another terminal, outside of the seashell container.
ip route get 8.8.8.8 | grep -oP '(?<=src )(\d{1,3}\.){3}\d{1,3}'
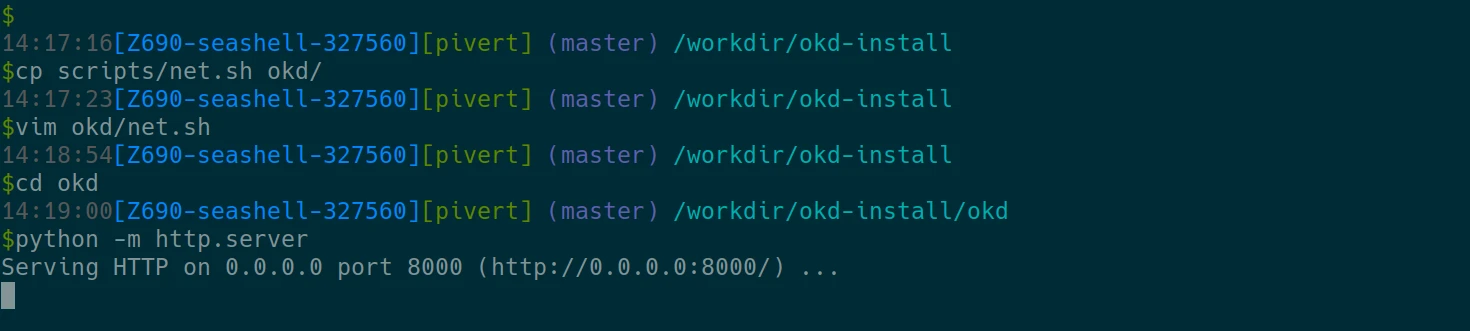
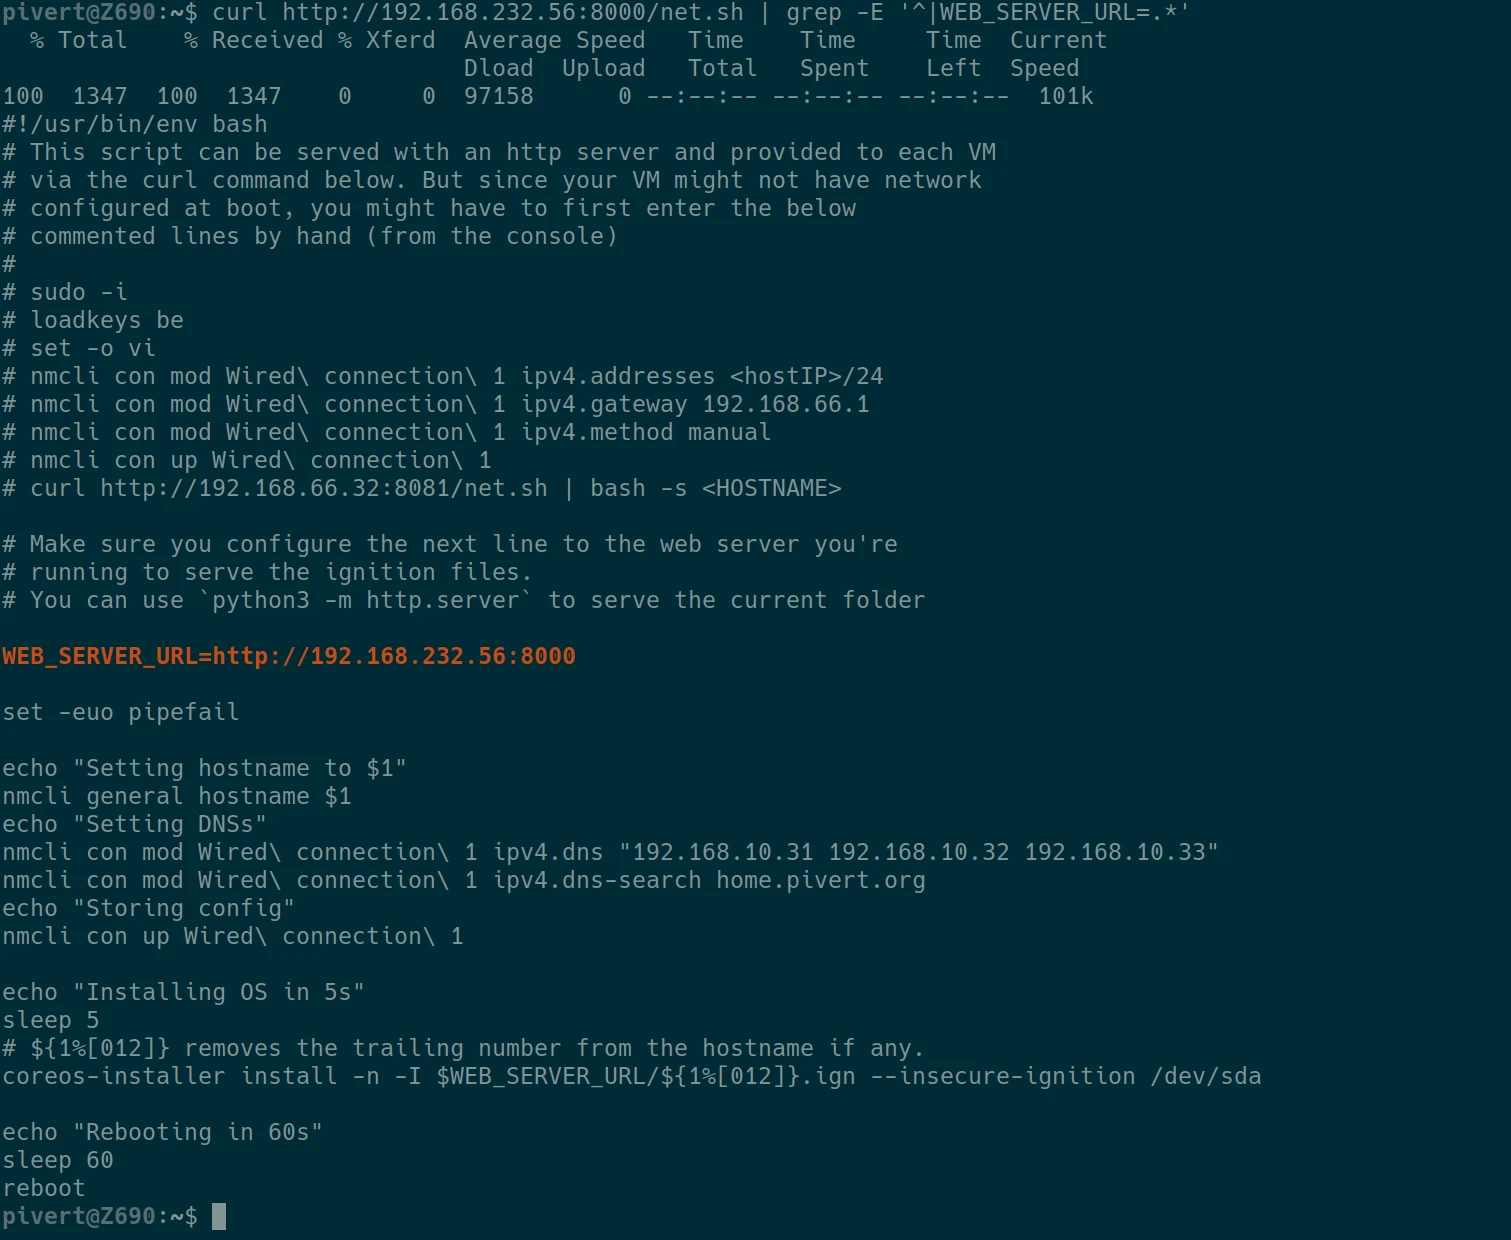
From a remote host, make sure that the -p 8000:8000 option on seashell start is effective, that you properly updated the WEB_SERVER_URL variable and that you can display the content of the net.sh helper script.
Deploy the cluster
Since we have no DHCP server, we will start with some manual configuration (the commented part in the above net.sh script), then pipe the content of the net.sh on the Bootstrap VM, then on the 3 Masters. This must be executed on all 4 nodes. Start with the bootstrap, then proceed to the 3 masters.
For each node, make sure you respect the IP address and node name according to your DNS configuration.
Ease yourself by setting the keyboard layout if required (be in the example), and possibly use set -o vi mode to type your commands from the previous one. Use <tab> completion.
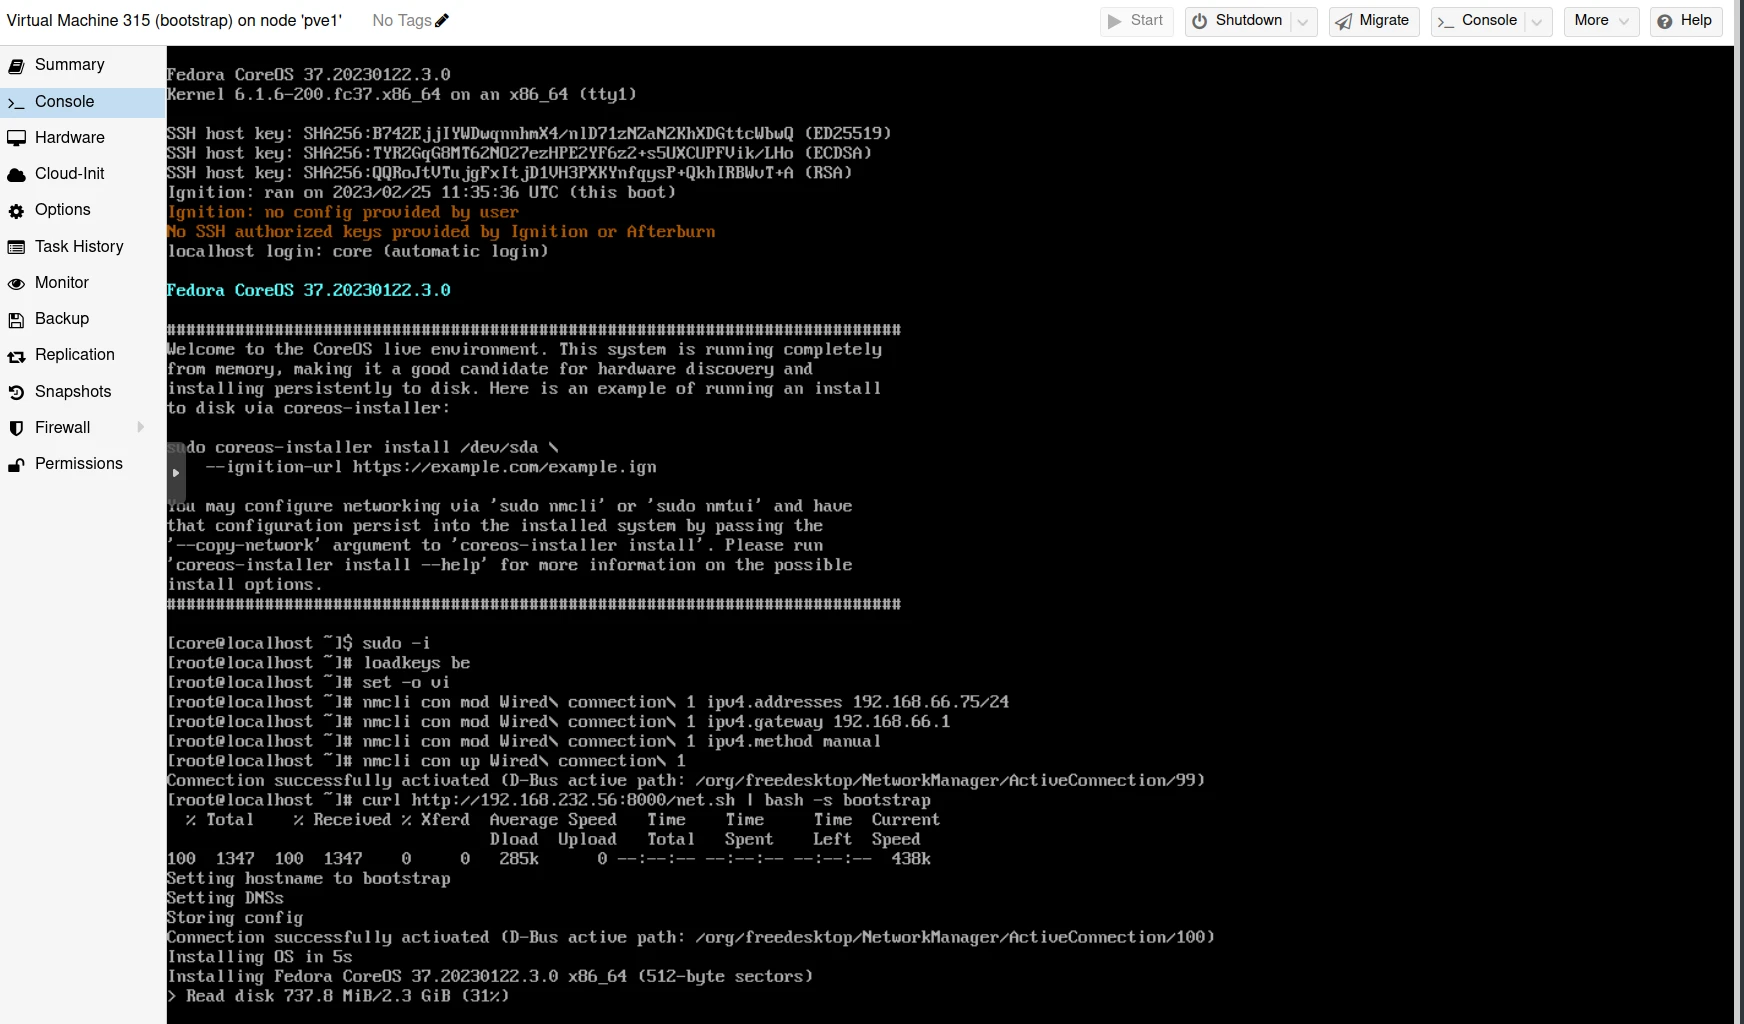
Do the same to your other nodes. And wait… the script will reboot the node after FCOS installation, then the bootstrap process will also reboot each node.
Reboot bootstrap first, then proceed to the master nodes and reboot them as well. The process will ask you to reboot the rist time, then it will reboot automatically and download some Gigs from the net. So the process depends a lot on your disk and internet connection speed.
Monitor the deployment
Monitor the bootstrap process (after bootstrap manual reboot)
Log into the bootstrap node with the core user and your ssh public key.
First start your ssh-agent if not already running and add your key: ssh-add
Then ssh bootstrap.okd -l core you can sudo, and execute the journalctl proposed in the MOTD :
sudo -i
journalctl -b -f -u release-image.service -u bootkube.service
You should see
Feb 18 10:53:19 bootstrap.okd.home.pivert.org release-image-download.sh[1535]: Pulling quay.io/openshift/okd@sha256:8c5e4d3a76aba995c005fa7f732d68658cc67d6f11da853360871012160b2ebf...
Feb 18 10:53:20 bootstrap.okd.home.pivert.org podman[1566]: 2023-02-18 10:53:20.956150729 +0000 UTC m=+0.864126399 system refresh
Feb 18 10:54:05 bootstrap.okd.home.pivert.org release-image-download.sh[1566]: 0f0ab2a5658fa9e95e9f885e5541f5771148fa670bebc214f776bba5e427b73f
Feb 18 10:54:05 bootstrap.okd.home.pivert.org podman[1566]: 2023-02-18 10:53:20.959991816 +0000 UTC m=+0.867967565 image pull  quay.io/openshift/okd@sha256:8c5e4d3a76aba995c005fa7f732d68658cc67d6f11da853360871012160b2ebf
Feb 18 10:54:05 bootstrap.okd.home.pivert.org systemd[1]: Finished release-image.service - Download the OpenShift Release Image.
The installer will reboot the servers automatically after install
It sticks to that line for about 10 minutes on a DSL connection. Then it reboots automatically. You’ll have to wait for some additional 5-10 minutes to get ports 6443 and 22623 to open.
The masters will start waiting for their second ignition from apt-int. This is normal as long as the bootstrap is not available:
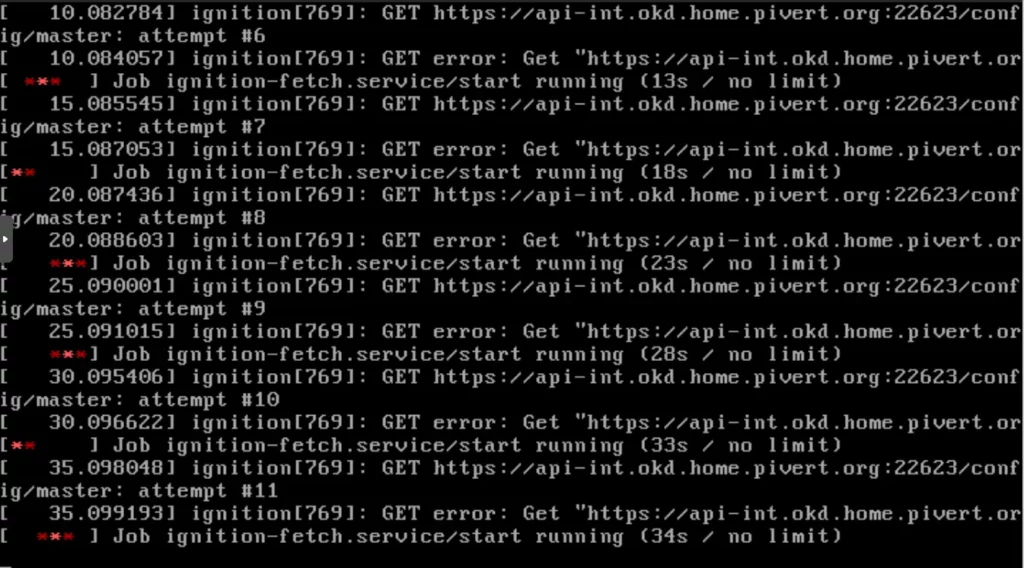
Monitor the python http server in the seashell console, you will see when you initiate the curl to download the net.sh, and when the installers are getting their ignition files. (The first lines from localhost and 232.56 where just tests). You should at least make sure each node gets its respective ignition file.

Login to the bootstrap.okd node again, and check with lsof and journalctl. This will take 5 minutes before you see the port 22623 listening, and another 3 minutes to get the api port 6443 listening. The masters will initiate setup as soon as the port 22623 is serving the ignition files.
sudo -i
lsof -Pni | grep LISTEN
lsof -Pni | grep -P '(6443|22623).*LISTEN'
Continue to monitor the bootstrap temporary control plane creation, and monitor the haproxy through the web interface.
journalctl -b -f -u release-image.service -u bootkube.service
# or the more generic
journalctl -f -l
Check that you have a certificate on each of the 6443 and 22623 (from bootstrap)
openssl s_client -connect localhost:6443 -showcerts </dev/null | openssl x509 -noout -text | head
openssl s_client -connect localhost:22623 -showcerts </dev/null | openssl x509 -noout -text | head
Then, from your workstation, or from the seashell, check that you see the same self-signed certificate and start monitoring the bootstrap-complete :
openssl s_client -connect api.okd.home.pivert.org:6443 -showcerts </dev/null | openssl x509 -noout -text | head
./openshift-install --dir=okd wait-for bootstrap-complete --log-level=info
Monitor the HAProxy
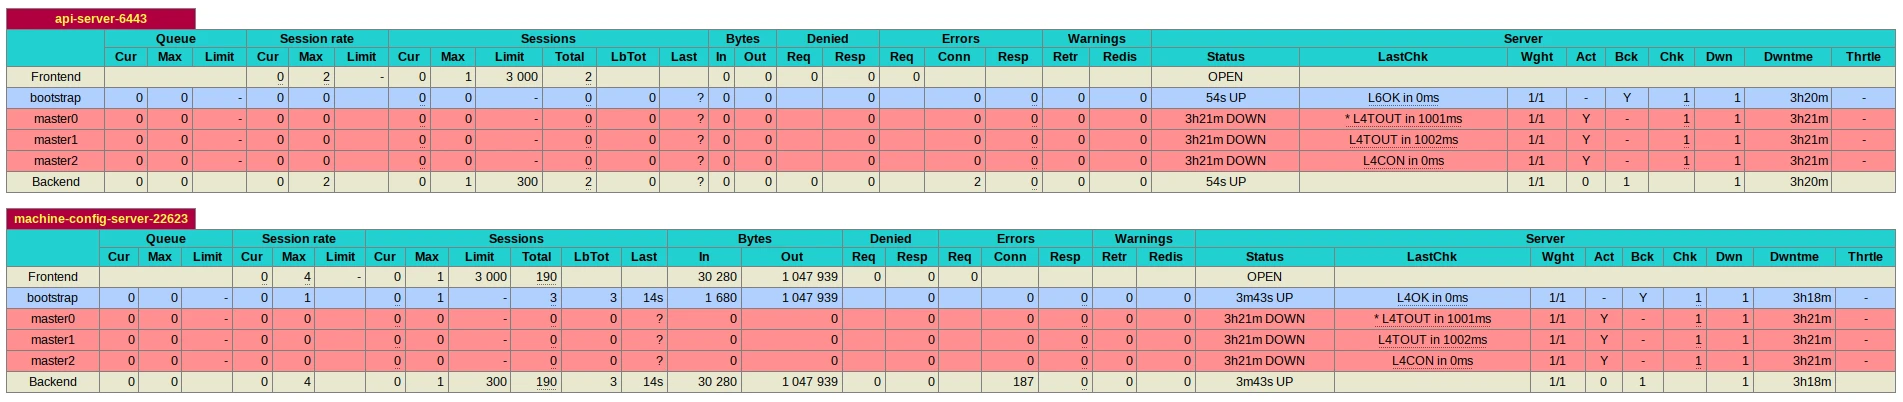
When you have your bootstrap listening on ports 22623, you can start monitoring progression from the haproxy as well:
root@haproxy:~# watch 'echo "show stat" | sudo socat stdio /run/haproxy/admin.sock | cut -d "," -f 1,2,5-11,18,24,27,30,36,50,37,56,57,62 | column -s, -t'
When the bootstrap completes, you should see the kubernetes-api UP on the bootstrap back-end, and check_status OK. (it means that it can get the /readyz file from the bootstrap).
You can also directly interact with HAProxy like this:
root@haproxy:~# nc -U /run/haproxy/admin.sock
prompt

> help
Unknown command. Please enter one of the following commands only :
  help           : this message
  prompt         : toggle inte....
Or from the GUI:
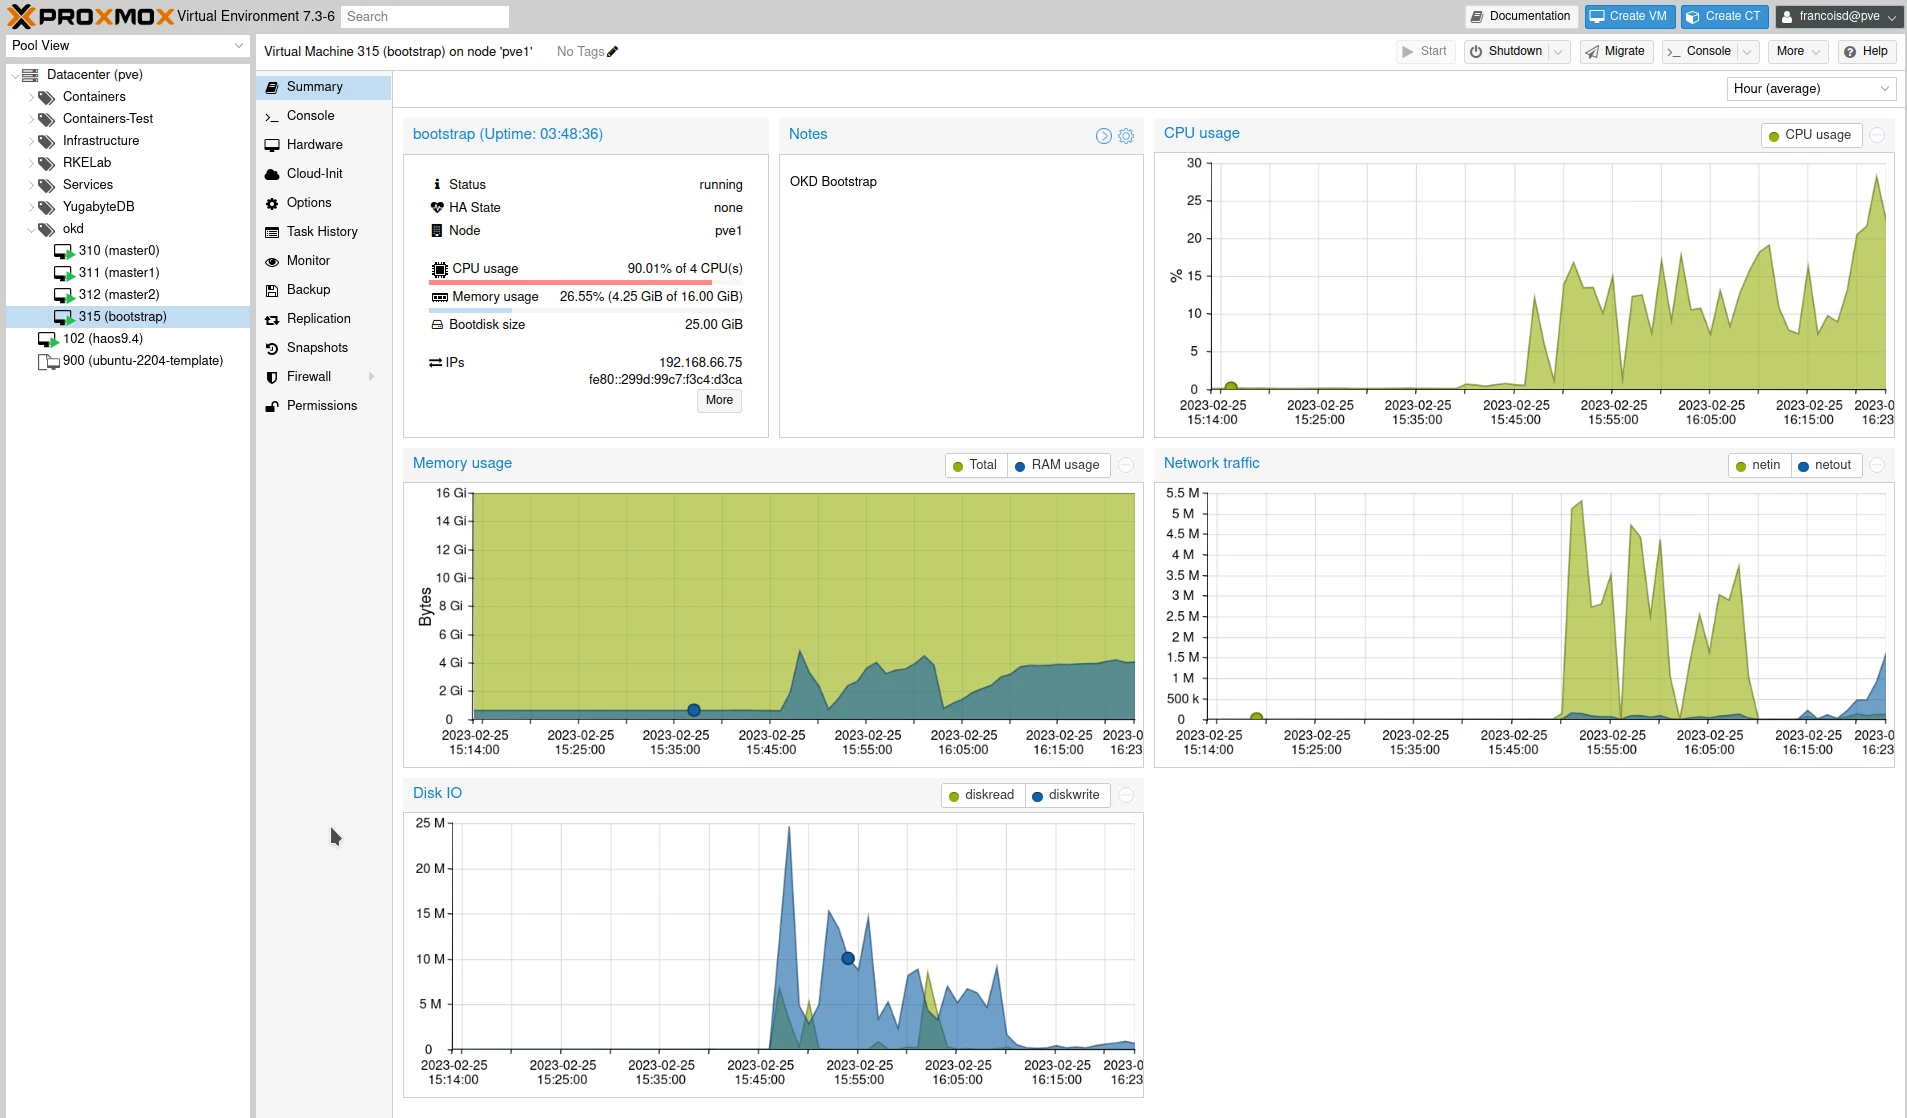
Monitor the bootstrap server
Once you have the port 6443 available on the bootstrap node, you can start monitoring the bootstrap from seashell.
Since you have your first window with the python web server, you can start a second shell in the same container with seashell -r
./openshift-install --dir=okd wait-for bootstrap-complete --log-level=info
INFO Waiting up to 20m0s (until 4:48PM) for the Kubernetes API at https://api.okd.home.pivert.org:6443...
INFO API v1.25.0-2653+a34b9e9499e6c3-dirty up
INFO Waiting up to 30m0s (until 4:58PM) for bootstrapping to complete...
For each node, you will see significant load and network traffic
You can also check the status of all pods from the bootstrap server:
export KUBECONFIG=/etc/kubernetes/kubeconfig
oc get pods -A
If everything goes fine, you should get from the openshift-install monitor
$./openshift-install --dir=okd wait-for bootstrap-complete --log-level=info
INFO Waiting up to 20m0s (until 12:17PM) for the Kubernetes API at https://api.okd.home.pivert.org:6443...
INFO API v1.25.0-2653+a34b9e9499e6c3-dirty up
INFO Waiting up to 30m0s (until 12:27PM) for bootstrapping to complete...
INFO It is now safe to remove the bootstrap resources
INFO Time elapsed: 13m39s
Monitor the cluster
When the backplane goes up, you can also access the oc or kubectl commands from seashell or the environment you initialized the cluster. Here are some commands you can try :
export KUBECONFIG=/workdir/okd-install/okd/auth/kubeconfig
kgpoall # or
oc get pod -A
kgno # or
oc get nodes
kubens
When deployment is successful
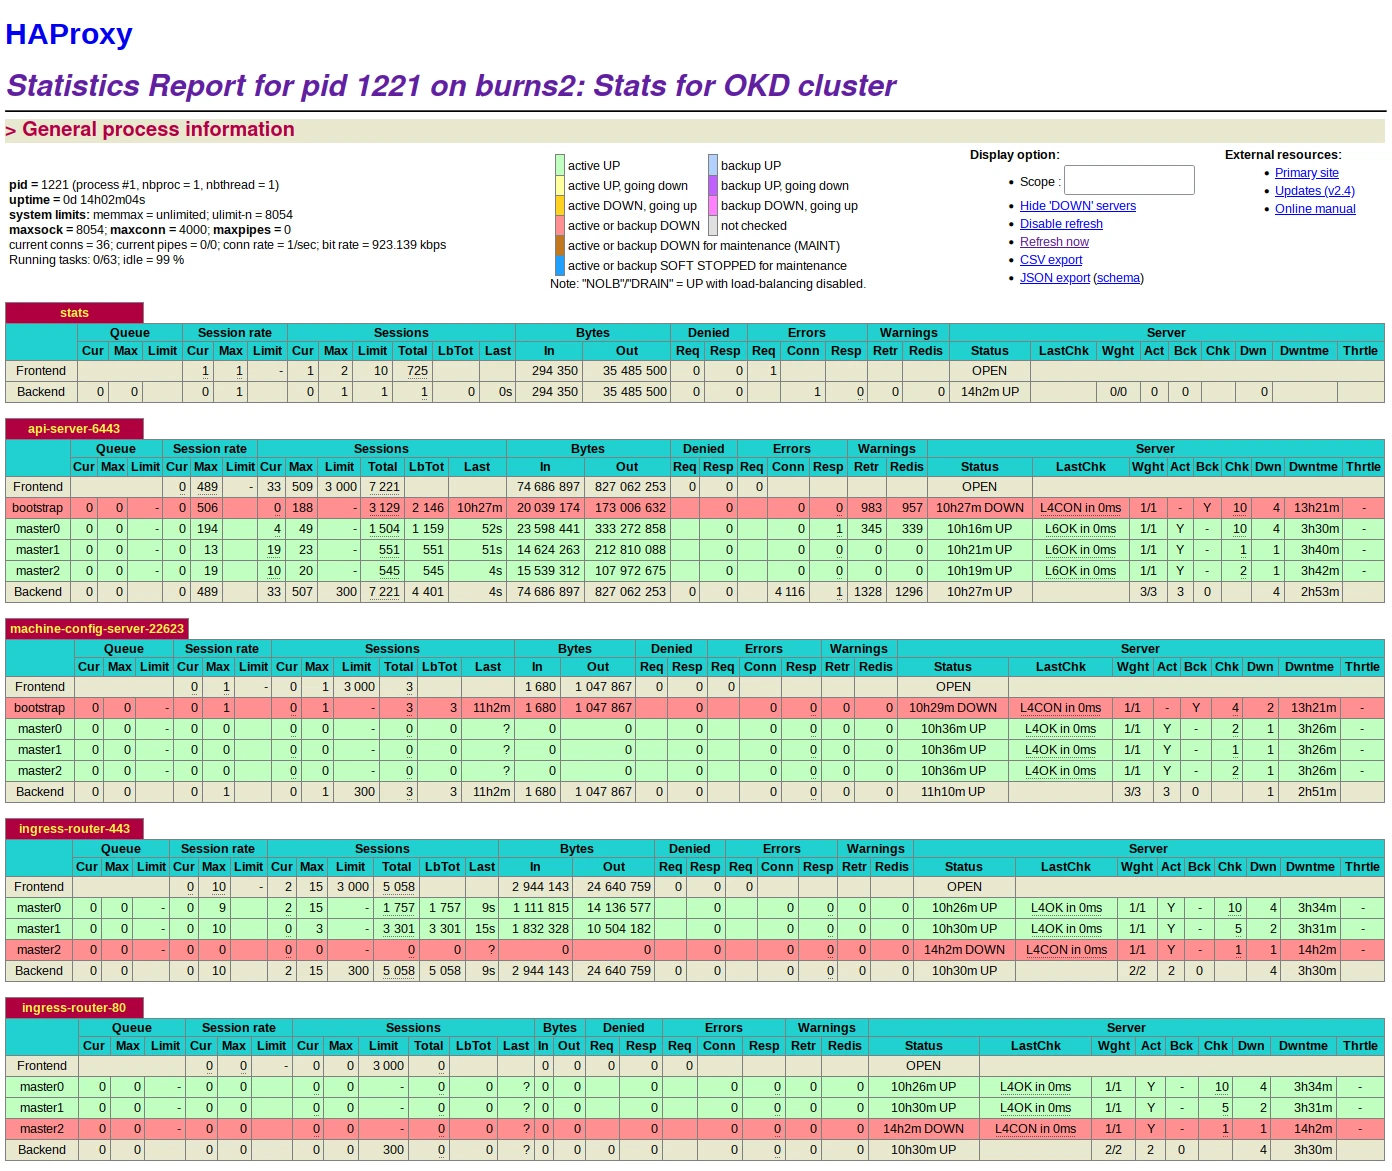
You will see the masters progressively going up on ports 22623, then on api 6443, and finally 2 on the port 80 and 443.
The bootstrap server shuts its services down automatically, it’s now safe to remove it from the haproxy configuration.
Make sure you use the kubeconfig generated by the openshift-installer
export KUBECONFIG=/workdir/okd-install/okd/auth/kubeconfig
oc get nodes
You should get about those numbers
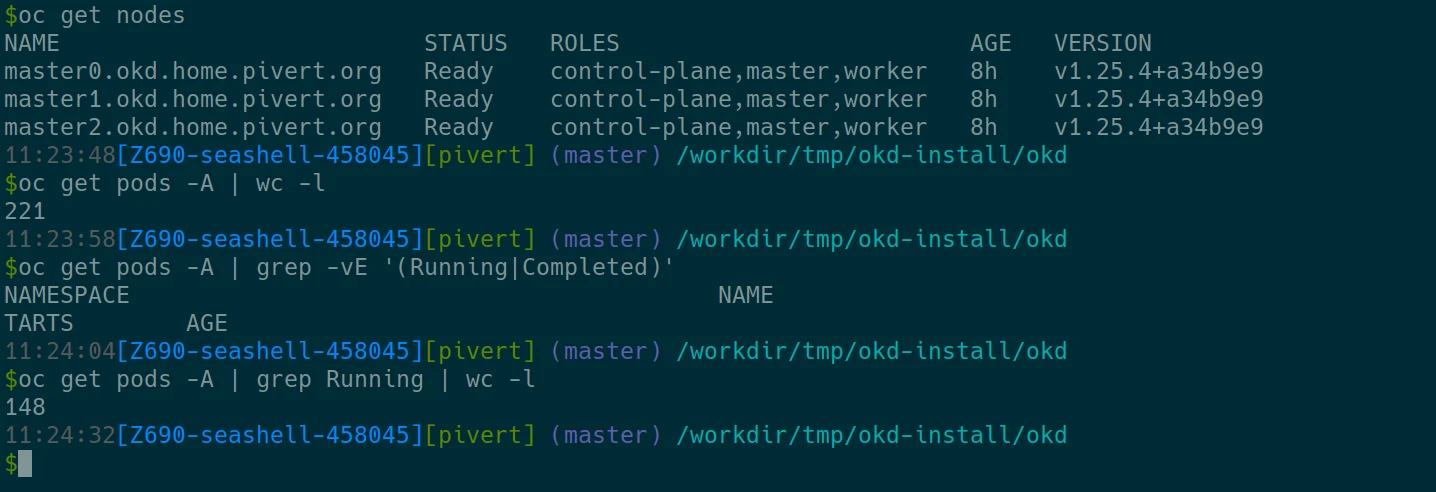
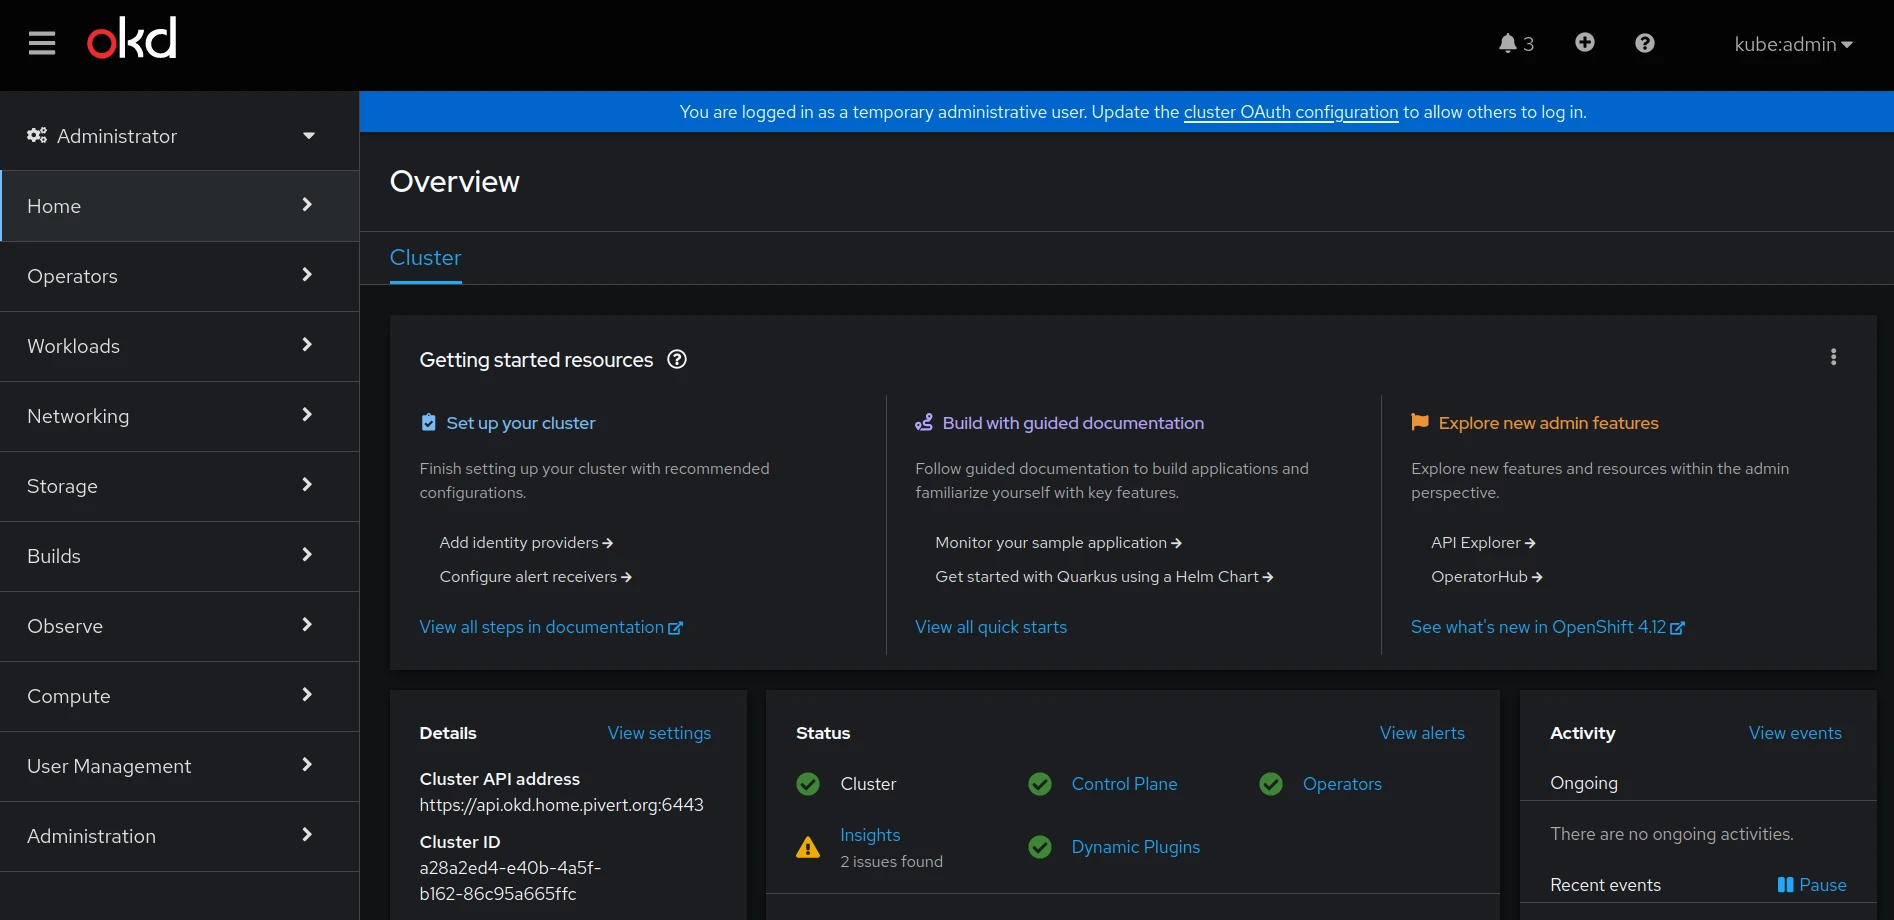
OpenShift Console
Check the okd/auth folder, you have the kubeadmin-password
$find okd/auth/
okd/auth/
okd/auth/kubeadmin-password
okd/auth/kubeconfig
The generic OpenShift console URL is : https://console-openshift-console.apps.<clustername>.<base-domain>
For instance, in the above example with okd cluster name (metadata.name) it is https://console-openshift-console.apps.okd.home.pivert.org
And voilà !
Explore
Seashell has throusands of tools to help you with K8S and OKD. Check all aliases starting with ‘k’, you can expand them with <ctrl>+j.
You might want to setup Persistent Storage / PVC. Check the ceph-csi on Kubernetes post.
Troubleshooting
In case the bootstrap fails, you might be interested in gathering logs. Here for the master1 for instance:
./openshift-install gather bootstrap --bootstrap bootstrap.okd --master master1.okd
And also check Troubleshooting installation issues
Links
- Installing a user-provisioned cluster on bare metal
- Resize vm disk (qemu) on Proxmox (partition grow)
- Resize /sysroot on FCOS (after partition grow)
- Approving the certificate signing requests – You shouln’t need that for the cluster initialization, however you might need it when adding or recreating a node.